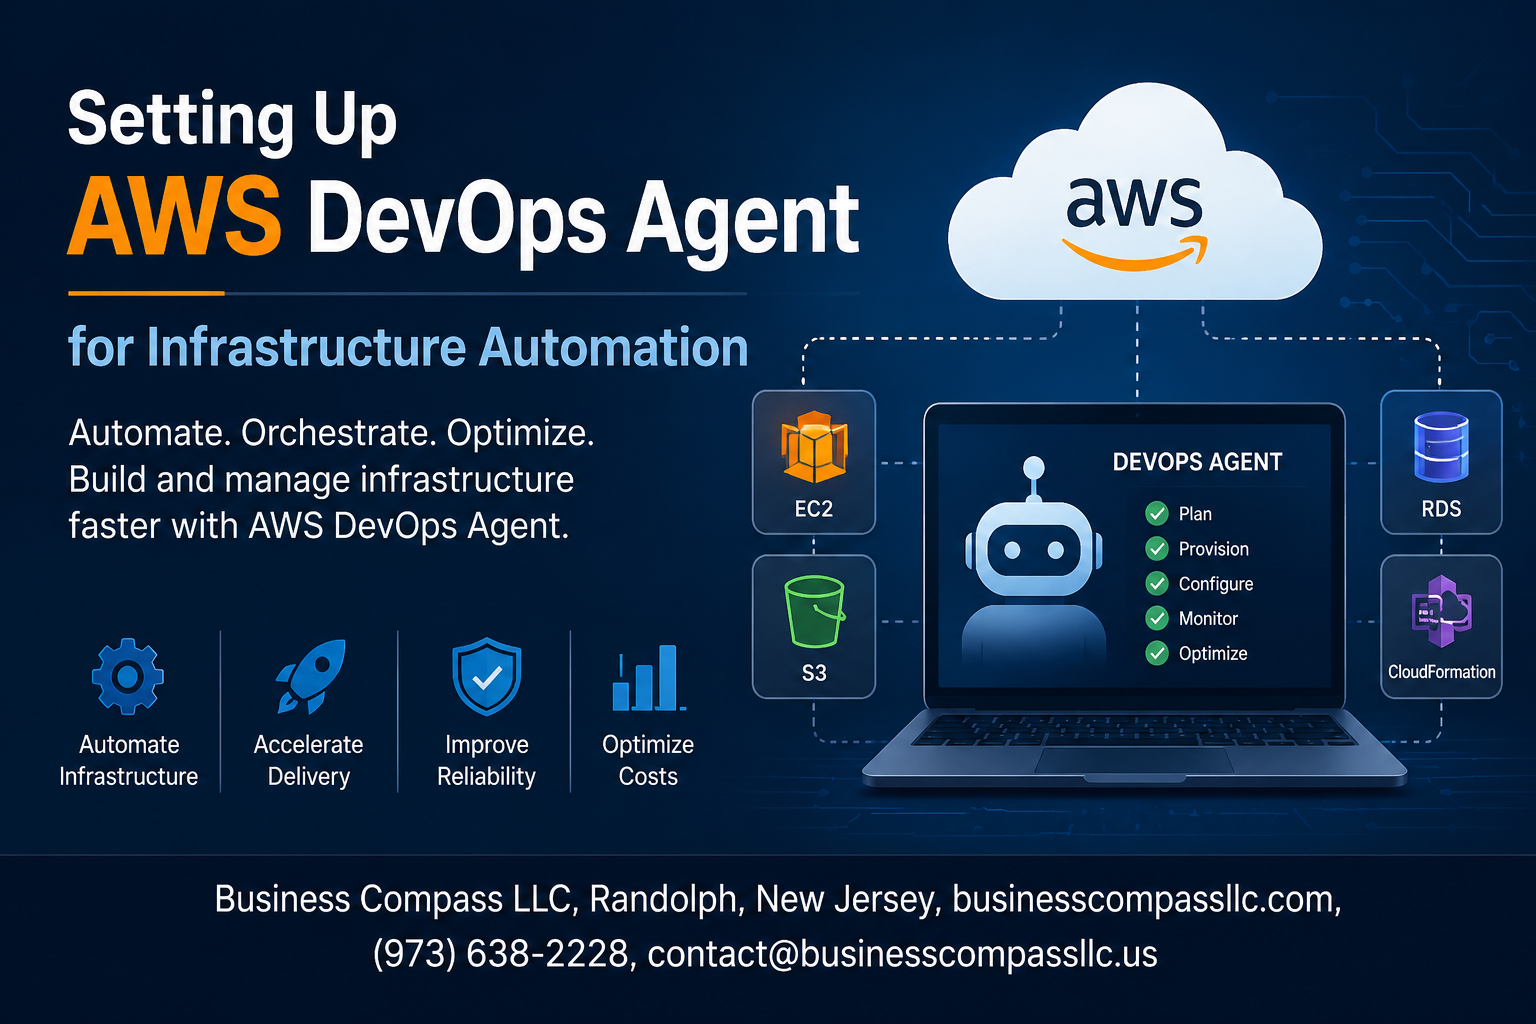
Setting Up AWS DevOps Agent for Infrastructure Automation
If you’re managing cloud infrastructure manually, you already know how exhausting it gets. Repetitive deployments, configuration drift, missed updates — it adds up fast. That’s exactly where AWS DevOps Agent setup changes the game.
This guide is for DevOps engineers, cloud architects, and developers who want to stop babysitting their infrastructure and start letting automation do the heavy lifting. No fluff, just a practical walkthrough you can actually use.
Here’s what we’ll cover:
- What the AWS DevOps Agent is and why it matters for cloud infrastructure automation
- How to configure your AWS DevOps Agent from scratch, including the prerequisites you need to nail before touching a single setting
- How to automate AWS infrastructure tasks and keep your agent running smoothly with monitoring and troubleshooting tips
By the end, you’ll have a working AWS DevOps pipeline and a clear picture of how to keep it optimized long-term.
Let’s get into it.
Understanding AWS DevOps Agent and Its Role in Infrastructure Automation
Key Capabilities That Make AWS DevOps Agent a Game Changer
The AWS DevOps Agent is a powerful tool that takes repetitive, manual infrastructure work off your plate by handling provisioning, configuration, and deployment tasks automatically. Think of it as a tireless team member that runs 24/7, executing workflows across your AWS environment without needing constant human input.
Here are the standout capabilities that set it apart:
- Automated task execution — runs infrastructure scripts and playbooks on demand or on a schedule
- Secure credential management — works with AWS IAM roles to keep permissions tight and auditable
- Multi-service integration — connects with EC2, ECS, Lambda, and other AWS services out of the box
- Real-time event response — reacts to CloudWatch events and triggers actions without manual intervention
- Cross-account support — manages resources across multiple AWS accounts from a single control point
How AWS DevOps Agent Fits Into Your Existing CI/CD Pipeline
Dropping the AWS DevOps Agent into your current pipeline doesn’t require a complete rebuild. It slots in naturally between your code repository and your deployment targets, acting as the execution layer that carries out the steps your pipeline defines.
A typical AWS DevOps pipeline setup looks something like this:
- Code commit triggers a pipeline in CodePipeline or Jenkins
- Build stage packages the application using CodeBuild
- AWS DevOps Agent picks up the deployment task and handles infrastructure changes
- Approval gates pause the process for human sign-off when needed
- Deploy stage pushes changes to the target environment with full logging
This flow keeps cloud infrastructure automation consistent, repeatable, and traceable without slowing down your delivery speed.
Core Benefits of Automating Infrastructure With AWS DevOps Agent
Choosing to automate AWS infrastructure tasks with the AWS DevOps Agent pays off in several concrete ways:
- Fewer human errors — automated processes follow the same steps every single time, eliminating the mistakes that come with manual work
- Faster deployments — what used to take hours of manual effort can happen in minutes
- Better compliance — every action is logged, making audits straightforward
- Cost savings — less time spent on repetitive tasks means your team focuses on work that actually moves the needle
- Scalability — the agent handles 10 tasks just as easily as it handles 1,000, making cloud automation with AWS genuinely scalable as your infrastructure grows
Essential Prerequisites Before Setting Up Your AWS DevOps Agent

A. Required AWS Account Permissions and IAM Roles
Before jumping into your AWS DevOps Agent setup, make sure your IAM roles are properly configured. Your agent needs specific permissions to interact with AWS services like EC2, S3, CodePipeline, and CloudFormation.
Key permissions to assign:
- AmazonEC2FullAccess – for spinning up and managing compute resources
- AWSCodePipelineFullAccess – to trigger and manage your AWS DevOps pipeline
- AmazonS3FullAccess – for artifact storage during automation runs
- CloudFormationFullAccess – essential for cloud infrastructure automation tasks
- AmazonSSMFullAccess – allows the agent to communicate through Systems Manager
Always follow the principle of least privilege — give the agent only what it actually needs, nothing more.
B. Necessary Tools and Dependencies to Install in Advance
Getting your environment ready saves a ton of headaches later. Here’s what you’ll want installed before configuring your AWS DevOps Agent:
- AWS CLI (v2+) – your main tool for interacting with AWS from the command line
- Python 3.8+ – many AWS automation tools depend on it
- Terraform or AWS CDK – depending on your preferred infrastructure-as-code approach for cloud automation with AWS
- Git – for version-controlling your infrastructure scripts
- Docker – if your pipeline involves containerized workloads
- boto3 – the AWS SDK for Python, helpful for scripting custom automation tasks
Run aws configure after installing the CLI to connect your credentials right away.
C. Planning Your Infrastructure Scope for Smooth Automation
Rushing into automation without a clear plan usually creates more problems than it solves. Take time to map out exactly what you want to automate AWS infrastructure tasks to cover.
Think through these areas:
- Which environments are in scope? Dev, staging, production — each may need separate agent configurations
- What resources will the agent manage? EC2 instances, RDS databases, Lambda functions, networking components
- How will changes be triggered? Manual approvals, scheduled runs, or event-driven automation via AWS EventBridge
- What’s your rollback strategy? Always plan for things going sideways
Documenting this scope upfront makes your AWS DevOps best practices actually stick in real-world scenarios.
D. Verifying Network and Security Group Configurations
Your agent won’t work properly if the network setup blocks it. Double-check these before anything else:
- Outbound internet access – the agent needs to reach AWS service endpoints
- Security group rules – open the right ports (typically 443 for HTTPS) for communication between the agent and AWS APIs
- VPC endpoints – if your agent runs inside a private VPC, set up VPC endpoints for services like S3, SSM, and CodePipeline to avoid routing traffic over the public internet
- NAT Gateway – needed for private subnets that require outbound access without a public IP
- DNS resolution – make sure your VPC has DNS hostnames and DNS resolution enabled
A quick telnet or curl test to AWS endpoints from your agent’s host confirms everything is reachable before you proceed.
Step-by-Step Process to Configure Your AWS DevOps Agent

A. Provisioning the Agent Environment in AWS
Start by spinning up an EC2 instance or container environment that matches your workload needs. A t3.medium works well for light automation tasks, while heavier pipelines benefit from a c5.xlarge or larger. Pick an Amazon Linux 2023 or Ubuntu 22.04 AMI, attach an IAM role during launch, and place the instance inside a private subnet with a NAT gateway for outbound traffic.
Quick provisioning checklist:
- Choose a region closest to your primary AWS services
- Enable detailed CloudWatch monitoring at launch
- Tag the instance with environment, team, and cost-center labels
- Allocate at least 20 GB of root volume storage
B. Installing and Initializing the AWS DevOps Agent
SSH into your instance and run the following to get the agent binary downloaded, verified, and running as a system service:
curl -O https://aws-devops-agent.s3.amazonaws.com/latest/linux/install.sh
chmod +x install.sh
sudo ./install.sh --region us-east-1 --auto-start
sudo systemctl enable aws-devops-agent
sudo systemctl start aws-devops-agent
After the service starts, check its status with systemctl status aws-devops-agent. A green active (running) output means the agent initialized cleanly. If you see any errors around missing credentials, your IAM role attachment likely did not propagate yet — wait 60 seconds and retry.
Initialization flags worth knowing:
--log-level debug— streams verbose output during first-run troubleshooting--proxy-url— required when traffic routes through a corporate proxy--workspace-dir— sets a custom directory for job artifacts
C. Connecting the Agent to Your AWS Services and Repositories
Connecting the agent to your broader AWS ecosystem is where the real AWS DevOps Agent setup work happens. Register the agent with AWS Systems Manager by running:
aws ssm register-managed-instance \
  --activation-id <your-activation-id> \
  --activation-code <your-activation-code> \
  --region us-east-1
For repository access, store your Git credentials or SSH keys in AWS Secrets Manager and pull them at runtime rather than hardcoding anything on disk. Link CodeCommit, GitHub, or Bitbucket repositories through the agent’s configuration file located at /etc/aws-devops-agent/config.yaml.
Service connections to configure:
- CodePipeline — grants the agent a trigger endpoint for pipeline events
- CodeBuild — allows the agent to kick off build projects directly
- S3 — needed for artifact storage and infrastructure state files
- ECR — required if your pipelines build or pull container images
D. Validating Agent Connectivity and Initial Health Checks
Before pushing any real workloads through, run a quick health check sequence to confirm everything talks to each other properly. The agent ships with a built-in diagnostic command:
aws-devops-agent diagnostics --full-check --output json
This scans IAM permissions, network reachability to AWS service endpoints, disk space, and clock synchronization. Clock drift above five seconds breaks AWS SigV4 request signing, so pay attention to that output.
Manual checks to run in parallel:
- Ping the SSM endpoint:
curl -I https://ssm.us-east-1.amazonaws.com - Verify S3 bucket access:
aws s3 ls s3://your-artifacts-bucket - Confirm CodePipeline can see the agent as an available runner in the console
- Review
/var/log/aws-devops-agent/agent.logfor any handshake failures
E. Securing Agent Access With Least Privilege Principles
Locking down your agent’s permissions is non-negotiable in any cloud infrastructure automation setup. Avoid attaching broad policies like AdministratorAccess — instead, scope the IAM role to only what the agent genuinely needs.
Recommended IAM policy actions for a standard agent role:
{
  "Version": "2012-10-17",
  "Statement": [
    {
      "Effect": "Allow",
      "Action": [
        "ssm:UpdateInstanceInformation",
        "codepipeline:PollForJobs",
        "codepipeline:AcknowledgeJob",
        "codepipeline:PutJobSuccessResult",
        "codepipeline:PutJobFailureResult",
        "s3:GetObject",
        "s3:PutObject",
        "logs:CreateLogGroup",
        "logs:CreateLogStream",
        "logs:PutLogEvents"
      ],
      "Resource": "*"
    }
  ]
}
Beyond IAM, apply these hardening steps:
- No inbound security group rules — the agent only needs outbound HTTPS on port 443
- Rotate Secrets Manager credentials every 30 days using an automated rotation Lambda
- Enable AWS Config rules to alert when the agent role policy changes unexpectedly
- Use IMDSv2 on EC2 by setting
HttpTokens: requiredin instance metadata options — this blocks SSRF-based credential theft targeting the metadata service
Automating Infrastructure Tasks Using the AWS DevOps Agent
Writing Infrastructure as Code Scripts Compatible With the Agent
When automating AWS infrastructure tasks, your IaC scripts need to align with how the AWS DevOps Agent processes and executes commands. Stick to these practices:
- Use AWS CloudFormation or Terraform templates with clearly defined resource dependencies
- Keep scripts modular — break large stacks into smaller, reusable components
- Tag every resource consistently so the agent can track and manage them across environments
- Store scripts in version-controlled repositories (CodeCommit or GitHub) and reference them directly in agent configurations
Scheduling and Triggering Automated Infrastructure Workflows
The AWS DevOps Agent works best when paired with event-driven or scheduled triggers through Amazon EventBridge or AWS CodePipeline. You can:
- Set cron-based schedules for routine tasks like scaling adjustments or patch deployments
- Trigger workflows on specific events such as a code push, failed health check, or SNS notification
- Chain multiple automation steps using AWS Step Functions for complex multi-stage infrastructure workflows
Managing State and Handling Rollbacks Effectively
State management is where cloud infrastructure automation either shines or falls apart. To keep things clean:
- Use S3 remote backends for Terraform state files with DynamoDB locking enabled
- Enable CloudFormation stack rollback triggers to automatically revert failed deployments
- Maintain deployment history logs in CloudWatch Logs so you can trace exactly what changed and when
- Test rollback procedures in staging before relying on them in production environments
Monitoring, Troubleshooting, and Optimizing Agent Performance

Setting Up Logging and Alerts for Real-Time Visibility
Getting clear visibility into your AWS DevOps Agent’s activity starts with Amazon CloudWatch. Pipe your agent logs directly into CloudWatch Log Groups, then set up metric filters to catch error patterns, failed deployments, or unexpected latency spikes. Create CloudWatch Alarms tied to those metrics and route notifications through Amazon SNS so your team gets pinged the moment something goes sideways — no manual log-digging required.
- Enable CloudWatch Agent on your EC2 instances or containers running the DevOps agent
- Create Log Groups with appropriate retention policies (30–90 days works for most teams)
- Set up metric filters for keywords like
ERROR,TIMEOUT, orFAILED - Use CloudWatch Dashboards to get a birds-eye view of pipeline health across all your AWS automation tools
- Route alerts through SNS topics to Slack, PagerDuty, or email
Diagnosing Common Configuration and Connectivity Issues
When your AWS DevOps Agent setup runs into trouble, the culprit is almost always one of three things: IAM permission gaps, network connectivity blocks, or misconfigured environment variables. Start by checking the agent’s local logs, then cross-reference with CloudTrail to see what API calls were made and whether they got denied.
Common issues and how to fix them:
- IAM permission errors — Run
aws iam simulate-principal-policyto test permissions without guessing. Make sure the agent’s role has the exact policies needed for your cloud infrastructure automation tasks - VPC connectivity problems — Confirm your security groups allow outbound HTTPS (port 443) and that your subnets have proper route table entries pointing to an internet gateway or NAT gateway
- Agent not registering — Double-check the
agent_config.jsonor equivalent config file for typos in the endpoint URL, region, or credentials path - Timeout errors during deployments — Increase the agent’s timeout thresholds and check if downstream services like S3, Systems Manager, or CodeDeploy are experiencing latency
- SSL/TLS handshake failures — Verify your certificates are current and that the agent trusts the AWS root CA bundle
Always check AWS Health Dashboard before going deep into troubleshooting — sometimes it’s a regional service hiccup, not your configuration.
Scaling the Agent to Handle Growing Infrastructure Demands
As your AWS DevOps pipeline grows, a single agent instance will eventually become the bottleneck. The right move is to shift toward a horizontally scaled agent pool where multiple instances share the workload. AWS Auto Scaling Groups are your best friend here — define scaling policies based on CPU utilization or custom CloudWatch metrics tied to job queue depth.
Scaling strategies that actually work:
- Horizontal scaling — Deploy multiple agent instances behind an Auto Scaling Group, triggered by queue depth metrics from SQS if you’re batching infrastructure tasks
- Spot Instances for cost efficiency — Use EC2 Spot Instances for non-critical, interruptible automation jobs to cut costs significantly while scaling
- Container-based agents — Run agents in ECS or EKS for faster spin-up times and tighter resource control; containers are much quicker to scale than full EC2 instances
- Job isolation — Assign specific agent pools to specific environments (dev, staging, prod) so a production deployment never competes for resources with a dev pipeline
- Warm pools — Pre-initialize a pool of stopped EC2 instances so they launch faster during demand spikes, reducing the cold-start delay
Keep an eye on SQS queue depth and agent idle time metrics together — high queue depth with low idle time tells you it’s time to scale out.
Applying Best Practices to Keep Automation Pipelines Efficient
Keeping your cloud automation with AWS running smoothly long-term is less about one-time setup and more about building good habits into your pipeline from the start. Treat your agent configuration as code, version-control everything, and review your automation workflows regularly — infrastructure needs change, and stale pipelines are a silent performance killer.
AWS DevOps best practices worth locking in:
- Infrastructure as Code for agent config — Store all agent configuration in CloudFormation templates or Terraform modules so changes are tracked, reviewed, and reversible
- Least privilege IAM roles — Audit agent permissions quarterly and remove anything the agent doesn’t actively need; bloated IAM roles are a security and compliance risk
- Pipeline caching — Cache dependencies, AMI snapshots, and build artifacts in S3 or ECR to cut down on redundant downloads and speed up deployment cycles
- Automated testing in pipelines — Add pre-deployment validation steps that run
cfn-lint, Terraformplanreviews, or custom policy checks before any infrastructure change goes live - Tagging everything — Apply consistent tags to all resources the agent touches so you can track costs, audit changes, and troubleshoot faster
- Regular agent updates — Keep the agent binary and its dependencies up to date; outdated agents miss security patches and compatibility fixes for newer AWS services
- Dead-letter queues — If your agent processes jobs via SQS, set up a DLQ to catch failed messages so nothing silently disappears
Pairing these habits with solid AWS agent monitoring gives you a pipeline that stays reliable even as your infrastructure scales and your team grows.
Setting up an AWS DevOps Agent for infrastructure automation might seem like a lot of moving parts at first, but once you break it down — understanding what the agent does, getting your prerequisites in order, walking through the configuration, and putting automation to work — it becomes a pretty straightforward process. Add in solid monitoring and troubleshooting habits, and you have a setup that not only runs smoothly but keeps getting better over time.
The real payoff here is freeing your team from repetitive manual tasks and letting automation handle the heavy lifting. So if you haven’t started yet, pick one infrastructure task to automate first, get comfortable with the process, and build from there. Small wins add up fast, and before long, you’ll wonder how you ever managed without it.