

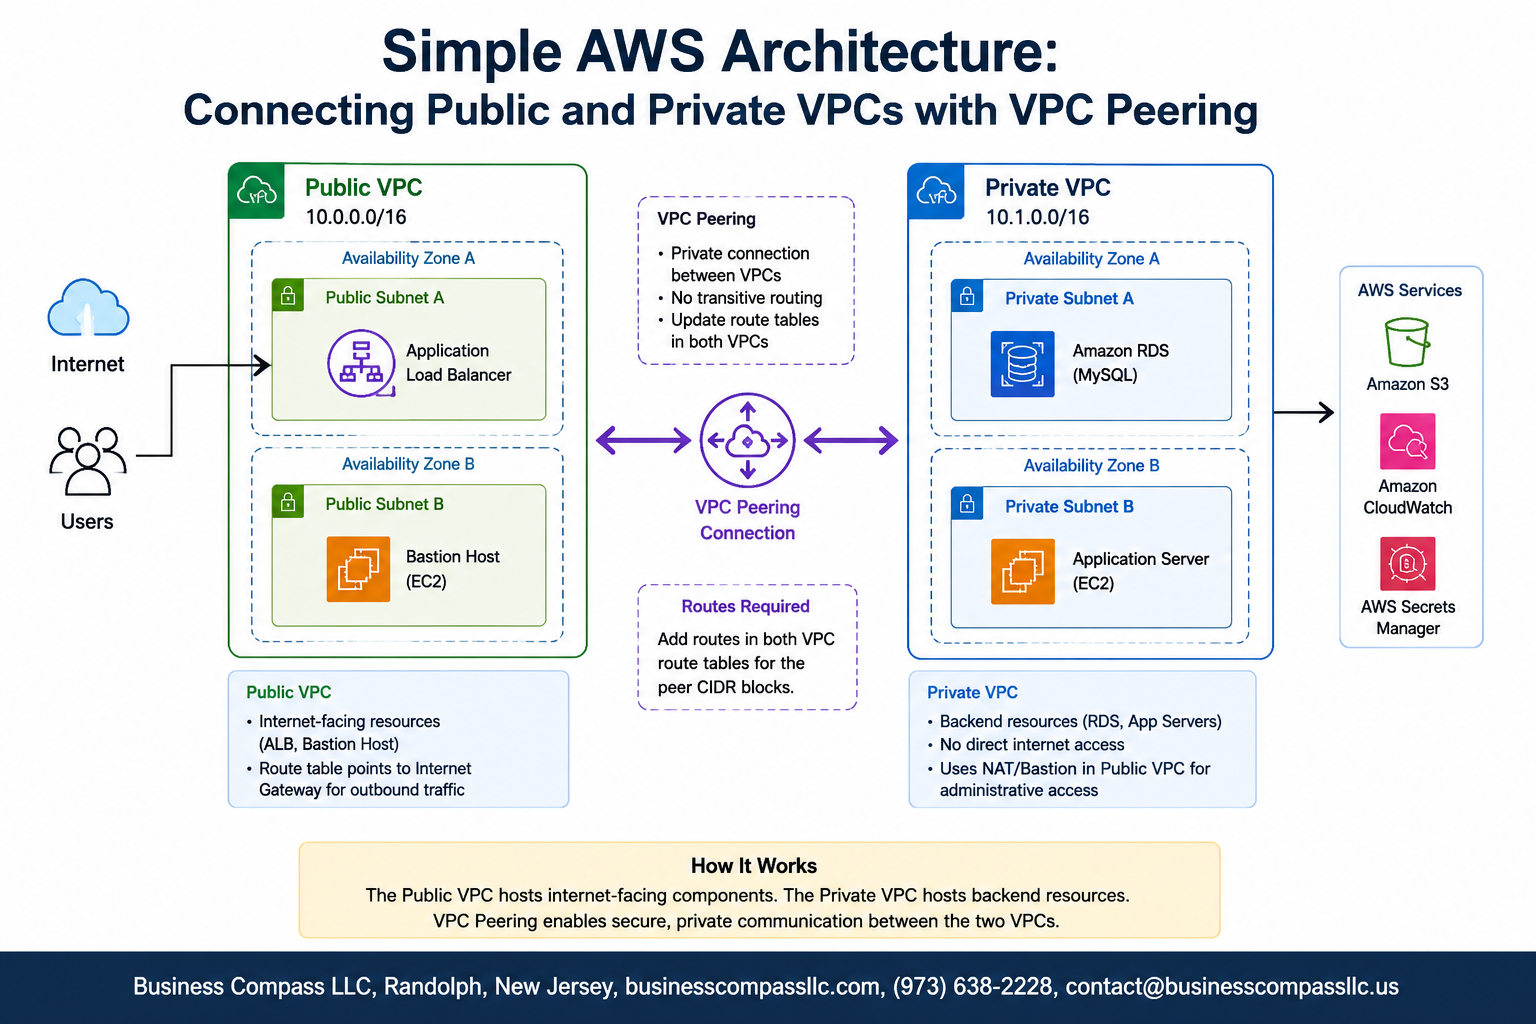
Connect Your AWS VPCs Without the Headache
If you’ve been building on AWS for a while, you’ve probably hit a point where you need two VPCs to talk to each other — maybe a public-facing app needs to reach a locked-down database sitting in a private VPC. That’s exactly where AWS VPC Peering comes in, and it’s simpler to set up than most people think.
This guide is for cloud engineers, DevOps practitioners, and AWS beginners who already know the basics of AWS but want a clear, hands-on walkthrough of public and private VPC architecture without wading through walls of documentation.
Here’s what we’ll cover:
- The core concepts behind how a VPC Peering Connection actually works — no fluff, just what you need to know before touching a single setting
- How to design and configure both your public and private VPC setup from scratch, including subnets, route tables, and security groups
- How to establish and test the peering connection so you know traffic is flowing correctly before you ship anything to production
By the end, you’ll have a working AWS cloud architecture that keeps your public resources accessible and your private resources protected — exactly how it should be.
Understanding the Core Concepts Behind VPC Peering

What is a VPC and Why It Matters for AWS Security
A Virtual Private Cloud (VPC) is your own isolated section of the AWS cloud where you get to define the networking environment — IP address ranges, subnets, route tables, and gateways. Think of it as your own private data center, but hosted on AWS infrastructure. Without a VPC, your AWS resources would be exposed to the public internet by default, which is a serious security risk. By placing resources inside a VPC, you control exactly who can reach them and how traffic flows in and out.
- Network isolation — resources inside a VPC are logically separated from other AWS customers
- Custom IP ranges — you define CIDR blocks that suit your architecture
- Granular access control — security groups and network ACLs give you fine-grained traffic management
- Compliance-friendly — VPCs help meet regulatory requirements by keeping sensitive workloads off the public internet
The Difference Between Public and Private VPCs
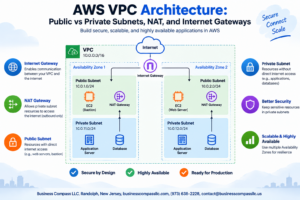
When people talk about public and private VPCs, they’re really describing how the VPCs and their subnets are connected to the internet.
A public VPC typically contains subnets with an Internet Gateway attached, allowing resources like load balancers or web servers to send and receive traffic from the internet directly.
A private VPC, on the other hand, has no direct internet route. Resources sitting inside it — like databases, internal APIs, or backend services — are completely shielded from the public internet. They can only be accessed through controlled pathways, which is exactly the kind of setup you want for sensitive workloads.
Here’s a quick comparison:
| Feature | Public VPC | Private VPC |
|---|---|---|
| Internet Gateway | Yes | No |
| Direct internet access | Yes | No |
| Typical workloads | Web servers, load balancers | Databases, internal services |
| Exposure risk | Higher | Minimal |
This Public and Private VPC Architecture is a foundational AWS Cloud Architecture pattern because it lets you expose only what needs to be public while keeping everything sensitive locked away.
How VPC Peering Enables Seamless Cross-VPC Communication
A VPC Peering Connection is a direct networking link between two VPCs that lets them route traffic between each other using private IP addresses — no internet, no VPN, no extra hops. Once a peering connection is active and routes are configured, resources in both VPCs talk to each other as if they’re on the same private network.
Here’s how the flow works in a typical AWS VPC Peering setup:
- A peering request is initiated from one VPC (the requester)
- The other VPC (the accepter) approves the request
- Route tables in both VPCs are updated to point traffic toward each other’s CIDR blocks
- Security groups and network ACLs are adjusted to allow the relevant traffic
One thing worth knowing — VPC peering is non-transitive. If VPC A peers with VPC B, and VPC B peers with VPC C, VPC A cannot automatically reach VPC C. Each peering relationship is direct and explicit.
Key Benefits of Using VPC Peering Over Other Connectivity Options
When you’re looking at ways to Connect VPCs in AWS, you have a few options — VPC peering, AWS Transit Gateway, VPNs, and AWS PrivateLink. Each has its place, but VPC peering stands out for specific use cases.
Why VPC Peering is often the right call:
- Low latency — traffic stays entirely within AWS’s private network backbone, so it’s fast
- No bandwidth bottleneck — unlike a Transit Gateway, peering doesn’t route traffic through a central hub that could become a choke point for high-throughput workloads
- Cost-effective for simple setups — peering itself has no hourly charge; you only pay for data transfer
- Simple to reason about — the routing is straightforward and easy to audit for security reviews
- No single point of failure — peering connections are managed by AWS and are highly available by design
Where other options make more sense:
- Transit Gateway — better when you have many VPCs that all need to talk to each other (avoids a peering mesh that gets complicated fast)
- AWS PrivateLink — the right choice when you want to expose a specific service privately without giving broad network access
- VPN connections — needed when connecting on-premises environments to AWS
For a clean, simple AWS VPC Configuration involving just a public-facing layer and a protected backend, VPC peering hits the sweet spot — straightforward, performant, and easy to maintain following VPC Peering Best Practices.
Designing Your Public and Private VPC Architecture
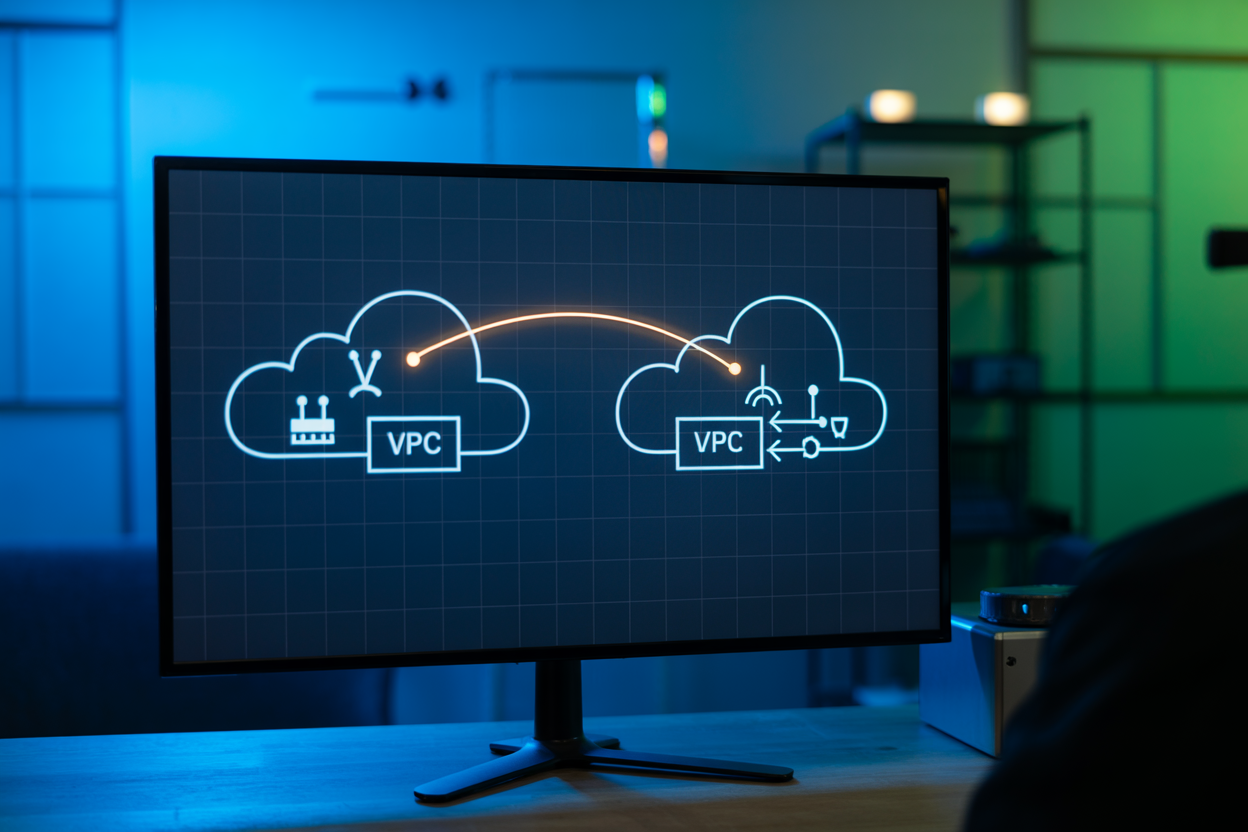
Choosing the Right CIDR Blocks to Avoid Overlap
Getting your CIDR blocks right from the start saves you a massive headache later. When setting up AWS VPC Peering, overlapping IP ranges are a hard blocker — AWS will flat-out reject the peering connection if both VPCs share the same address space.
Here’s a clean example setup that works well:
- Public VPC:
10.0.0.0/16 - Private VPC:
10.1.0.0/16
This gives each VPC 65,536 IP addresses with zero overlap, leaving room to expand into 10.2.0.0/16, 10.3.0.0/16, and beyond as your architecture grows. Avoid using the default 172.31.0.0/16 range since AWS default VPCs already grab that block, which can cause conflicts down the road.
Planning Subnet Layouts for Public and Private Tiers
Your subnet design directly shapes how traffic flows between the two VPCs. A clean public and private VPC architecture looks like this:
Public VPC Subnets:
10.0.1.0/24— Public subnet (us-east-1a) hosting your load balancers, bastion hosts, or NAT Gateways10.0.2.0/24— Public subnet (us-east-1b) for high availability
Private VPC Subnets:
10.1.1.0/24— Private subnet (us-east-1a) for databases, internal services, or backend APIs10.1.2.0/24— Private subnet (us-east-1b) for failover capacity
Spreading subnets across multiple Availability Zones right from the design phase is a smart move. It keeps your setup resilient without requiring a major rework later. For the private VPC, skip attaching an Internet Gateway entirely — resources there should only talk to the outside world through the peering connection or a NAT Gateway sitting in the public VPC.
Defining Security Boundaries Between the Two VPCs
A VPC Peering Connection opens a networking path, but it doesn’t automatically mean everything can talk to everything. You stay in control through Security Groups and Network ACLs.
Security Group Rules to Set Up:
- On your private VPC instances, allow inbound traffic only from the public VPC’s CIDR (
10.0.0.0/16) on the specific ports your app needs (like port 5432 for PostgreSQL or port 3306 for MySQL) - On your public VPC instances, allow outbound traffic toward
10.1.0.0/16on those same ports
Network ACL Considerations:
- Keep NACLs as a secondary layer of control at the subnet level
- Explicitly deny any traffic that doesn’t fit your expected communication patterns
- Remember NACLs are stateless, so you need both inbound and outbound rules
The goal is a clear AWS cloud architecture where the public VPC acts as the entry point and the private VPC stays locked down, only accepting connections from known, trusted sources within your own network range.
Setting Up the Public VPC

A. Creating the VPC and Configuring the Internet Gateway
Start by heading to the AWS VPC console and clicking Create VPC. Give it a meaningful name like public-vpc, and set the IPv4 CIDR block to something like 10.0.0.0/16. Once the VPC is created, attach an Internet Gateway (IGW) to it:
- Navigate to Internet Gateways → Create Internet Gateway
- Name it
public-igwand click Create - Select the IGW, click Actions → Attach to VPC, then choose your
public-vpc
Without the IGW attached, your VPC is completely isolated from the internet — no traffic in, no traffic out.
B. Building Public Subnets for Internet-Facing Resources
With the VPC ready, carve out at least two public subnets across different Availability Zones for high availability:
public-subnet-1: CIDR10.0.1.0/24, AZus-east-1apublic-subnet-2: CIDR10.0.2.0/24, AZus-east-1b
When creating each subnet, make sure to enable auto-assign public IPv4 addresses. This setting ensures that any EC2 instance launched in these subnets automatically gets a public IP — which is exactly what you need for internet-facing resources in your public and private VPC architecture.
C. Configuring Route Tables to Enable Outbound Internet Access
By default, AWS creates a main route table for every VPC, but you don’t want to mess with that one directly. Create a dedicated public route table:
- Go to Route Tables → Create Route Table
- Name it
public-rtand associate it withpublic-vpc - Under Routes, add a new route:
- Destination:
0.0.0.0/0 - Target: your
public-igw
- Destination:
Then associate this route table with both public-subnet-1 and public-subnet-2. This tells AWS to send all outbound traffic through the Internet Gateway — a core piece of any solid AWS VPC configuration.
D. Assigning Security Groups to Control Inbound Traffic
Security groups act as virtual firewalls at the instance level. For the public VPC, create a security group called public-sg with rules that make sense for your workload:
Inbound Rules:
- HTTP (port 80) from
0.0.0.0/0— for web traffic - HTTPS (port 443) from
0.0.0.0/0— for secure web traffic - SSH (port 22) from your IP only — never open SSH to the world
Outbound Rules:
- All traffic allowed by default — keep it that way unless you have a specific reason to restrict it
Following VPC peering best practices, keep security groups tight and purpose-specific rather than creating one broad group for everything.
E. Deploying a Bastion Host for Secure Remote Access
A bastion host is a hardened EC2 instance sitting in your public subnet that acts as a jump box into your private resources. Here’s how to set one up:
- Launch an EC2 instance (Amazon Linux 2 works great) in
public-subnet-1 - Assign it the
public-sgsecurity group - Choose or create a key pair and download it locally
- Make sure it gets a public IP address
Once running, you SSH into the bastion first, then hop from there into private instances — keeping your private resources completely off the public internet. This is the standard, battle-tested approach in any AWS cloud architecture where sensitive workloads live behind a private boundary.
Setting Up the Private VPC
Creating the VPC with No Direct Internet Exposure
When setting up your Private VPC in AWS, the goal is straightforward — keep it completely off the public internet. You do this by simply not attaching an Internet Gateway. Without one, no traffic can flow in or out from the wider web, which is exactly what you want for internal workloads like databases, backend services, or sensitive application tiers.
- Go to the VPC Console and select Create VPC
- Assign a unique CIDR block (e.g.,
10.1.0.0/16) that doesn’t overlap with your Public VPC range - Skip adding an Internet Gateway entirely — this is the key step that keeps it private
- Tag it clearly (e.g.,
private-vpc) so you can identify it easily when setting up the VPC Peering connection later
Designing Private Subnets for Internal Workloads
Inside your private VPC, you’ll carve out subnets for different internal workloads. A clean approach is to separate your application layer from your data layer.
- App Subnet:
10.1.1.0/24— hosts backend EC2 instances or containers - Data Subnet:
10.1.2.0/24— reserved for RDS databases or ElastiCache clusters - Spread subnets across multiple Availability Zones for resilience
- Avoid assigning public IPs to any instances in these subnets
This layout keeps your Private VPC setup organized and follows solid AWS cloud architecture practices without overcomplicating things.
Configuring Route Tables for Internal Routing Only
Your private subnets need route tables that only handle internal traffic — nothing pointing to the public internet.
- Create a dedicated route table for the private VPC
- Add the local route:
10.1.0.0/16 → local(this is auto-added by AWS) - Once you establish the AWS VPC Peering connection, you’ll add a route like
10.0.0.0/16 → pcx-xxxxxxxxto allow traffic to flow back to the Public VPC - Associate this route table with both the app and data subnets
- Double-check there’s no default route (
0.0.0.0/0) pointing anywhere — that would break the isolation you’re building
Establishing the VPC Peering Connection

A. Initiating the Peering Request from the Public VPC
Head over to the AWS Console, navigate to VPC > Peering Connections, and click Create Peering Connection. You’ll need to fill in a few details:
- Peering connection name – something clear like
public-to-private-peer - VPC (Requester) – select your Public VPC
- Account – choose “My account” if both VPCs live under the same AWS account
- Region – pick the same region or a different one if you’re going cross-region
- VPC (Accepter) – enter the VPC ID of your Private VPC
Once you hit Create, AWS sends a peering request that sits in a Pending Acceptance state until the other side approves it.
B. Accepting the Peering Connection in the Private VPC
Still inside VPC > Peering Connections, you’ll see the request showing up with a Pending Acceptance status. Select it, click Actions, then hit Accept Request. AWS will ask you to confirm — go ahead and do that. The status flips to Active, which means the VPC Peering Connection is now live between your public and private VPC architecture. Worth double-checking the VPC IDs match what you set up earlier before accepting.
C. Updating Route Tables in Both VPCs to Enable Traffic Flow
An active peering connection alone won’t move traffic — you’ve got to update the route tables on both sides. Here’s the pattern to follow:
In the Public VPC route table:
- Destination:
10.1.0.0/16(Private VPC CIDR) - Target:
pcx-xxxxxxxxxxxxxxxxx(your peering connection ID)
In the Private VPC route table:
- Destination:
10.0.0.0/16(Public VPC CIDR) - Target:
pcx-xxxxxxxxxxxxxxxxx(same peering connection ID)
Make sure you’re editing the right route tables — the ones actually associated with the subnets that need to talk to each other. If your private VPC has multiple subnets, each relevant subnet’s route table needs this entry.
D. Adjusting Security Groups to Allow Cross-VPC Communication
Route tables handle the path, but security groups control the door. You need to open up the right ports between your VPCs:
- On the Private VPC’s EC2 instances or RDS, edit the attached security group and add an inbound rule:
- Type: the protocol you need (e.g., MySQL/Aurora, SSH, HTTPS)
- Source: the CIDR block of the Public VPC (e.g.,
10.0.0.0/16)
- On the Public VPC side, if your instances need to receive responses, check outbound rules are open (they usually are by default).
A common mistake people make is referencing a security group ID from another VPC — that only works within the same VPC. Across peered VPCs, always use the CIDR range as the source or destination to keep AWS VPC configuration clean and working correctly.
Validating and Testing the Peered Architecture
Verifying Connectivity Between Resources Across Both VPCs
Once your AWS VPC Peering connection is active, the first real test is pinging or SSH-ing from an EC2 instance in the public VPC to one sitting in the private VPC. Use the private IP addresses, not public ones, since that’s exactly what VPC peering routes traffic through.
- Run
ping <private-IP>from your public EC2 instance to confirm ICMP traffic flows - Try an SSH connection:
ssh -i your-key.pem ec2-user@<private-IP> - Check route tables in both VPCs — each side needs a route pointing to the other VPC’s CIDR block via the peering connection ID
- If traffic drops, double-check that your route tables are updated on both ends, not just one
Using VPC Flow Logs to Monitor and Troubleshoot Traffic
VPC Flow Logs are your best friend when something isn’t working the way you expect in your public and private VPC architecture.
- Enable flow logs on both VPCs and send them to CloudWatch Logs or an S3 bucket
- Look for
REJECTentries — these tell you exactly which traffic is getting blocked and by which network interface - Filter logs by source/destination IP to isolate cross-VPC traffic quickly
- Use CloudWatch Insights query:
filter action="REJECT"to surface problem traffic fast
Testing Security Rules to Confirm Access Controls Are Working
Security groups and network ACLs are stateful and stateless respectively, so testing both is key when validating your VPC peering best practices setup.
- Attempt connections that should be blocked — confirm they actually fail
- Try accessing a database port (like 5432 or 3306) from the public VPC to verify only allowed sources get through
- Review security group inbound rules on private VPC resources to make sure only the public VPC’s CIDR is whitelisted
- Run
telnet <private-IP> <port>ornc -zv <private-IP> <port>to test specific port-level access quickly

Setting up VPC peering between public and private VPCs does not have to be an overwhelming task. By breaking it down into clear steps — designing your architecture, configuring each VPC, establishing the peering connection, and testing everything end-to-end — you can build a secure and well-structured AWS environment that keeps your resources properly isolated while still allowing the communication they need.
If you are just getting started, take it one step at a time and make sure to validate your setup thoroughly before moving anything critical into production. Double-check your route tables and security group rules, as those are usually where things go sideways. Once everything is running smoothly, you will have a solid foundation that you can build on as your cloud infrastructure grows.