

Scale Your .NET APIs Without the Growing Pains
Running a .NET API that handles a few hundred requests a day is one thing. Keeping it alive, fast, and cost-efficient when traffic spikes to millions of requests? That’s a whole different challenge — and it’s exactly what this guide tackles.
This post is for backend engineers and platform teams who already know their way around .NET but want a clear, practical path to production-grade Kubernetes deployments on AWS EKS. If you’ve been copy-pasting YAML configs and hoping for the best, this is the reset you need.
Here’s what we’re walking through together:
- Containerizing your .NET APIs the right way so they’re actually ready for production — not just “it works on my machine” ready
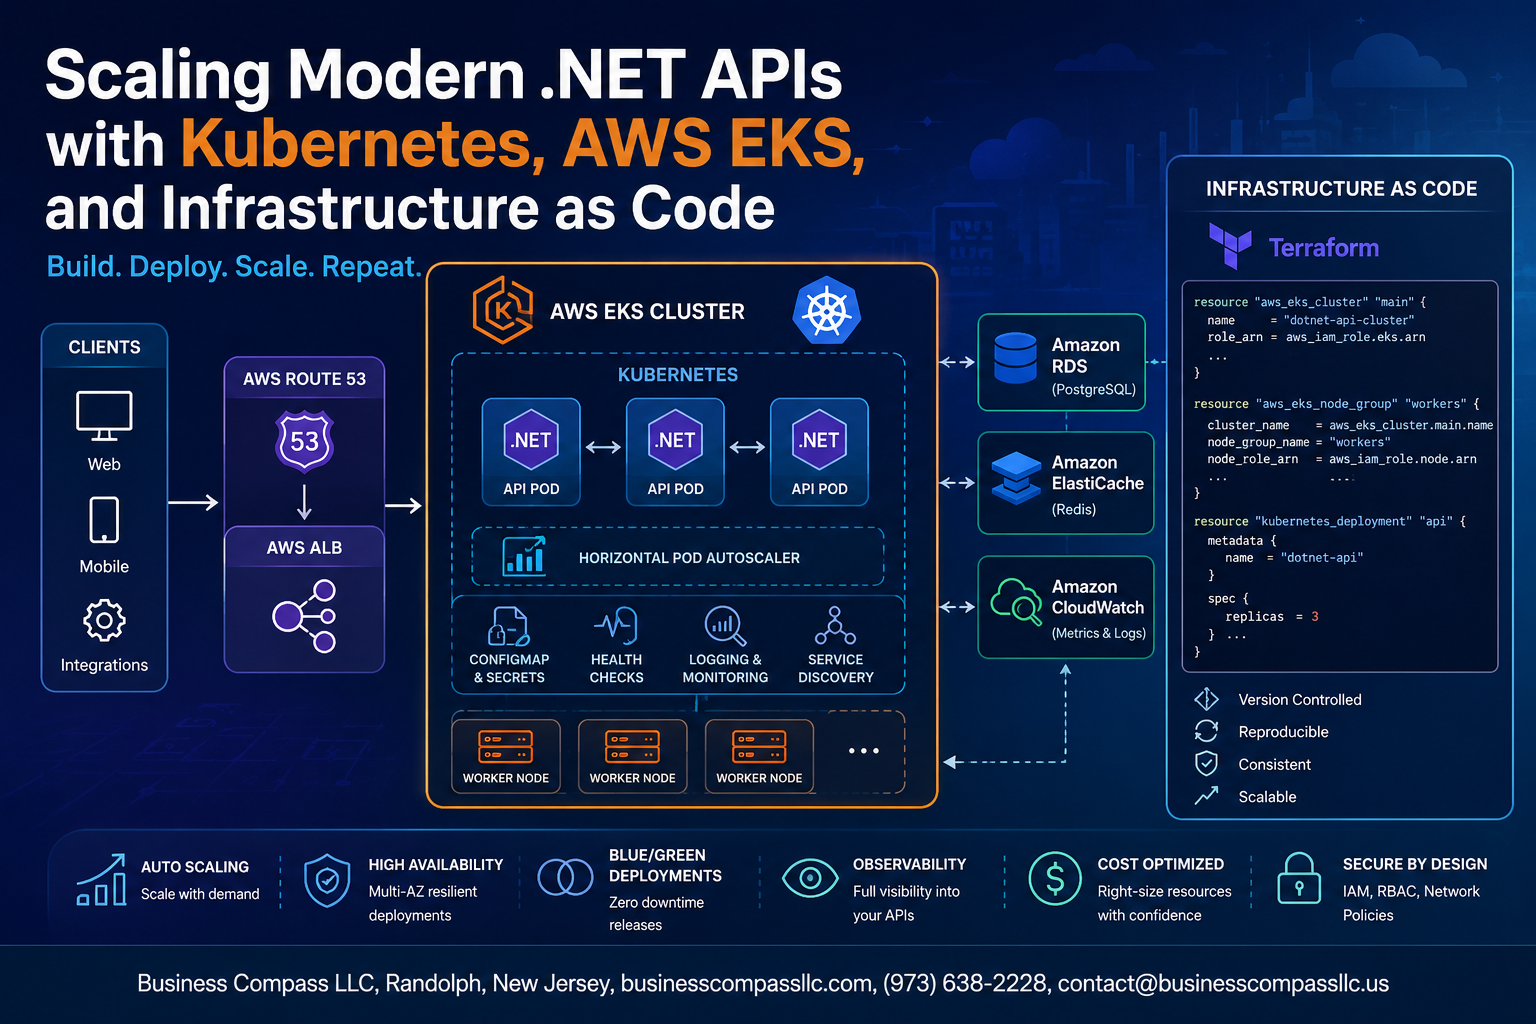
- Deploying and autoscaling workloads on AWS EKS using Terraform EKS provisioning to automate your infrastructure instead of clicking through the AWS console at 2am
- Wiring up .NET API observability so you can see what’s breaking, why it’s breaking, and fix it before your users notice
By the end, you’ll have a solid blueprint for a scalable .NET cloud architecture that doesn’t fall apart the moment real traffic hits it. No hand-waving, no fluff — just the setup that actually holds up in production.
Let’s get into it.
Building a Scalable .NET API Foundation

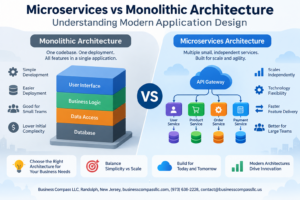
Choosing the Right .NET API Architecture for High-Traffic Workloads
Picking the right architecture upfront saves you from painful rewrites later. For high-traffic workloads, minimal APIs in .NET 8 are a solid starting point — they’re lightweight, fast, and cut down on unnecessary middleware overhead. If your system is growing into separate domains with distinct scaling needs, breaking things into microservices makes sense, especially when targeting a scalable .NET cloud architecture on AWS EKS.
- Minimal APIs — great for simple, high-throughput endpoints with low latency requirements
- Controller-based APIs — better when you need more structure, filters, and complex routing
- Microservices — ideal when different parts of your system need to scale independently
Designing Stateless Services to Maximize Horizontal Scalability
Stateless services are the backbone of any serious .NET API Kubernetes scaling strategy. When your API holds no session state locally, Kubernetes can spin up or tear down pods freely without any sticky session headaches.
- Store session data in Redis or DynamoDB, not in memory
- Use JWT tokens for auth instead of server-side sessions
- Push any file storage to S3, never the local filesystem
- Keep configuration in environment variables or AWS Secrets Manager
Implementing Health Checks and Readiness Probes for Resilient APIs
Kubernetes needs to know when your pod is ready to take traffic and when something’s broken. .NET makes this straightforward with the built-in Microsoft.Extensions.Diagnostics.HealthChecks package.
builder.Services.AddHealthChecks()
    .AddSqlServer(connectionString)
    .AddRedis(redisConnection);

app.MapHealthChecks("/health/ready");
app.MapHealthChecks("/health/live");
- Liveness probe — tells Kubernetes whether to restart the container
- Readiness probe — tells Kubernetes whether to send traffic to the pod
- Check downstream dependencies like databases and caches in your readiness probe, not your liveness probe
Optimizing .NET Performance with Async Patterns and Minimal APIs
Async/await is non-negotiable for APIs that handle real traffic. Blocking threads under load kills throughput fast. Every I/O call — database queries, HTTP calls, file reads — should be async end-to-end.
- Use
async Task<IResult>in minimal API handlers - Avoid
.Resultor.Wait()— they block threads and cause deadlocks under pressure - Lean on
IAsyncEnumerable<T>for streaming large datasets - Turn on response compression and output caching in .NET 8 for quick wins
- Profile with dotnet-trace or PerfView before optimizing — guess less, measure more
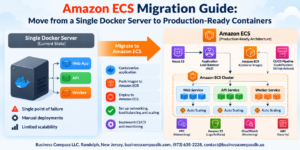
Containerizing .NET APIs for Production-Ready Deployments

Writing Efficient Dockerfiles to Minimize Image Size and Build Time
When containerizing .NET APIs, a bloated Docker image is your worst enemy — it slows down deployments, drains bandwidth, and increases your attack surface. Start with the official mcr.microsoft.com/dotnet/aspnet runtime image as your base, and always pin specific version tags rather than floating latest tags to keep builds predictable.
Key practices for lean, fast images:
- Use Alpine-based images (
mcr.microsoft.com/dotnet/aspnet:8.0-alpine) to dramatically cut image size - Run
dotnet publishwith-c Releaseand--self-contained falseto strip debug symbols - Add a
.dockerignorefile to excludebin/,obj/, test projects, and local config files - Avoid installing unnecessary OS packages inside the container
Managing Environment-Specific Configurations Securely in Containers
Hardcoding connection strings or API keys into your Docker image is a rookie mistake that will haunt you in production. .NET’s built-in configuration system stacks nicely with Kubernetes — appsettings.json handles your defaults, and environment variables or mounted ConfigMaps override them at runtime.
Smart configuration patterns to follow:
- Store sensitive values like database passwords and JWT secrets in Kubernetes Secrets, not ConfigMaps
- Reference secrets as environment variables in your pod spec using
secretKeyRef - Use AWS Secrets Manager for rotating credentials, pulling them via the Secrets Store CSI driver
- Never bake environment-specific URLs or credentials into your Docker image layers
Leveraging Multi-Stage Builds to Streamline CI/CD Pipelines
Multi-stage builds are a game-changer for production .NET Kubernetes deployments. You get a clean separation between the SDK-heavy build environment and the lean runtime image, meaning your final container only ships what actually needs to run — nothing from your build toolchain makes it through.
A typical multi-stage Dockerfile for a .NET API looks like this:
- Stage 1 (build): Use
mcr.microsoft.com/dotnet/sdk:8.0to restore packages and compile - Stage 2 (publish): Run
dotnet publishto produce optimized output artifacts - Stage 3 (final): Copy only published output into the
aspnetruntime image
This pattern keeps your CI/CD pipeline fast because Docker layer caching kicks in aggressively — if your .csproj files haven’t changed, the dotnet restore layer gets reused entirely, cutting build times significantly across repeated pipeline runs.
Deploying and Managing Workloads on AWS EKS

Setting Up an EKS Cluster Optimized for .NET Microservices
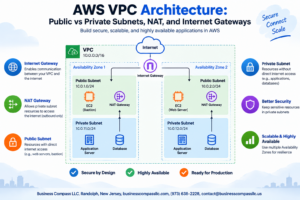
Spinning up an EKS cluster that actually works well for .NET microservices means thinking beyond the defaults. You want to pick the right Kubernetes version, enable managed node groups, and configure your VPC with private subnets so your API pods aren’t sitting exposed to the public internet. A solid starting point looks something like this:
- Use eksctl or Terraform to provision the cluster with a dedicated VPC
- Enable OIDC provider during cluster creation — you’ll need this for IAM Roles for Service Accounts later
- Pick an AMI optimized for your workload (Amazon Linux 2 works great for .NET container workloads)
- Set your cluster logging to capture API server, audit, and controller manager logs from day one
Configuring Node Groups and Auto Scaling for Cost Efficiency
Node group configuration is where most teams leave money on the table. For .NET APIs, mixing on-demand and Spot instances across multiple node groups gives you reliability without burning through budget unnecessarily.
- Create separate node groups for system workloads and application workloads
- Set minimum, desired, and maximum node counts that reflect your real traffic patterns
- Attach the Cluster Autoscaler or switch to Karpenter for faster, smarter node provisioning
- Tag node groups properly so the autoscaler can identify and manage them
Karpenter is especially worth exploring if you want sub-minute node provisioning — it reads your pending pod requirements and spins up exactly the right instance type rather than guessing.
Using IAM Roles for Service Accounts to Secure API Access
Hard-coding AWS credentials into your .NET API is a fast track to a security incident. IAM Roles for Service Accounts (IRSA) lets your pods assume an IAM role directly through a Kubernetes service account, so your app gets temporary, scoped credentials automatically.
- Create an IAM role with a trust policy pointing to your cluster’s OIDC provider
- Annotate the Kubernetes service account with the IAM role ARN
- Reference that service account in your pod spec or deployment manifest
- Your .NET app uses the AWS SDK’s default credential chain — no config changes needed
This approach keeps secrets out of your container images and environment variables entirely, which is a huge win for AWS EKS .NET deployment security.
Simplifying Service Discovery and Load Balancing with AWS Load Balancer Controller
Getting traffic into your .NET APIs cleanly on EKS means setting up the AWS Load Balancer Controller. It watches for Kubernetes Ingress and Service resources and automatically provisions Application Load Balancers (ALB) or Network Load Balancers (NLB) on your behalf.
- Install the controller via Helm, pointing it to the right IAM role
- Use
IngressClass: albannotations in your Ingress manifests to trigger ALB creation - Configure path-based routing to direct traffic to different .NET microservices from a single ALB
- Enable target type: ip mode so traffic goes directly to pods, skipping an extra network hop
This setup cuts down on latency and makes .NET API Kubernetes scaling much cleaner since the load balancer adapts as pods scale up or down.
Storing Sensitive Credentials Safely with AWS Secrets Manager Integration
Your .NET API will almost certainly need database passwords, API keys, or third-party tokens at runtime. Baking those into ConfigMaps or environment variables is risky — AWS Secrets Manager paired with the Secrets Store CSI Driver solves this cleanly.
- Install the CSI driver and AWS provider on your cluster
- Create a
SecretProviderClassmanifest that maps Secrets Manager secrets to file paths or environment variables - Mount secrets as volumes in your deployment, so your .NET app reads them like regular config files
- Secrets rotate automatically in Secrets Manager, and the CSI driver syncs updates to your pods
This pattern keeps your sensitive credentials safely out of Kubernetes etcd and gives you a clean audit trail of who accessed what and when.
Automating Infrastructure Provisioning with Infrastructure as Code

Provisioning EKS Clusters Reliably Using Terraform
Terraform EKS provisioning takes the guesswork out of standing up Kubernetes clusters on AWS. Instead of clicking through the console and hoping you remember every setting, you define your cluster in code — node groups, IAM roles, VPC config, and all.
- Use the
terraform-aws-modules/eks/awsmodule to get a production-ready cluster without reinventing the wheel - Pin your Terraform and provider versions so upgrades don’t surprise you mid-sprint
- Store your
terraform.tfstatein an S3 backend with DynamoDB locking to prevent state corruption across teams - Separate your networking layer (VPC, subnets) into its own Terraform module so it can be reused across environments
module "eks" {
  source          = "terraform-aws-modules/eks/aws"
  cluster_name    = "dotnet-api-cluster"
  cluster_version = "1.29"
  vpc_id          = module.vpc.vpc_id
  subnet_ids      = module.vpc.private_subnets
}
This approach to Infrastructure as Code for .NET deployments means your entire EKS environment is reproducible, reviewable, and version-controlled — just like your application code.
Managing Kubernetes Manifests at Scale with Helm Charts
Raw Kubernetes YAML files work fine for one service, but they get messy fast when you’re managing multiple .NET APIs across several environments. Helm charts solve this by letting you template your manifests and inject environment-specific values at deploy time.
- Package your .NET API Deployment, Service, HPA, and Ingress resources into a single Helm chart
- Use
values.yamlfor defaults and override them per environment withvalues-prod.yamlorvalues-staging.yaml - Helm’s release history gives you a clear audit trail of what changed and when
- Tools like Helmfile let you manage multiple charts together, which is a lifesaver for AWS EKS microservices setups
# values-prod.yaml
replicaCount: 5
image:
  repository: your-ecr-repo/dotnet-api
  tag: "2.1.0"
resources:
  requests:
    cpu: "500m"
    memory: "512Mi"
Helm also pairs well with CI/CD pipelines — a single helm upgrade --install command during your pipeline run handles both fresh deployments and rolling updates cleanly.
Enforcing Consistent Environments Across Dev, Staging, and Production
One of the biggest headaches in scalable .NET cloud architecture is the classic “it works on my machine” problem — except at the infrastructure level. When dev spins up a cluster with different node sizes, security groups, or add-ons than production, debugging becomes a nightmare.
Here’s how to keep environments consistent:
- Use the same Terraform modules across dev, staging, and production — only the variable values should change (cluster size, instance types, replica counts)
- Lock container image tags in your Helm values files rather than using
latest, so every environment runs an identical, traceable build - Apply the same Kubernetes RBAC policies and network policies across all environments from day one, not as an afterthought before go-live
- Run automated
terraform plandiffs in CI to catch environment drift before it reaches production
| Config Area | Dev | Staging | Production |
|---|---|---|---|
| Node instance type | t3.medium | t3.large | m5.xlarge |
| Replica count | 1 | 2 | 5 |
| HPA enabled | No | Yes | Yes |
Keeping these differences intentional and documented — rather than accidental — is what separates teams that ship confidently from teams that treat every production deploy like defusing a bomb.
Version Controlling Infrastructure to Enable Faster Rollbacks
Treating infrastructure the same way you treat application code is one of the highest-leverage habits a team can build. When every Terraform change and Helm chart update goes through a pull request, you get peer review, a full history, and the ability to roll back fast when something goes sideways.
- Tag every Helm release with the Git commit SHA so you can trace exactly what’s running in your cluster back to a specific code change
- Use
helm rollback <release> <revision>to revert a bad deployment in seconds rather than manually editing YAML under pressure - Keep Terraform changes in feature branches and merge only after a
terraform planreview — this alone prevents most accidental infrastructure breakages - Store Helm chart versions in a private OCI registry (like AWS ECR) so you can pull and redeploy any historical version of your .NET API infrastructure on demand
# Roll back to the previous Helm release revision
helm rollback dotnet-api 3

# Check rollback status
helm history dotnet-api
When your infrastructure is version-controlled this way, a rollback isn’t a fire drill — it’s just another command in your runbook, and your team can execute it calmly at 2am without second-guessing anything.
Scaling .NET APIs Intelligently on Kubernetes

Applying Horizontal Pod Autoscaling Based on Real-Time Metrics
.NET API Kubernetes scaling gets real when you wire up Horizontal Pod Autoscaling (HPA) to actual traffic signals rather than guesswork. HPA watches CPU and memory metrics through the Kubernetes Metrics Server and spins up new pods automatically when thresholds are crossed.
Key steps to set this up:
- Deploy the Metrics Server in your AWS EKS cluster
- Define resource requests on each container so HPA has a baseline to calculate percentages against
- Apply an HPA manifest targeting your .NET API Deployment with
minReplicas,maxReplicas, and a target CPU utilization like 60%
apiVersion: autoscaling/v2
kind: HorizontalPodAutoscaler
metadata:
  name: dotnet-api-hpa
spec:
  scaleTargetRef:
    apiVersion: apps/v1
    kind: Deployment
    name: dotnet-api
  minReplicas: 2
  maxReplicas: 20
  metrics:
    - type: Resource
      resource:
        name: cpu
        target:
          type: Utilization
          averageUtilization: 60
This keeps your production .NET Kubernetes setup responsive without over-provisioning during quiet hours.
Using KEDA to Scale APIs Driven by Event and Queue Workloads
Standard HPA only reacts to CPU and memory, which falls short when your .NET API consumes messages from an SQS queue or processes events from Kafka. KEDA (Kubernetes Event-Driven Autoscaling) fills that gap cleanly.
KEDA scales pods down to zero during idle periods and ramps them back up the moment messages start arriving — a huge win for cost efficiency on AWS EKS microservices.
Common KEDA scalers for .NET APIs:
- AWS SQS — scales based on queue depth
- Azure Service Bus — scales on message count per topic subscription
- RabbitMQ — reacts to queue length thresholds
- Kafka — tracks consumer group lag
A simple SQS-based ScaledObject looks like this:
apiVersion: keda.sh/v1alpha1
kind: ScaledObject
metadata:
  name: dotnet-worker-scaler
spec:
  scaleTargetRef:
    name: dotnet-worker-deployment
  minReplicaCount: 0
  maxReplicaCount: 30
  triggers:
    - type: aws-sqs-queue
      metadata:
        queueURL: https://sqs.us-east-1.amazonaws.com/123456789/my-queue
        queueLength: "10"
        awsRegion: us-east-1
Pair KEDA with IAM Roles for Service Accounts (IRSA) on EKS so your pods can securely read queue metrics without hardcoding credentials.
Tuning Resource Requests and Limits to Prevent Performance Bottlenecks
Getting resource requests and limits right is one of the most overlooked parts of running a scalable .NET cloud architecture. Set them too low and your API gets throttled; set them too high and you waste money on idle compute.
Requests tell the Kubernetes scheduler how much CPU and memory to reserve when placing a pod on a node. Limits cap how much a pod can actually consume.
Practical tuning approach:
- Start with load testing using tools like k6 or NBomber against your .NET API
- Watch real consumption in AWS CloudWatch Container Insights or Prometheus
- Set requests at roughly the 50th percentile of observed usage and limits at the 95th percentile
A solid starting point for a typical .NET API pod:
resources:
  requests:
    cpu: "250m"
    memory: "256Mi"
  limits:
    cpu: "1000m"
    memory: "512Mi"
A few things to keep in mind:
- Avoid setting CPU limits on latency-sensitive .NET APIs — CPU throttling can silently kill response times even when the node has spare capacity
- Use the Vertical Pod Autoscaler (VPA) in recommendation mode to get data-driven suggestions without automatic changes disrupting running pods
- Namespace-level LimitRanges are a good safety net, preventing any single deployment from starving the rest of the cluster
Dialing in these numbers directly feeds back into how HPA and KEDA behave, so treating resource tuning as an ongoing practice rather than a one-time setup pays off consistently.
Monitoring, Observability, and Continuous Improvement

Collecting Metrics from .NET APIs Using Prometheus and Grafana
Getting visibility into your .NET API’s behavior starts with scraping the right metrics. Add the prometheus-net.AspNetCore package to your project and expose a /metrics endpoint that Kubernetes can scrape automatically.
- Track request rates, error counts, and response latencies using built-in HTTP metrics
- Define custom counters and histograms for business-critical operations like order processing or payment flows
- Deploy Prometheus inside your EKS cluster using the
kube-prometheus-stackHelm chart, which bundles Grafana dashboards out of the box - Build Grafana dashboards that surface pod-level CPU and memory alongside application-level throughput, giving you a complete picture without switching tools
Implementing Distributed Tracing with OpenTelemetry for Faster Debugging
When a request touches five microservices before returning a 500, logs alone won’t tell you where things went wrong. OpenTelemetry fills that gap by stitching together a full trace across every service boundary.
- Install
OpenTelemetry.Extensions.Hostingand configure exporters to send traces to AWS X-Ray or Jaeger - Propagate
traceparentheaders automatically so every downstream HTTP call and database query gets attached to the originating trace - Use span attributes to capture user IDs, tenant identifiers, or feature flags, making traces searchable by business context
- Set sampling rates carefully in production — 100% sampling on a high-traffic .NET API Kubernetes deployment gets expensive fast; start at 10% and adjust based on error rates
Setting Up Alerting Pipelines to Catch Issues Before They Impact Users
Good alerting catches degradation trends, not just outright failures. Wire Prometheus Alertmanager to your existing incident channels so your team gets actionable notifications rather than noisy dumps.
- Alert on error rate thresholds like
sum(rate(http_requests_total{status=~"5.."}[5m])) / sum(rate(http_requests_total[5m])) > 0.01rather than raw error counts - Set multi-window, multi-burn-rate SLO alerts that page on-call only when real user impact is happening
- Route alerts by severity — Slack for warnings, PagerDuty for critical — so engineers don’t start ignoring notifications
- Include runbook links directly in alert annotations so whoever gets paged knows exactly what to check first
Analyzing Scaling Trends to Continuously Optimize Infrastructure Costs
Autoscaling keeps your .NET API Kubernetes workloads healthy, but without regular cost analysis you’ll end up over-provisioning nodes and quietly burning through your AWS budget.
- Pull Kubernetes resource utilization reports from CloudWatch Container Insights and cross-reference them with your HPA scaling history
- Identify pods with consistently low CPU utilization and right-size their resource requests — oversized requests block efficient bin-packing on EKS nodes
- Use AWS Cost Explorer tags tied to your Kubernetes namespaces to attribute spending by team or service, making accountability clear
- Review scaling events weekly to spot recurring traffic spikes and consider Scheduled Scaling for predictable load patterns, reducing reliance on reactive autoscaling alone

Scaling .NET APIs in production doesn’t have to feel overwhelming. By containerizing your application, deploying it on AWS EKS, and automating your infrastructure with code, you’re setting yourself up for a system that can grow without breaking a sweat. Throw in smart scaling strategies and solid observability practices, and you’ve got a setup that not only handles traffic spikes but also gives you full visibility into what’s happening under the hood.
The best part? Once these pieces are in place, your team spends less time fighting fires and more time shipping features. If you haven’t started yet, pick one piece of this stack and get comfortable with it. Start with containerizing your API, get it running on EKS, and build from there. Every step you take toward this kind of modern infrastructure pays off down the road.