

Stop Letting Your Kubernetes Cluster Turn Into a Mess
If your Kubernetes cluster has grown from a clean setup into something that feels like a cluttered attic, you’re not alone. Teams add workloads, skip cleanup steps, and suddenly nobody knows what’s running where or why resources are getting choked.
This guide is for DevOps engineers, platform teams, and SREs who want to get their clusters back under control — and keep them that way.
Here’s what we’ll walk through:
- Kubernetes namespaces best practices — how to use namespaces to actually isolate workloads and stop teams from stepping on each other
- Kubernetes resource quotas — setting limits that prevent one runaway app from starving everything else
- Kubernetes lifecycle management and cluster maintenance — the ongoing habits that keep your cluster optimized instead of constantly fighting fires
Kubernetes cluster hygiene isn’t a one-time cleanup job. It’s a mindset and a set of practices you build into how your team operates daily. Get this right, and you’ll spend less time debugging weird resource issues and more time shipping things that matter.
Let’s get into it.
Understanding Kubernetes Cluster Hygiene and Why It Matters

The Hidden Costs of a Poorly Maintained Cluster
Runaway pods, orphaned namespaces, and uncapped resource usage quietly drain your infrastructure budget and slow down every team depending on the cluster. Without Kubernetes cluster hygiene, a single misconfigured workload can consume CPU and memory that other critical services desperately need, turning a minor oversight into a full-blown outage.
- Bloated clusters burn cloud spend on idle or forgotten workloads
- Uncontrolled resource consumption leads to noisy-neighbor problems
- Stale configurations create attack surfaces that are easy to exploit
- Debugging becomes painfully slow when namespaces are cluttered and unlabeled
Key Signs Your Cluster Needs a Hygiene Overhaul
If your team is constantly firefighting instead of shipping features, the cluster is probably telling you something. Watch for these red flags:
- Namespaces with no clear ownership — nobody knows who created them or why they still exist
- Pods stuck in CrashLoopBackOff for days without anyone cleaning them up
- No Kubernetes resource quotas set, meaning one team can accidentally starve another
- RBAC rules that grant cluster-admin to half the organization
- Deployments running outdated container images with known vulnerabilities
- Zero visibility into which workloads are actually consuming the most resources
Any one of these alone is a warning sign. Seeing three or more means your cluster maintenance practices need a serious reset.
How Good Hygiene Directly Improves Performance and Security
Clean clusters run faster and stay safer — it really is that straightforward. When you enforce Kubernetes resource quotas, workloads get fair access to compute without stepping on each other. Proper Kubernetes workload isolation through well-structured namespaces means a compromised service can’t easily pivot to sensitive systems. Tight Kubernetes access control policies shrink the blast radius of both accidents and attacks.
- Defined quotas eliminate resource contention and improve scheduling efficiency
- Isolated namespaces through managing Kubernetes namespaces properly reduce lateral movement risks
- Regular lifecycle cleanup cuts API server load and speeds up
kubectlresponse times - Enforced Kubernetes security best practices keep your compliance posture solid without last-minute scrambles
Good Kubernetes cluster optimization isn’t a one-time project — it’s an ongoing discipline that pays dividends every single day your platform runs.
Mastering Namespaces to Organize and Isolate Workloads

What Namespaces Are and How They Create Logical Boundaries
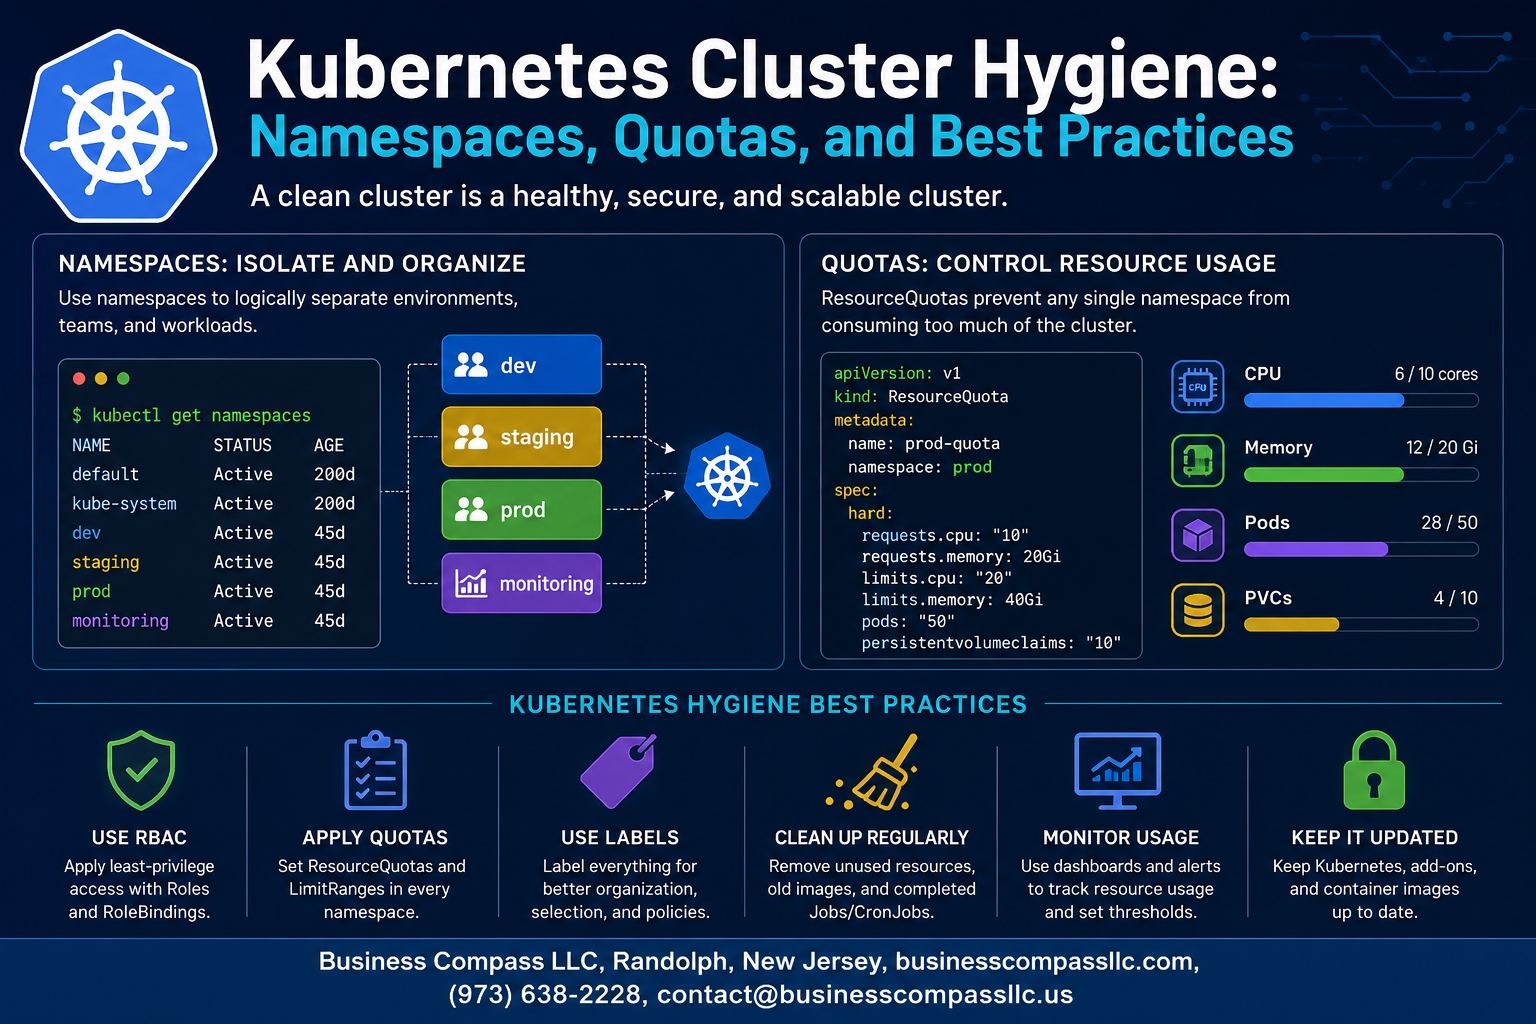
Namespaces in Kubernetes act like invisible walls inside your cluster — they carve up a single physical cluster into multiple virtual ones. Every resource you deploy, from pods to services to config maps, lives inside a namespace. This means teams can work side by side without stepping on each other’s toes.
- Namespaces scope resource names, so two teams can both have a service called
apiwithout conflict - They make it easy to apply policies, quotas, and access rules to a specific group of workloads
- Kubernetes ships with a few default namespaces:
default,kube-system,kube-public, andkube-node-lease— avoid dumping workloads intodefault
Think of namespaces as folders on a shared drive. Without them, everyone tosses files into the same root directory and chaos follows.
Designing a Namespace Strategy That Scales With Your Team
A good namespace strategy grows with your organization rather than fighting it. Start by asking: who owns what, and how do teams collaborate? Your answers will shape your structure.
Common patterns teams use:
- Team-based namespaces — each squad gets their own namespace (
team-payments,team-auth) - Application-based namespaces — group by product or service (
checkout-app,analytics-platform) - Hybrid approach — combine both, like
team-payments-prodorteam-auth-staging
Whichever pattern you pick, keep naming conventions consistent. A namespace called dev-payments and another called payments_development in the same cluster is a headache waiting to happen. Write down your conventions and enforce them early — retrofitting naming standards onto a large cluster is painful.
Kubernetes namespaces best practices also recommend attaching meaningful labels to every namespace so tooling, monitoring, and cost attribution work cleanly from day one.
Separating Environments Like Dev, Staging, and Production Effectively
Kubernetes workload isolation across environments is one of the most impactful things you can do for cluster hygiene. Mixing dev and production workloads in the same namespace is a recipe for accidental outages and security gaps.
Two main approaches:
- Separate namespaces in the same cluster
- Lower infrastructure cost
- Faster to set up
- Risk: a misconfigured quota or network policy can still affect production
- Separate clusters per environment
- Strongest isolation
- Better for regulated industries or large teams
- Higher operational overhead
For most teams, a middle ground works well — separate clusters for production and a shared cluster for lower environments, with namespaces dividing dev from staging within that shared cluster. Always apply stricter resource quotas and access controls in the production namespace, even if you’re on the same cluster as dev.
Avoiding Common Namespace Pitfalls That Cause Confusion
Even with good intentions, teams run into the same traps when managing Kubernetes namespaces.
Pitfalls to watch out for:
- Dumping everything into
default— The default namespace has no quotas, no isolation, and no ownership. Treat it as off-limits for real workloads. - Too many namespaces with no clear ownership — If nobody knows who owns
temp-test-v2-final, it will sit there forever consuming resources. - Skipping network policies — Namespaces alone don’t block network traffic between pods. You need explicit
NetworkPolicyresources to achieve real Kubernetes workload isolation. - Forgetting to clean up — Old feature-branch namespaces accumulate and bloat your cluster. Automate deletion with TTL annotations or a namespace lifecycle tool.
- Inconsistent labeling — Without labels like
environment,team, orcost-center, filtering, monitoring, and access control become messy and error-prone.
Managing Kubernetes namespaces well is less about the technology and more about agreeing on rules early and actually sticking to them as your team grows.
Enforcing Resource Quotas to Prevent Waste and Bottlenecks

How Resource Quotas Protect Cluster Stability
Without resource quotas in place, a single misbehaving application or team can quietly consume CPU and memory until the entire cluster starts struggling. Kubernetes resource quotas act like guardrails — they cap what any given namespace can consume, so one noisy neighbor doesn’t starve everyone else’s workloads.
- Quotas prevent runaway pods from monopolizing shared infrastructure
- They make resource planning predictable across teams
- They give platform engineers clear visibility into consumption patterns
Setting CPU and Memory Limits That Reflect Real Workload Needs
The biggest mistake teams make is copying default values without actually profiling their applications. Setting CPU and memory limits based on real usage data — not guesswork — keeps workloads healthy without over-provisioning.
- Run workloads in staging and observe actual peak consumption
- Add a 20–30% buffer above observed peaks to handle traffic spikes
- Revisit limits every quarter as applications evolve
apiVersion: v1
kind: ResourceQuota
metadata:
  name: team-quota
  namespace: team-alpha
spec:
  hard:
    requests.cpu: "4"
    requests.memory: 8Gi
    limits.cpu: "8"
    limits.memory: 16Gi
Using LimitRange to Control Individual Pod Resource Consumption
ResourceQuota manages the namespace ceiling, but LimitRange handles per-pod and per-container boundaries. Without LimitRange, developers can accidentally deploy a container with no resource requests, which breaks the scheduler’s ability to place pods intelligently.
- Set default requests and limits so every container gets sensible baselines automatically
- Define minimum and maximum values to prevent both starvation and resource hogging
- Apply LimitRange objects during namespace creation as part of your standard Kubernetes cluster hygiene checklist
apiVersion: v1
kind: LimitRange
metadata:
  name: container-limits
  namespace: team-alpha
spec:
  limits:
  - type: Container
    default:
      cpu: 500m
      memory: 256Mi
    defaultRequest:
      cpu: 250m
      memory: 128Mi
    max:
      cpu: "2"
      memory: 2Gi
Monitoring Quota Usage to Catch Issues Before They Escalate
Quotas are only useful if someone is actually watching them. Teams that ignore quota metrics often discover problems only when deployments start failing because the namespace has hit its ceiling.
- Use
kubectl describe resourcequota -n <namespace>for a quick snapshot - Integrate quota metrics into Prometheus and build Grafana dashboards for real-time visibility
- Set alerts when namespace usage crosses 80% of any quota threshold — that gives teams time to react before hitting the hard limit
- Pair quota monitoring with Kubernetes cluster optimization workflows so capacity reviews happen on a regular cadence
Balancing Resource Fairness Across Multiple Teams and Projects
When multiple teams share a cluster, resource fairness becomes a real conversation. Some teams run batch jobs that spike briefly; others run steady-state services. A one-size-fits-all quota strategy doesn’t work well here.
- Segment namespaces by team, environment, or project to apply targeted quotas
- Use priority classes to make sure critical production workloads can always get resources even when the cluster is busy
- Hold regular reviews with team leads to adjust quotas based on actual growth — not assumptions
- Document quota decisions so every team understands the reasoning behind their allocation
Strengthening Security Through Access Controls and Policies

Applying RBAC to Limit Who Can Do What in Each Namespace
Role-Based Access Control (RBAC) is your first line of defense for Kubernetes access control policies. By defining Roles and RoleBindings scoped to specific namespaces, you make sure developers, CI/CD pipelines, and service accounts only touch what they actually need.
- Role: Defines permissions (verbs like
get,list,create,delete) on specific resources within a namespace - ClusterRole: Same idea, but applies cluster-wide — useful for admins or monitoring tools
- RoleBinding: Ties a Role to a user, group, or service account within a namespace
- ClusterRoleBinding: Grants cluster-wide permissions — use sparingly
A solid starting point is the principle of least privilege — grant only the permissions a subject needs to do its job, nothing more. Here’s a simple example:
apiVersion: rbac.authorization.k8s.io/v1
kind: Role
metadata:
  namespace: team-alpha
  name: pod-reader
rules:
- apiGroups: [""]
  resources: ["pods"]
  verbs: ["get", "list", "watch"]
Audit your RBAC bindings regularly. Tools like kubectl auth can-i and open-source projects like rbac-lookup help you spot overly permissive roles before they become a problem.
Using Network Policies to Control Traffic Between Workloads
By default, Kubernetes workload isolation at the network level is basically non-existent — every pod can talk to every other pod. Network Policies change that by letting you define exactly which pods can communicate with each other, and over which ports and protocols.
Think of Network Policies as firewall rules for your cluster’s internal traffic. A few patterns worth knowing:
- Default deny all ingress: Block all incoming traffic to a namespace unless explicitly allowed
- Allow only specific namespaces: Limit cross-namespace communication to trusted sources
- Port-specific rules: Open only the ports a service genuinely needs
apiVersion: networking.k8s.io/v1
kind: NetworkPolicy
metadata:
  name: deny-all-ingress
  namespace: production
spec:
  podSelector: {}
  policyTypes:
  - Ingress
Keep in mind that Network Policies require a CNI plugin that supports them — Calico, Cilium, and Weave Net are popular choices. Without a compatible CNI, the policies exist in your cluster but do absolutely nothing.
Enforcing Pod Security Standards to Reduce Attack Surfaces
Kubernetes security best practices strongly recommend locking down how pods are configured at runtime. Pod Security Standards (PSS) replaced the deprecated PodSecurityPolicy (PSP) and come in three levels:
| Level | Description |
|---|---|
| Privileged | No restrictions — only for trusted system workloads |
| Baseline | Blocks known privilege escalation paths; good for most apps |
| Restricted | Heavily locked down; follows current hardening best practices |
You apply these standards at the namespace level using labels:
apiVersion: v1
kind: Namespace
metadata:
  name: secure-apps
  labels:
    pod-security.kubernetes.io/enforce: restricted
    pod-security.kubernetes.io/warn: restricted
    pod-security.kubernetes.io/audit: restricted
The enforce mode blocks non-compliant pods outright, while warn and audit give you visibility without breaking deployments — a great way to roll things out gradually. Aim to run most production workloads under at least the baseline standard, and push toward restricted wherever possible to genuinely shrink your attack surface.
Keeping Your Cluster Clean with Lifecycle Management

Removing Unused Namespaces, Deployments, and Stale Resources
Dead weight in your cluster is more than just clutter — it quietly drains CPU, memory, and storage while making troubleshooting a nightmare. Regularly scan for:
- Orphaned namespaces left behind after project shutdowns
- Completed or failed jobs that never got cleaned up
- Unused ConfigMaps, Secrets, and PersistentVolumeClaims tied to deleted workloads
- Stale deployments running zero replicas but still consuming namespace-level quota
A quick kubectl get all --all-namespaces combined with label-based filtering gives you a solid starting point for spotting resources that have outlived their purpose.
Automating Cleanup Tasks to Reduce Manual Overhead
Manual cleanup doesn’t scale. As your cluster grows, you need automation doing the heavy lifting. Tools worth adding to your Kubernetes lifecycle management toolkit:
- kubectl-neat + CronJobs — schedule periodic sweeps to delete completed pods and old replica sets
- Argo CD or Flux — GitOps-driven reconciliation prevents configuration drift and removes resources no longer declared in source control
- kube-janitor — a lightweight controller that watches for annotated resources and removes them on a schedule
Automation keeps Kubernetes cluster hygiene consistent without depending on someone remembering to run cleanup scripts.
Implementing Resource Expiration Policies for Short-Lived Workloads
Not every workload is meant to live forever — feature branches, load tests, and ephemeral dev environments all have a natural end date. Tag these resources from the start using annotations like:
janitor/ttl: "24h"
janitor/expires: "2024-12-31"
Pair expiration annotations with namespace-level resource quotas so that short-lived workloads can’t quietly balloon and crowd out production traffic before anyone notices they’re still running.
Scheduling Regular Audits to Maintain Long-Term Cluster Health
Kubernetes cluster maintenance isn’t a one-time task — it’s an ongoing habit. Build audits into your team’s regular workflow by:
- Running Popeye or Kube-score weekly to catch misconfigurations and resource inefficiencies
- Reviewing namespace-level quota consumption monthly to right-size limits
- Checking RBAC bindings and service accounts quarterly to remove permissions tied to departed team members or decommissioned services
- Keeping a cluster changelog so you always know what changed, when, and why
Consistent auditing is what separates a well-tuned cluster from one that becomes a mystery box over time.
Adopting Proven Best Practices for Ongoing Cluster Maintenance

Standardizing Labels and Annotations for Better Resource Visibility
Good Kubernetes cluster maintenance starts with consistent labeling. When every resource carries meaningful labels like env, team, app, and version, you can quickly filter, monitor, and troubleshoot without playing guessing games. Annotations add extra context — think runbook URLs, cost center codes, or oncall contacts — making resources self-documenting.
Recommended label standards to adopt:
app.kubernetes.io/name— the application nameapp.kubernetes.io/owner— the team responsibleapp.kubernetes.io/environment— staging, production, devapp.kubernetes.io/version— current deployment version
Leveraging GitOps to Enforce Consistent Configuration Across Environments
GitOps tools like ArgoCD or Flux treat your Git repository as the single source of truth. Every namespace definition, quota, and policy lives in version-controlled manifests, meaning configuration drift gets caught automatically. If someone manually tweaks a resource limit in production, GitOps reconciliation flags or reverts it immediately, keeping your Kubernetes cluster optimization goals on track.
Key GitOps habits that pay off:
- Store all namespace and quota manifests in dedicated directories per environment
- Use branch protection rules to require peer review before merging cluster changes
- Enable automated sync with reconciliation alerts for drift detection
Integrating Hygiene Checks into Your CI/CD Pipeline
Your CI/CD pipeline is the perfect enforcement point for Kubernetes cluster hygiene. Tools like kube-score, Polaris, and OPA Conftest can scan manifests before they ever reach the cluster, catching missing resource limits, absent security contexts, or unlabeled workloads early.
Practical checks to embed in your pipeline:
- Validate resource requests and limits are defined on every container
- Confirm namespace-level labels match your organization’s standards
- Block deployments that lack
readinessProbeorlivenessProbedefinitions - Scan for overly permissive RBAC roles as part of Kubernetes access control policies review

Keeping a Kubernetes cluster in good shape isn’t a one-time task — it’s an ongoing habit. From using namespaces to keep workloads organized and isolated, to setting resource quotas that stop one team or app from hogging everything, to locking down access with solid security policies, every piece plays a role in keeping things running smoothly. Add in regular lifecycle management and you’ve got a cluster that’s clean, efficient, and far less likely to surprise you at 2 AM.
The good news is that none of this has to be overwhelming. Start small — get your namespaces in order, set some basic quotas, and build from there. The best practices covered here aren’t just theory; they’re the kind of habits that make a real difference over time. The teams that treat cluster hygiene as a routine part of their workflow are the ones that spend less time firefighting and more time shipping. Pick one area to improve this week and keep the momentum going.