

Stop Clicking Through the AWS Console — Let Terraform Do It
If you’ve ever manually configured an AWS Network Load Balancer and thought “there has to be a better way,” you’re right. Managing cloud infrastructure by hand is slow, error-prone, and nearly impossible to scale across teams. That’s exactly where AWS Network Load Balancer Terraform automation comes in.
This guide is for DevOps engineers, cloud architects, and developers who want to move away from point-and-click AWS setups and start treating infrastructure like code. Whether you’re spinning up your first NLB or trying to standardize deployments across multiple environments, this walkthrough has something concrete for you.
Here’s what we’ll cover:
- Getting your Terraform environment ready for AWS — the right way, without cutting corners on state management or credentials
- Building and optimizing your NLB configuration in Terraform — from core listener and target group resources to performance tuning that actually matters at scale
- Packaging everything into reusable NLB Terraform modules — so your team can deploy consistent, scalable AWS infrastructure without starting from scratch every time
By the end, you’ll have a working Terraform IaC deployment pattern for AWS Network Load Balancers that you can test, validate, and ship with confidence. Let’s get into it.
Understanding AWS Network Load Balancers and Their Business Value

Key Advantages of NLBs Over Other AWS Load Balancer Types
AWS Network Load Balancers operate at Layer 4 of the OSI model, handling TCP, UDP, and TLS traffic with exceptional speed. Unlike Application Load Balancers (ALBs), NLBs skip deep packet inspection, which means they can process millions of requests per second while maintaining ultra-low latency — often under 100 milliseconds.
Here’s what makes NLBs stand out:
- Static IP addresses — Each NLB gets a fixed IP per Availability Zone, making firewall rules and client whitelisting straightforward
- Extreme throughput — NLBs handle sudden, volatile traffic spikes without pre-warming, something ALBs struggle with
- TLS passthrough — Traffic can be passed directly to backend targets without terminating at the load balancer, keeping encryption intact end-to-end
- Preserve source IP — Backend servers see the actual client IP without extra configuration headers
Common Use Cases That Benefit Most From NLB Deployments
NLBs shine brightest in specific scenarios where raw performance and protocol flexibility matter more than HTTP-level routing logic.
- Real-time gaming servers requiring persistent TCP connections and sub-millisecond response consistency
- Financial trading platforms where even microseconds of added latency translate directly to lost revenue
- IoT device fleets communicating over MQTT or custom UDP protocols
- VoIP and media streaming applications that rely on UDP for efficient packet delivery
- Microservices exposing gRPC APIs where HTTP/2 connections need to stay alive and performant
- AWS PrivateLink services that require NLBs as the underlying infrastructure to expose services across VPC boundaries
Why Manual NLB Configuration Creates Costly Bottlenecks
Clicking through the AWS console to set up an NLB sounds simple enough for a single environment. The real pain hits when you need to replicate that setup across dev, staging, and production — or when a teammate makes an undocumented change that breaks traffic routing at 2 AM.
Manual configuration creates problems that compound over time:
- No version history — Console changes leave no audit trail, making rollbacks nearly impossible without guesswork
- Human error at scale — A misconfigured health check threshold or wrong target group port can silently degrade traffic routing
- Slow environment provisioning — Spinning up a new environment manually takes hours instead of minutes
- Configuration drift — Production ends up looking nothing like staging because each was built by hand at different times
- Knowledge silos — Only the person who built it understands the full setup, creating a single point of failure on your team
Automating AWS load balancer setup with Terraform eliminates these problems by treating your NLB configuration as versioned, reviewable, repeatable code — the same way you’d handle application source code.
Setting Up Your Terraform Environment for AWS

Installing and Configuring Terraform with the AWS Provider
Getting Terraform talking to AWS is straightforward once you have the right pieces in place. Start by downloading Terraform from HashiCorp’s official site and adding it to your system PATH. Then, in your project root, create a providers.tf file that pins the AWS provider version:
terraform {
  required_providers {
    aws = {
      source  = "hashicorp/aws"
      version = "~> 5.0"
    }
  }
}

provider "aws" {
  region = var.aws_region
}
Organizing Your Project Directory for Scalable IaC Workflows
A clean directory structure saves you headaches down the road, especially when your AWS Network Load Balancer Terraform configs grow across multiple environments. Here’s a layout that works well in practice:
project-root/
├── modules/
│   └── nlb/
│       ├── main.tf
│       ├── variables.tf
│       └── outputs.tf
├── environments/
│   ├── dev/
│   │   ├── main.tf
│   │   └── terraform.tfvars
│   └── prod/
│       ├── main.tf
│       └── terraform.tfvars
├── providers.tf
└── backend.tf
- Keep environment-specific values in
terraform.tfvarsfiles - Put reusable NLB logic inside the
modules/nlb/directory - Separate provider and backend configs from your resource definitions
Configuring AWS Credentials and Backend State Storage Securely
Never hardcode AWS credentials in your Terraform files. Instead, pick one of these approaches:
- Environment variables:
AWS_ACCESS_KEY_IDandAWS_SECRET_ACCESS_KEY - AWS CLI profiles: Run
aws configure --profile myprofileand reference it in your provider block withprofile = "myprofile" - IAM roles: The cleanest option when running Terraform IaC deployment from CI/CD pipelines like GitHub Actions or AWS CodeBuild
For remote state, use an S3 backend with DynamoDB locking to keep your team’s deployments from stomping on each other:
terraform {
  backend "s3" {
    bucket         = "my-terraform-state-bucket"
    key            = "nlb/terraform.tfstate"
    region         = "us-east-1"
    dynamodb_table = "terraform-state-lock"
    encrypt        = true
  }
}
Make sure the S3 bucket has versioning turned on so you can roll back state files if something goes sideways.
Essential Terraform Version Requirements for NLB Compatibility
Running outdated Terraform versions against modern AWS NLB features is a recipe for cryptic errors. Here’s what you need to keep in mind:
- Terraform >= 1.3.0 is the minimum for stable NLB support, including cross-zone load balancing toggles
- AWS Provider >= 4.x brought full support for
aws_lb,aws_lb_listener, andaws_lb_target_groupresources used in Terraform NLB configuration - AWS Provider >= 5.0 added support for newer NLB attributes like
dns_record_client_routing_policyand improved target group health check options
Pin your versions tightly in required_providers and use a .terraform.lock.hcl file committed to version control, so every team member and CI runner pulls the exact same provider binary. Running terraform version and terraform providers regularly keeps you from chasing down version mismatch bugs mid-deployment.
Building Core NLB Resources with Terraform

Defining the NLB Resource Block with Critical Configuration Options
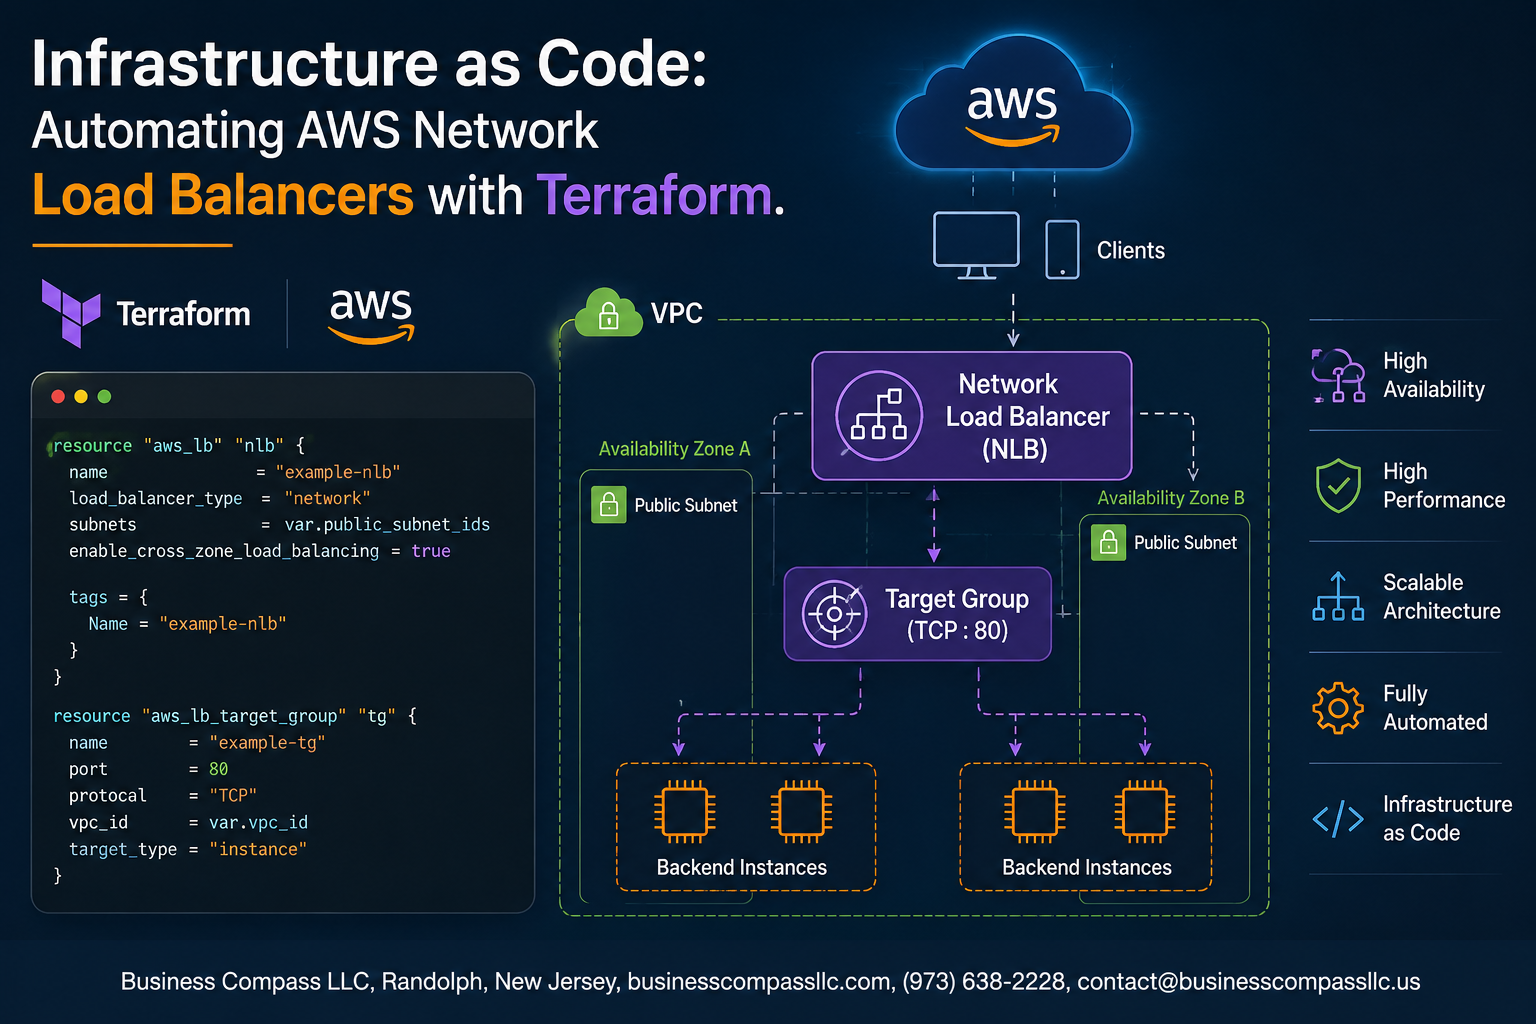
When building an AWS Network Load Balancer Terraform configuration, the aws_lb resource block is your starting point. You’ll set load_balancer_type = "network", choose between internal or internet-facing schemes, and pin down your VPC subnets right here.
resource "aws_lb" "main" {
  name               = "my-nlb"
  internal           = false
  load_balancer_type = "network"
  subnets            = var.public_subnet_ids

  enable_cross_zone_load_balancing = true
  enable_deletion_protection       = false

  tags = {
    Environment = var.environment
    ManagedBy   = "Terraform"
  }
}
Key attributes to get right:
enable_cross_zone_load_balancing— distributes traffic evenly across all registered targets in all enabled AZsenable_deletion_protection— settruein production to prevent accidental teardownssubnet_mappingblock — needed when you want to assign Elastic IPs to your NLB for static IP addresses
Creating Target Groups to Route Traffic Efficiently
Target groups are where your traffic actually lands. The aws_lb_target_group resource controls health checks, protocols, and how backends get selected during Terraform NLB configuration.
resource "aws_lb_target_group" "app" {
  name        = "app-tg"
  port        = 80
  protocol    = "TCP"
  vpc_id      = var.vpc_id
  target_type = "instance"

  health_check {
    protocol            = "TCP"
    interval            = 30
    healthy_threshold   = 3
    unhealthy_threshold = 3
  }
}
Things worth getting right here:
target_typeacceptsinstance,ip, orlambda— pick based on your backend architecture- NLB health checks support
TCP,HTTP, andHTTPS— HTTP/HTTPS gives you path-based checks for smarter monitoring deregistration_delaydefaults to 300 seconds; dropping it to 30–60 seconds speeds up deployments without dropping active connections
Configuring Listeners to Handle Incoming Connection Rules
Listeners define which port the NLB watches and where it sends traffic. In Terraform AWS networking, the aws_lb_listener resource ties your load balancer to a target group.
resource "aws_lb_listener" "tcp_80" {
  load_balancer_arn = aws_lb.main.arn
  port              = 80
  protocol          = "TCP"

  default_action {
    type             = "forward"
    target_group_arn = aws_lb_target_group.app.arn
  }
}

resource "aws_lb_listener" "tls_443" {
  load_balancer_arn = aws_lb.main.arn
  port              = 443
  protocol          = "TLS"
  ssl_policy        = "ELBSecurityPolicy-TLS13-1-2-2021-06"
  certificate_arn   = var.acm_certificate_arn

  default_action {
    type             = "forward"
    target_group_arn = aws_lb_target_group.app.arn
  }
}
Quick notes:
- NLB supports
TCP,UDP,TCP_UDP, andTLSprotocols — no HTTP/HTTPS like ALB - For TLS termination, always reference an ACM certificate and pick a modern SSL policy
- You can stack multiple listeners on different ports pointing to different target groups
Attaching EC2 Instances or IP Targets to Your Target Groups
The aws_lb_target_group_attachment resource handles registering your backends. This works whether you’re attaching EC2 instance IDs or direct IP addresses — great for container workloads or scalable AWS infrastructure Terraform setups.
resource "aws_lb_target_group_attachment" "app_servers" {
  count            = length(var.instance_ids)
  target_group_arn = aws_lb_target_group.app.arn
  target_id        = var.instance_ids[count.index]
  port             = 80
}
For IP-based targets (ECS Fargate, Lambda, or cross-VPC):
resource "aws_lb_target_group_attachment" "fargate_tasks" {
  target_group_arn  = aws_lb_target_group.app.arn
  target_id         = "10.0.1.45"
  port              = 8080
  availability_zone = "us-east-1a"
}
Practical tips:
- Use
for_eachovercountwhen your instance list might change — it avoids index shifting issues during updates - When
target_type = "ip", specifyavailability_zoneto control cross-zone routing behavior - In auto-scaling setups, skip manual attachments and use
aws_autoscaling_attachmentto keep things dynamic
Managing Security Groups and VPC Subnet Associations
NLBs behave differently from ALBs here — by default, NLBs don’t have security groups at all. Traffic filtering happens at the instance/target level. That said, AWS added security group support for NLBs (available in newer configurations), and Terraform handles this cleanly.
resource "aws_security_group" "nlb_sg" {
  name   = "nlb-sg"
  vpc_id = var.vpc_id

  ingress {
    from_port   = 80
    to_port     = 80
    protocol    = "tcp"
    cidr_blocks = ["0.0.0.0/0"]
  }

  egress {
    from_port   = 0
    to_port     = 0
    protocol    = "-1"
    cidr_blocks = ["0.0.0.0/0"]
  }
}

resource "aws_lb" "main" {
  name               = "my-nlb"
  load_balancer_type = "network"
  subnets            = var.subnet_ids
  security_groups    = [aws_security_group.nlb_sg.id]
}
Subnet and VPC considerations:
- Always place NLBs in at least two subnets across different AZs for high availability
- Use
subnet_mappingwithallocation_idto assign Elastic IPs when clients need to whitelist static IPs - For internal NLBs, use private subnets — your backends stay off the public internet entirely
- Reference subnets using data sources (
aws_subnet) rather than hardcoding IDs to keep configurations portable across environments
Optimizing NLB Performance Through Terraform Configuration

Enabling Cross-Zone Load Balancing for Higher Availability
When running an AWS Network Load Balancer Terraform setup, cross-zone load balancing is one of those settings you really don’t want to skip. It spreads traffic evenly across all registered targets in every Availability Zone, which means no single zone gets hammered while others sit idle.
resource "aws_lb" "nlb" {
  name                             = "my-network-lb"
  internal                        = false
  load_balancer_type              = "network"
  enable_cross_zone_load_balancing = true
  subnets                         = var.subnet_ids
}
- Eliminates uneven traffic distribution across AZs
- Reduces the risk of hotspots during traffic spikes
- Particularly valuable in multi-AZ deployments where target counts differ per zone
Tuning Health Check Settings to Reduce Downtime Risk
Health checks are your first line of defense against routing traffic to unhealthy targets. In your Terraform NLB configuration, dialing in the right thresholds makes a huge difference between catching a failure fast and letting bad traffic linger.
health_check {
  protocol            = "TCP"
  port                = "traffic-port"
  healthy_threshold   = 3
  unhealthy_threshold = 3
  interval            = 10
}
interval: How often the NLB pings your targets — lower values catch failures fasterhealthy_threshold: Consecutive successes needed before marking a target healthyunhealthy_threshold: Consecutive failures before pulling a target from rotation
Keeping interval at 10 seconds paired with a threshold of 3 gives you a solid 30-second detection window without being overly aggressive.
Configuring Connection Draining to Protect Active Sessions
Connection draining (called deregistration delay in AWS terms) lets in-flight requests finish up before a target gets pulled out of rotation. This is critical for AWS NLB performance optimization, especially in environments handling long-lived TCP connections like database proxies or file transfers.
resource "aws_lb_target_group" "nlb_tg" {
  name        = "nlb-target-group"
  port        = 80
  protocol    = "TCP"
  vpc_id      = var.vpc_id
  target_type = "instance"

  deregistration_delay = 300

  health_check {
    protocol = "TCP"
    interval = 10
  }
}
deregistration_delayaccepts values between0and3600seconds- Set it lower (60–90 seconds) for short-lived HTTP connections
- Push it higher (300+ seconds) when protecting persistent sessions like WebSockets or database connections
- Setting it to
0forces immediate termination — only appropriate for stateless workloads
Balancing this value properly inside your Terraform AWS networking configuration keeps deployments clean and prevents dropped sessions during scaling events or rolling updates.
Implementing Reusable and Scalable Terraform Modules

Structuring NLB Configurations as Shareable Modules
Building your AWS Network Load Balancer Terraform setup as a reusable module means you write the logic once and drop it into any project. A clean module structure looks like this:
modules/
  nlb/
    main.tf
    variables.tf
    outputs.tf
    versions.tf
Keep your main.tf focused strictly on NLB resources — the load balancer itself, target groups, and listeners. This separation makes it dead simple for teammates to pick up the module without digging through tangled code.
Using Input Variables to Support Multiple Environments
Input variables are what make your NLB Terraform modules actually flexible. Instead of hardcoding values, expose everything environment-specific as a variable:
variable "environment" {
  description = "Deployment environment (dev, staging, prod)"
  type        = string
}

variable "internal" {
  description = "Whether the NLB is internal or internet-facing"
  type        = bool
  default     = false
}

variable "target_port" {
  description = "Port for target group"
  type        = number
  default     = 443
}
Your terraform.tfvars files per environment then handle the differences cleanly, keeping the core module untouched.
Leveraging Outputs to Integrate NLB Data Across Your Infrastructure
Outputs are how your Terraform AWS networking module talks to everything else. Expose the values other teams or modules will need:
output "nlb_arn" {
  value = aws_lb.this.arn
}

output "nlb_dns_name" {
  value = aws_lb.this.dns_name
}

output "target_group_arn" {
  value = aws_lb_target_group.this.arn
}
These outputs plug directly into Route 53 records, ECS services, or Auto Scaling groups without anyone needing to look up resource names manually.
Versioning Modules to Maintain Consistent Deployments
Pinning module versions protects your scalable AWS infrastructure Terraform setup from unexpected breaking changes. When you call the module, always reference a specific tag:
module "nlb" {
  source  = "git::https://github.com/your-org/terraform-aws-nlb.git?ref=v1.3.0"
  environment  = "production"
  internal     = false
  target_port  = 443
}
- Tag every release using semantic versioning (
v1.0.0,v1.1.0) - Document breaking changes in a
CHANGELOG.md - Test new versions in staging before bumping production references
This way, production never gets surprised by a module update someone pushed on a Tuesday afternoon.
Testing, Validating, and Deploying Your Terraform NLB Configuration

Running terraform plan to Catch Errors Before Deployment
Before pushing any AWS Network Load Balancer Terraform configuration live, always run terraform plan first. This command previews every change Terraform intends to make, flags misconfigurations, and highlights resource drift — saving you from costly rollbacks in production.
- Run
terraform plan -out=nlb.tfplanto save the execution plan for later use - Review listener protocol mismatches, missing target group attachments, and subnet conflicts
- Use
-var-file=env/prod.tfvarsto test environment-specific values before applying
Automating Infrastructure Testing with Tools Like Terratest
Terratest lets you write Go-based tests that spin up real AWS infrastructure, validate behavior, then tear everything down automatically — perfect for catching subtle NLB routing or health-check issues that static analysis misses.
- Write test cases that confirm NLB listeners respond on expected ports
- Validate target group health check paths and thresholds programmatically
- Integrate Terratest into your CI/CD pipeline so every pull request triggers an automated Terraform IaC deployment validation
Applying Changes Safely Using Workspaces and Staged Deployments
Terraform workspaces let you maintain separate state files for dev, staging, and production, meaning you can test your Terraform NLB configuration in a lower environment before it ever touches production traffic.
- Create workspaces with
terraform workspace new staging - Deploy NLB changes to staging first, run smoke tests, then promote to production
- Use remote state backends like S3 with DynamoDB locking to prevent simultaneous conflicting applies across teams

Managing AWS Network Load Balancers with Terraform doesn’t have to be complicated. By treating your infrastructure as code, you get consistency, repeatability, and the ability to spin up or tear down environments without the usual manual headaches. From setting up your Terraform environment to building reusable modules and fine-tuning performance settings, every step brings you closer to infrastructure that practically manages itself.
Start small if you need to — get a basic NLB configuration working, validate it thoroughly, then layer in the optimizations and modular structure as your confidence grows. The real payoff comes when your team can deploy reliable, scalable load balancing across multiple environments with a single command. That’s the kind of efficiency that makes a genuine difference in day-to-day operations, and it’s well within reach with the right Terraform setup.