

Stop Emailing Files Back and Forth — Build a Secure Shared File Server on AWS EC2 with NFS
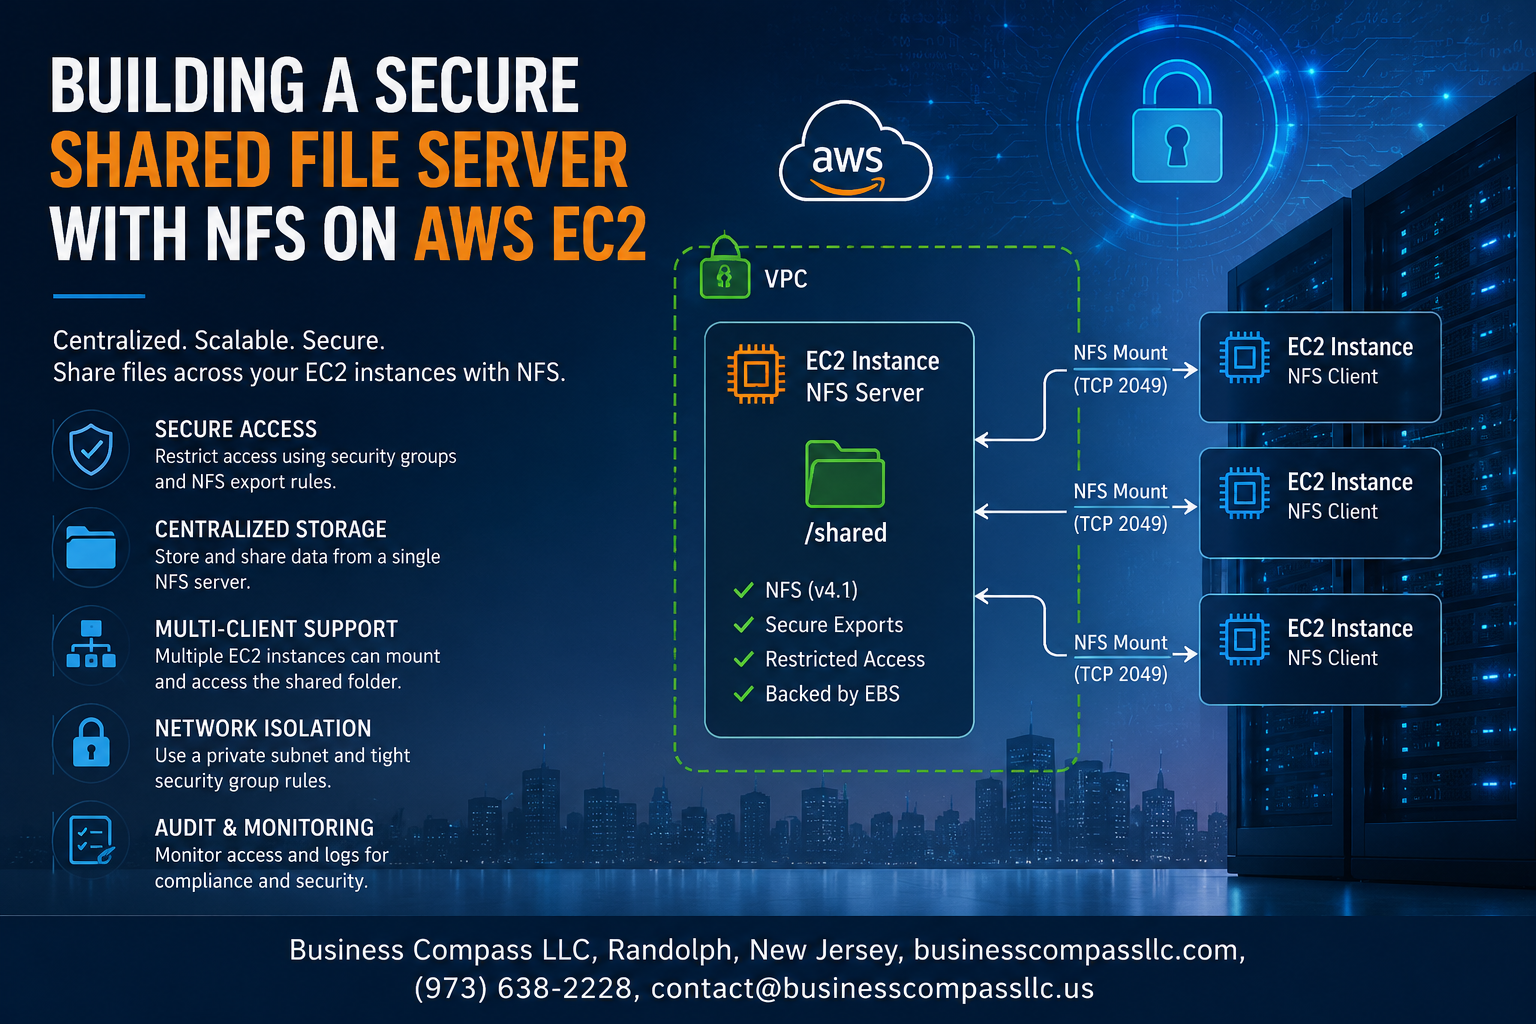
If you’re managing multiple EC2 instances that need access to the same files, copying data manually or syncing buckets gets old fast. A proper NFS server setup on AWS EC2 solves that problem cleanly — one central location, multiple clients, real-time access.
This guide is for Linux system administrators, DevOps engineers, and cloud architects who want a reliable, production-ready shared file system without overpaying for managed services.
Here’s what we’ll walk through together:
- Setting up and configuring your NFS server on a Linux EC2 instance — from installing the right packages to writing your exports file correctly
- Connecting your EC2 NFS clients so they can mount and access shared directories without headaches
- Locking things down with NFS server security hardening — because an open NFS share on a cloud server is asking for trouble, and AWS gives you solid tools to prevent it
By the end, you’ll have a working AWS EC2 shared file server that’s secure, tuned for performance, and ready to handle real workloads. No fluff — just the steps that actually matter.
Let’s get into it.
Understanding the Core Components of NFS on AWS EC2
What NFS Is and Why It Simplifies File Sharing
Network File System (NFS) lets multiple machines share files over a network as if those files lived locally on each machine. Instead of copying data back and forth manually, every connected client reads and writes to one central location, cutting down on duplication and keeping everyone working from the same source of truth.
How EC2 Instances Support NFS for Scalable Storage
AWS EC2 instances run Linux environments that natively support NFS, making an NFS server setup on AWS EC2 straightforward without extra licensing or proprietary software. You can spin up instances of varying sizes depending on your workload, and because EC2 lives inside a VPC, you get granular control over which instances can actually mount your shared storage through security groups and network ACLs.
Key Benefits of Hosting a Shared File Server on AWS
Hosting an AWS EC2 shared file server gives you on-demand scalability, pay-as-you-go pricing, and the ability to place your NFS server in the same region or availability zone as your clients, slashing latency. Pair that with AWS’s built-in redundancy options and the flexibility of secure file sharing on AWS, and you get a setup that’s genuinely hard to beat compared to managing physical hardware in a traditional data center.
Setting Up Your AWS EC2 Environment for NFS
Choosing the Right EC2 Instance Type and OS
For an NFS server setup on AWS EC2, a t3.medium or m5.large instance works well for most workloads, balancing cost and performance. Amazon Linux 2 or Ubuntu 22.04 LTS are solid choices since both have strong NFS package support and regular security patches baked in.
Configuring Security Groups to Control Access
Your security group is basically the bouncer for your secure file sharing on AWS setup. Open port 2049 (NFS) only to trusted client IP ranges or specific VPC CIDR blocks — never to 0.0.0.0/0. Also allow ports 111 (portmapper) for NFS v3 if needed. Keeping this tight is the backbone of NFS server security hardening.
Allocating and Attaching Storage for Shared Files
Attach an EBS volume (gp3 recommended) to your EC2 instance for shared storage. Format it with ext4 or xfs, then mount it at a dedicated path like /srv/nfs/shared. EBS gp3 gives you predictable IOPS and throughput, which directly impacts your AWS file server performance optimization down the line.
Assigning Elastic IPs for Stable Server Connectivity
Without an Elastic IP, your AWS EC2 shared file server gets a new public IP every restart, which breaks client mounts completely. Allocate an Elastic IP from the EC2 console and associate it with your NFS server instance. Clients can then reliably NFS mount EC2 instances using a consistent address that never changes unexpectedly.
Installing and Configuring NFS Server on EC2
A. Installing the NFS Kernel Server Package
On your EC2 instance running Ubuntu or Debian, run sudo apt update && sudo apt install nfs-kernel-server -y to get the NFS server package installed. For Amazon Linux or RHEL-based systems, swap that out for sudo yum install nfs-utils -y. Once the package downloads and installs, the NFS daemon binaries are ready on your machine.
B. Defining Export Directories for Shared Access
Create the directory you want to share — something like sudo mkdir -p /mnt/shared — then open /etc/exports with your preferred editor. Add a line following this pattern: /mnt/shared 10.0.1.0/24(rw,sync,no_subtree_check). This tells the NFS server exactly which directory to broadcast and which IP range gets access, keeping your NFS configuration on Linux EC2 tight and intentional.
C. Setting Permissions to Protect Shared Resources
Run sudo chown nobody:nogroup /mnt/shared and sudo chmod 755 /mnt/shared to lock down ownership properly. Using nobody:nogroup prevents remote users from inheriting unintended privileges, which is a straightforward win for secure file sharing on AWS without adding unnecessary complexity.
D. Starting and Enabling the NFS Service Automatically
After saving your exports file, apply changes with sudo exportfs -a, then start the service using sudo systemctl start nfs-kernel-server. To make sure NFS survives reboots automatically, run sudo systemctl enable nfs-kernel-server. Your AWS EC2 shared file server is now live and persistent across instance restarts.
E. Verifying the Server Is Broadcasting Exports Correctly
From the server itself, run showmount -e localhost to confirm the NFS server is broadcasting the right directories. You should see your /mnt/shared path listed with the allowed subnet. If the output looks clean and matches your /etc/exports entries, your NFS server setup on AWS EC2 is working exactly as expected.
Connecting NFS Clients to the Shared File Server
Installing NFS Client Tools on Remote Instances
On each EC2 instance that needs access to the shared file server, run sudo apt install nfs-common -y on Ubuntu or sudo yum install nfs-utils -y on Amazon Linux. These packages give your EC2 NFS client setup everything needed to talk to the server and mount remote directories cleanly.
Mounting the NFS Share for Immediate File Access
Once the tools are in place, create a local mount point with sudo mkdir -p /mnt/shared, then mount the NFS share using sudo mount -t nfs server-ip:/exported/path /mnt/shared. This gives you instant access to the shared files across your NFS mount EC2 instances without any reboot required.
Automating Mounts at Boot with fstab Configuration
To make the mount survive reboots, open /etc/fstab and add a line like server-ip:/exported/path /mnt/shared nfs defaults,_netdev 0 0. The _netdev option tells the system to wait for network availability before mounting, which is critical in an AWS EC2 shared file server environment where the network initializes slightly after boot begins.
Hardening Security to Protect Your NFS File Server
A. Restricting NFS Exports to Trusted IP Ranges
Locking down your /etc/exports file is one of the smartest moves you can make when hardening your NFS server setup on AWS EC2. Instead of exporting shares to the entire network, pin them down to specific, trusted IP ranges or CIDR blocks that match your EC2 client instances. A configuration like /shared 10.0.1.0/24(rw,sync,no_subtree_check) means only machines in that subnet can even knock on the door, dramatically cutting your attack surface for secure file sharing on AWS.
B. Enforcing User and Group ID Mapping for Safe Access
By default, NFS trusts the UID and GID sent by the client, which can open a nasty door for privilege escalation. Using the root_squash option in your exports file maps any root-level client requests to the anonymous nobody user, so a rogue client can’t just waltz in with root privileges. For tighter control, all_squash combined with anonuid and anongid settings lets you funnel all client access through a single, carefully chosen unprivileged account on the server side.
C. Encrypting Data in Transit with VPN or SSH Tunneling
NFS on its own sends data in plaintext, which is a real problem if you care about secure NFS on AWS Cloud. The cleanest fix is placing your EC2 instances inside a VPC and using AWS Site-to-Site VPN or a WireGuard/OpenVPN setup between nodes so everything traveling over the wire stays encrypted. SSH tunneling is another solid option for smaller setups — forward the NFS port through an encrypted SSH connection, and you get a lightweight encryption layer without much overhead.
D. Monitoring Access Logs to Detect Unauthorized Activity
Keeping an eye on who’s touching your NFS server security hardening efforts is just as important as setting them up. Enable logging through rpcdebug or ship your /var/log/syslog and /var/log/auth.log entries to AWS CloudWatch Logs, where you can set up metric filters and alarms for suspicious patterns like repeated mount failures or access from unexpected IPs. Pair that with AWS GuardDuty for network-level threat detection, and you’ve got a solid early-warning system running quietly in the background.
Optimizing NFS Performance for Reliable File Sharing
Tuning Read and Write Buffer Sizes for Faster Transfers
Bumping up your rsize and wsize mount options to 1048576 bytes (1MB) can dramatically cut transfer times on high-throughput workloads. When mounting, add rsize=1048576,wsize=1048576 to your options — this tells the NFS client and server to exchange larger data chunks per request, slashing the round-trip overhead that kills performance on busy AWS EC2 shared file servers.
Selecting the Right NFS Version for Your Workload
NFSv4 is the go-to choice for most NFS server setups on AWS EC2 because it supports stateful connections, built-in Kerberos security, and better handling of file locking across multiple clients. NFSv3 still makes sense for legacy apps or environments where simplicity beats features, but if you’re starting fresh, NFSv4.1 with parallel NFS (pNFS) gives you even better scalability across clustered workloads — a real win for AWS file server performance optimization.
Reducing Latency with EC2 Placement Groups
Dropping your NFS server and its clients into a Cluster Placement Group keeps them physically close inside the same AWS availability zone, cutting network latency down to microseconds and pushing bandwidth close to 25 Gbps on supported instance types. Pair this with Enhanced Networking (ENA) enabled instances, and your NFS mount between EC2 instances becomes noticeably snappier, especially during large sequential reads and writes.
Setting up a secure shared file server with NFS on AWS EC2 doesn’t have to be overwhelming. By getting familiar with the core components, properly configuring your EC2 environment, and carefully setting up both the server and client connections, you create a solid foundation for reliable file sharing. Layering in strong security measures and fine-tuning performance settings takes your setup from basic to production-ready.
Now it’s your turn to put this into action. Start small, test your configuration thoroughly, and tighten up your security rules before going live. A well-built NFS server on EC2 can be a game-changer for teams that need fast, centralized access to shared files — so don’t leave performance and security as an afterthought. Get it right from the start, and your infrastructure will thank you later.