

Stop Guessing How to Lock Down Your NFS Storage on AWS EC2
If you’re running shared storage across multiple EC2 instances, you already know NFS gets the job done — but a poorly configured NFS setup is basically an open door to your data. This guide is for Linux sysadmins, DevOps engineers, and cloud architects who want to move beyond default settings and actually secure their NFS storage on AWS EC2 the right way.
Here’s what we’ll walk through together:
- Hardening NFS security at the server and network level so only the right instances can even knock on the door
- Linux file permissions for NFS shares — the foundational layer that controls who reads, writes, and executes what
- Linux ACLs for NFS to go beyond the standard owner/group/other model and set granular access control on specific users and directories
By the end, you’ll have a solid, repeatable approach to AWS EC2 NFS configuration that doesn’t leave you crossing your fingers every time a new team member gets added to a project.
Understanding NFS Storage and Its Role in AWS EC2 Environments

Key Benefits of Using NFS for Shared Storage on EC2
NFS storage on AWS EC2 gives multiple instances simultaneous access to the same files without duplicating data, which cuts costs and keeps everything in sync. Teams working on shared codebases, media assets, or configuration files get a single source of truth, and scaling up just means mounting the share on new instances.
How NFS Works Within AWS Infrastructure
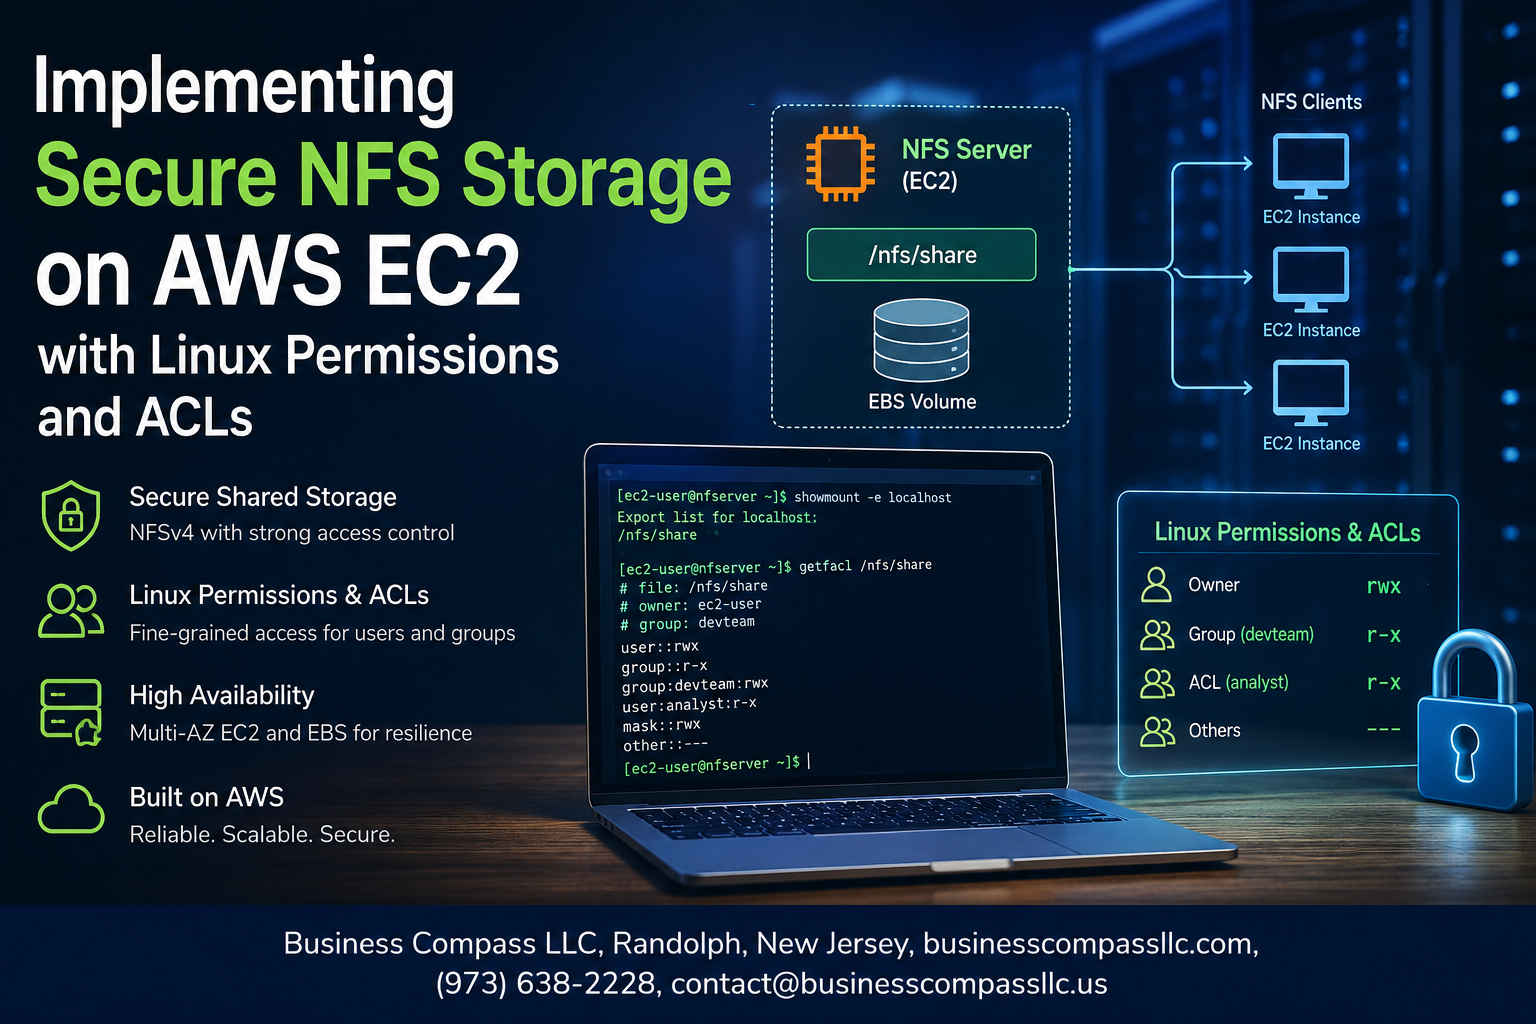
NFS runs over TCP/UDP, letting EC2 instances connect to a central file server — whether that’s another EC2 instance acting as the NFS host or Amazon EFS — using standard mount commands. Traffic stays within your VPC, and security groups act as the first line of defense controlling which instances can even reach the NFS port (2049).
Common Use Cases for NFS on EC2 Instances
Shared NFS mounts shine in web server clusters where every node needs identical content, CI/CD pipelines sharing build artifacts, machine learning workflows reading large datasets across multiple training nodes, and home directory sharing across a fleet of Linux instances. Each scenario benefits from centralized Linux file permissions and NFS access control lists to keep data access clean and auditable.
Setting Up Your AWS EC2 Environment for NFS
Choosing the Right EC2 Instance Type and Storage Configuration
When setting up NFS storage on AWS EC2, picking the right instance type matters more than most people realize. For NFS server workloads, compute-optimized instances like c5n or memory-optimized r5 types work well, especially when you need high network throughput. Pair your instance with EBS gp3 volumes for consistent IOPS, or go with io2 if you’re running latency-sensitive workloads. If you need shared storage that scales automatically, Amazon EFS is worth considering as a managed NFS alternative, removing the overhead of managing your own NFS server while still giving you standard NFS mount options across multiple EC2 instances.
Configuring Security Groups to Allow NFS Traffic Safely
NFS relies on specific ports, and locking these down in your security groups is one of the first things you should do. NFS traffic runs on TCP/UDP port 2049, and if you’re using NFSv4, that’s the only port you need to open. Restrict inbound rules strictly to the CIDR ranges or security group IDs of your client instances — never open NFS ports to 0.0.0.0/0. A dedicated security group for your NFS server, referencing the client security group directly, keeps your AWS EC2 NFS configuration tight and auditable without relying on IP-based rules that can drift over time.
Installing and Enabling NFS Server and Client Packages
Getting your NFS packages installed is straightforward. On Amazon Linux 2 or RHEL-based systems, run sudo yum install -y nfs-utils on both the server and client instances. For Ubuntu, use sudo apt install -y nfs-kernel-server on the server and nfs-common on clients. After installing, start and enable the NFS service with sudo systemctl enable --now nfs-server. Double-check the service status with systemctl status nfs-server before moving forward — catching a failed service early saves a lot of troubleshooting headaches later.
Mounting NFS Shares Across EC2 Instances
Once your NFS server exports are configured in /etc/exports, mounting shares on client instances is simple. Use a command like sudo mount -t nfs4 <server-private-ip>:/exported/path /mnt/nfs to test connectivity manually first. For persistent mounts that survive reboots, add an entry to /etc/fstab like <server-ip>:/exported/path /mnt/nfs nfs4 defaults,_netdev 0 0. The _netdev option is key — it tells the system to wait for the network before attempting the mount, which prevents boot failures on EC2 instances where network availability can lag slightly behind the OS startup sequence.
Hardening NFS Security to Protect Your Data

A. Restricting NFS Exports to Trusted Hosts Only
Locking down your /etc/exports file is the first real line of defense when hardening NFS security on AWS EC2. Instead of exporting shares to a wildcard *, pin exports to specific private IPs or CIDR blocks within your VPC, like 192.168.1.0/24, and always pair that with ro or rw flags alongside root_squash to strip root privileges from remote clients.
B. Enforcing Encrypted Connections Using NFS Over TLS
Plain NFS traffic travels unencrypted, which is a real problem on shared networks. NFS over TLS, available with NFSv4.1 and higher on modern Linux kernels, wraps your data in transport-layer encryption using xprtsec=tls mount options. Combine this with AWS Security Groups to block NFS port 2049 from anything outside your trusted subnet, giving your secure NFS setup on Linux genuine protection against eavesdropping.
C. Disabling Unnecessary NFS Services to Reduce Attack Surface
A leaner NFS stack means fewer ways in for attackers. If you’re running NFSv4 exclusively, you can safely disable rpcbind, rpc.mountd, and rpc.statd since NFSv4 doesn’t need them, cutting down exposed ports significantly. Run systemctl disable rpcbind and confirm with ss -tulnp to make sure those services stay off after a reboot.
Mastering Linux File Permissions for NFS Shares

Understanding User, Group, and Other Permission Levels
Linux file permissions work on three levels: the file owner (user), the assigned group, and everyone else (other). When you’re running NFS storage on AWS EC2, these three levels become your first line of defense. Each level gets read (r), write (w), and execute (x) permissions, and getting this right keeps your shared directories tight and secure without locking out the people who genuinely need access.
Setting Ownership and Permission Bits on Shared Directories
Run chown and chmod on your NFS-mounted directories before anything else touches them. For example, chown nfsuser:nfsgroup /mnt/shared paired with chmod 770 /mnt/shared gives the owner and group full access while completely blocking everyone else. This is a critical step in any secure NFS setup on Linux, especially when multiple EC2 instances are mounting the same share and need consistent, predictable access behavior.
Avoiding Common Permission Misconfigurations That Expose Data
The most damaging mistake people make with Linux file permissions on NFS shares is setting directories to 777, thinking it’s a quick fix. That opens your data to every user on every mounted client. Another trap is ignoring UID/GID consistency across EC2 instances — if user IDs don’t match between servers, permissions become meaningless, and someone gets access they were never supposed to have.
Using Sticky Bits and SetUID to Control File Access
The sticky bit (chmod +t /mnt/shared) is a smart move for shared NFS directories where multiple users write files. It stops users from deleting each other’s files even when they have write permission on the directory. Be careful with SetUID on NFS shares though — many NFS configurations ignore SetUID by default for security reasons, and you should keep it that way unless you have a very specific, well-understood reason to enable it.
Leveraging ACLs to Implement Granular Access Control

Why Standard Linux Permissions Fall Short for Complex Access Needs
Traditional Linux permissions work on a simple owner-group-others model, which breaks down fast when you need one user to read a file, another to write, and a third to have no access at all — all within the same directory on your NFS storage AWS EC2 setup. Linux ACLs on NFS shares give you that extra layer of control without restructuring your entire permission scheme.
Enabling and Configuring ACL Support on NFS Volumes
Before you can assign granular access control Linux-style, you need ACL support active on both the server and client sides. On the server, mount your EFS or EBS-backed volume with the acl option in /etc/fstab:
/dev/xvdf /mnt/nfs_share ext4 defaults,acl 0 0
On the NFS client, add acl to your mount options as well. Confirm support is active by running tune2fs -l /dev/xvdf | grep "Default mount". For NFS exports on AWS EC2, make sure your /etc/exports file includes no_root_squash only when absolutely required, and always pair it with tight security group rules.
Assigning Fine-Grained Permissions to Specific Users and Groups
With ACL support enabled, setfacl becomes your best friend. Say you want user alice to have read and write access to /mnt/nfs_share/projects without touching the owning group’s permissions:
setfacl -m u:alice:rw /mnt/nfs_share/projects
Need a whole group — say devteam — to have read-only access?
setfacl -m g:devteam:r /mnt/nfs_share/projects
You can stack as many ACL entries as you need, targeting individual users and groups independently. This is what makes NFS access control lists so powerful compared to the classic chmod approach — you stop bending your group structure to fit permission requirements and start defining access exactly as your team actually works.
Auditing and Verifying ACL Entries to Ensure Correct Access
Once you’ve set your ACLs, always verify them. Run getfacl on the target path:
getfacl /mnt/nfs_share/projects
The output breaks down every ACL entry clearly — owner, owning group, named users, named groups, and the effective mask. Pay close attention to the mask entry; it acts as a ceiling for all named user and group permissions. If the mask is set to r--, even an ACL entry granting rwx to a specific user gets trimmed down to read-only. Regularly auditing these entries as part of your secure NFS setup Linux workflow catches misconfigured permissions before they become a real problem.
Managing ACL Inheritance for Consistent Subfolder Permissions
One of the most overlooked parts of Linux ACLs on NFS shares is default ACLs, which control what permissions new files and directories inherit automatically. Without them, every new subfolder or file starts with no ACL entries, meaning new content silently falls back to standard permission rules and breaks your carefully planned access model.
Set default ACLs like this:
setfacl -d -m u:alice:rw /mnt/nfs_share/projects
setfacl -d -m g:devteam:r /mnt/nfs_share/projects
The -d flag marks these as default entries. Any file or directory created inside /mnt/nfs_share/projects automatically picks up these ACLs, keeping your AWS EC2 shared storage security consistent as your project structure grows. Combine this with a periodic getfacl -R /mnt/nfs_share sweep to spot any directories that slipped through without the right defaults applied.
Monitoring and Maintaining a Secure NFS Setup Long Term

Logging NFS Activity to Detect Unauthorized Access
Enable NFS audit logging by configuring /etc/exports alongside rsyslog or auditd to capture mount events, file access attempts, and permission denials. Running ausearch -k nfs_mount helps you quickly surface suspicious patterns. Pair this with CloudWatch Logs on your AWS EC2 instances to centralize log data and set real-time alerts for unauthorized access attempts against your NFS storage.
Automating Permission Audits with Linux Command Line Tools
Schedule regular audits using cron jobs that run find /mnt/nfs -perm /o+w to catch world-writable files, and getfacl -R /mnt/nfs > acl_snapshot.txt to snapshot your Linux ACL configurations. Diffing snapshots weekly reveals unexpected permission changes before they become security gaps. Tools like aide can also baseline your NFS shares and flag any drift in Linux file permissions automatically.
Keeping NFS and System Packages Updated to Patch Vulnerabilities
Run sudo apt update && sudo apt upgrade nfs-kernel-server nfs-common regularly on your AWS EC2 instances, or use yum update on RHEL-based systems. Subscribe to CVE feeds related to NFS packages so you catch critical patches fast. Automating updates with unattended-upgrades or AWS Systems Manager Patch Manager keeps your secure NFS setup protected without requiring constant manual intervention.

Setting up secure NFS storage on AWS EC2 doesn’t have to be overwhelming. By getting your EC2 environment configured correctly from the start, locking down NFS security, and combining Linux file permissions with ACLs, you can build a storage setup that gives the right people access to the right files — and keeps everyone else out. Ongoing monitoring is what keeps that security intact over time, so don’t treat it as an afterthought.
Take what you’ve learned here and start small — audit your current NFS setup, tighten up permissions where things look loose, and layer in ACLs where basic permissions aren’t cutting it. A secure NFS environment isn’t something you build once and forget; it’s something you check in on regularly. The time you put in now will save you a serious headache down the road.