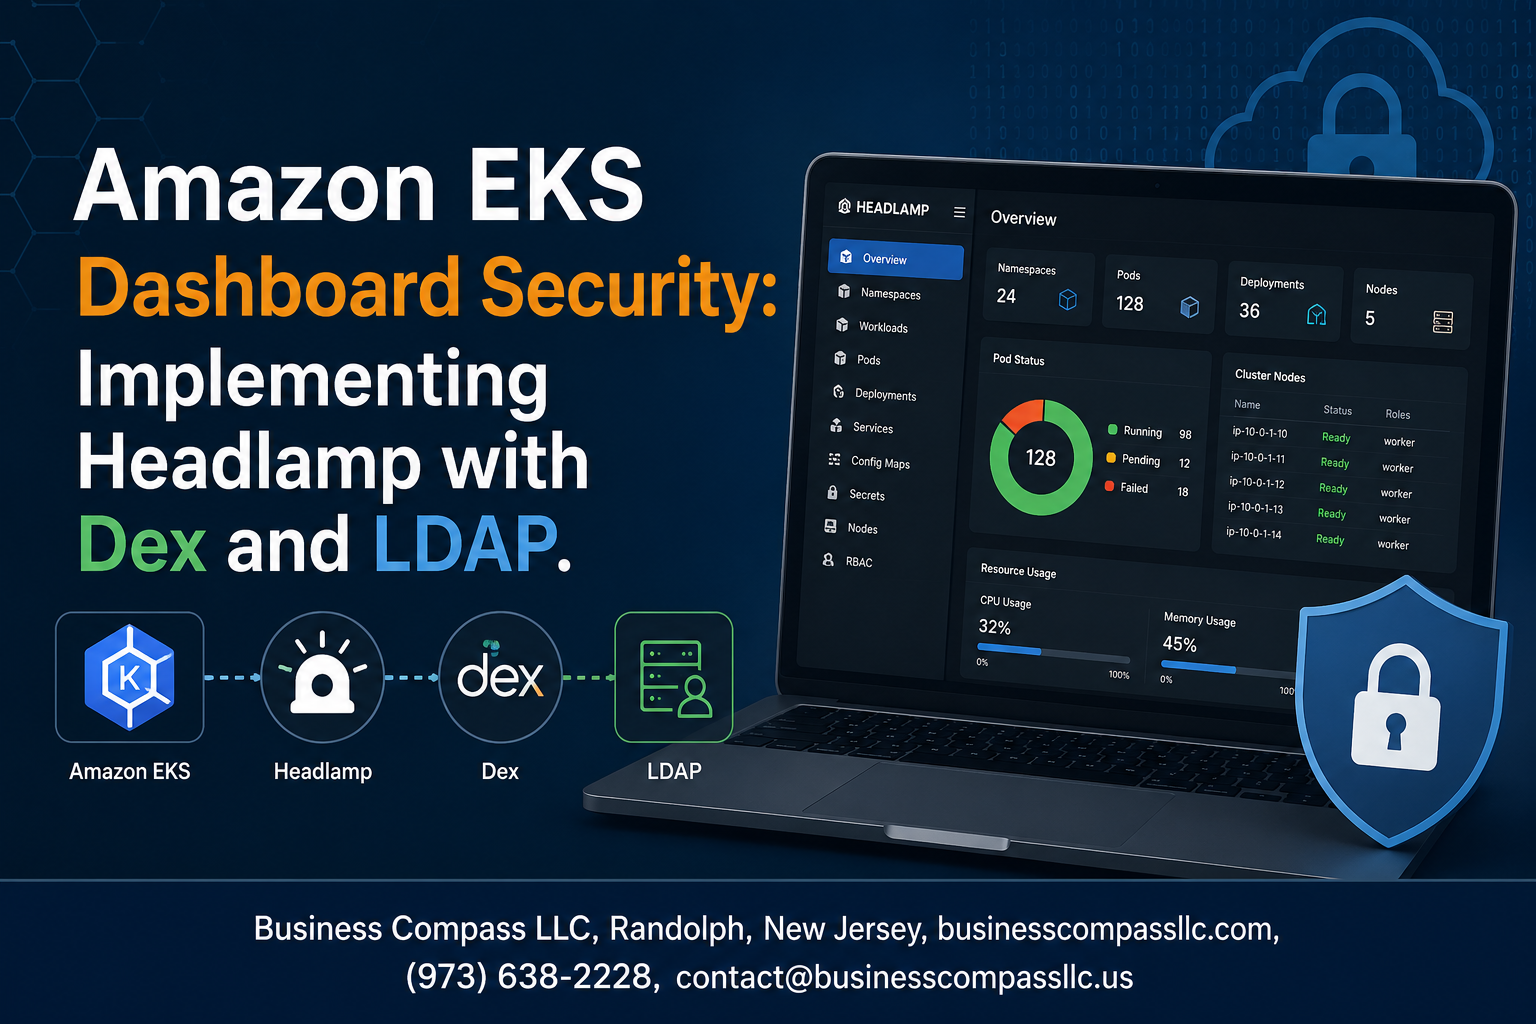
Secure Your Amazon EKS Dashboard with Headlamp, Dex, and LDAP
If you’re running workloads on Amazon EKS and relying on the default dashboard setup, you’re likely leaving a security gap wide open. This guide is for DevOps engineers, platform teams, and security-minded developers who want to lock down Amazon EKS dashboard security without sacrificing usability.
You’ll walk away knowing how to replace basic, credential-heavy access with a proper authentication chain — one that connects your existing LDAP directory to Headlamp Kubernetes dashboard through Dex as an OIDC identity provider. The result is a clean Kubernetes SSO integration where users log in with the same corporate credentials they already use every day.
Here’s what this guide covers:
- Core components and EKS cluster prep — what Headlamp, Dex, and LDAP each do, and how to get your cluster ready before touching a single config file
- Deploying Dex and wiring up LDAP — the actual Dex LDAP configuration steps that turn your identity directory into a working OIDC broker
- Headlamp Dex OIDC setup plus hardening — installing Headlamp, connecting it to Dex, and tightening everything down so your EKS secure dashboard access holds up in production
Let’s get into it.
Understanding the Core Components and Their Roles
What Headlamp Brings to Kubernetes Dashboard Management
Headlamp is a modern, extensible Kubernetes dashboard that gives platform teams a clean, plugin-driven interface for managing cluster resources. Unlike legacy dashboards, Headlamp supports OIDC natively, making it a natural fit for Amazon EKS dashboard security workflows where teams need browser-based access without sacrificing authentication controls.
- Plugin architecture lets teams customize views without forking the codebase
- Native OIDC support connects directly to identity providers like Dex
- Lightweight deployment footprint reduces cluster overhead
- Role-based UI rendering respects Kubernetes RBAC automatically
How Dex Serves as a Flexible Identity Provider
Dex acts as an OpenID Connect identity broker, sitting between your Kubernetes cluster and whatever upstream identity source your organization already trusts. As a Dex OIDC identity provider, it translates authentication requests from Headlamp into queries against backends like LDAP, SAML providers, or GitHub, then hands back tokens that Kubernetes API server can actually validate.
- Supports multiple upstream connectors simultaneously
- Issues short-lived JWT tokens with configurable claims
- Works seamlessly with EKS’s built-in OIDC authenticator
- Open-source and actively maintained by the CNCF community
Why LDAP Integration Strengthens Enterprise Authentication
LDAP authentication for Kubernetes matters because most enterprises already have user directories in Active Directory or OpenLDAP. Plugging Dex into your existing LDAP directory means no duplicate user management, no separate credential stores, and automatic access revocation when someone leaves the organization. Groups synced from LDAP map directly to Kubernetes RBAC roles.
- Centralized user lifecycle management stays in one place
- Group membership drives cluster permissions automatically
- Audit trails link Kubernetes actions back to real directory identities
- Reduces onboarding friction for new engineers joining the platform team
How These Components Work Together to Secure EKS Access
The full Headlamp Dex OIDC setup creates a clean authentication chain: a user opens Headlamp, gets redirected to Dex, Dex verifies credentials against LDAP, then issues an OIDC token that Headlamp presents to the EKS API server. Every piece of this chain is stateless and auditable.
- Headlamp initiates OIDC flow → Dex handles identity brokering → EKS validates tokens
- No static kubeconfig credentials stored in browsers or shared drives
- Token expiry enforces re-authentication without manual intervention
- RBAC policies on the EKS side control what each authenticated user can actually do
Preparing Your Amazon EKS Cluster for Secure Dashboard Access

Meeting Prerequisites for EKS, Headlamp, and Dex
Before you start wiring things together, make sure your environment checks these boxes:
- EKS Cluster: Running Kubernetes 1.21 or later, with
kubectlconfigured and pointing at the right cluster context - Helm 3.x: Installed locally — you’ll use this to deploy both Headlamp and Dex
- AWS CLI v2: Authenticated with sufficient permissions to interact with your EKS cluster and related AWS services
- A working LDAP directory: This could be AWS Directory Service, OpenLDAP, or Active Directory — Dex will connect to this for LDAP authentication Kubernetes users need
- A domain name or internal DNS: You’ll need stable endpoints for both Headlamp and the Dex OIDC identity provider, since OIDC flows depend on resolvable callback URLs
- cert-manager (recommended): Handles TLS certificates automatically, which keeps your EKS secure dashboard access endpoints properly encrypted without manual certificate juggling
Double-check that your kubeconfig is current by running kubectl cluster-info before moving forward.
Configuring IAM Roles and Permissions for Secure Deployment
Amazon EKS dashboard security starts at the IAM layer. Getting permissions wrong here either locks out legitimate users or opens doors you don’t want open.
- Create a dedicated IAM role for the service account that Dex and Headlamp pods will run under — avoid using overly broad roles like
AdministratorAccess - Enable IRSA (IAM Roles for Service Accounts): This binds an IAM role directly to a Kubernetes service account, so your pods get AWS credentials without needing static keys baked into secrets
- Run
eksctl utils associate-iam-oidc-provider --cluster <your-cluster> --approveto enable the OIDC provider on your cluster
- Run
- Scope IAM policies tightly: If Dex or Headlamp needs to read from AWS Secrets Manager (for LDAP bind credentials, for example), grant only
secretsmanager:GetSecretValueon the specific secret ARN — nothing broader - AWS Load Balancer Controller permissions: If you’re exposing Headlamp through an ALB, the controller’s IAM policy needs to be attached correctly; grab the official policy JSON from the AWS docs and create it as a named policy before associating it
A quick way to verify IRSA is working after setup:
kubectl describe sa headlamp -n headlamp | grep Annotations
You should see the IAM role ARN annotation there.
Setting Up Namespace and RBAC Policies in EKS
Keeping Dex and Headlamp in their own namespaces makes access control much cleaner and easier to audit. Here’s a solid starting structure:
Create dedicated namespaces:
kubectl create namespace headlamp
kubectl create namespace dex
Service accounts for each component:
kubectl create serviceaccount headlamp -n headlamp
kubectl create serviceaccount dex -n dex
RBAC for Headlamp: Headlamp reads cluster resources to display them in the dashboard, so it needs a ClusterRole with read access:
apiVersion: rbac.authorization.k8s.io/v1
kind: ClusterRole
metadata:
  name: headlamp-read-only
rules:
  - apiGroups: ["*"]
    resources: ["*"]
    verbs: ["get", "list", "watch"]
Bind this to the Headlamp service account with a ClusterRoleBinding. If you want to grant admin-level access through the Headlamp Kubernetes dashboard to specific LDAP groups, you’ll map those groups to roles using subjects in your RoleBinding or ClusterRoleBinding:
subjects:
  - kind: Group
    name: "eks-admins"   # matches a group from your LDAP/Dex token claim
    apiGroup: rbac.authorization.k8s.io
For Dex, permissions are simpler — it doesn’t need direct cluster API access. Its service account mainly needs the IRSA annotation to pull secrets from AWS, and nothing more from the Kubernetes RBAC side.
Keep your Kubernetes SSO integration user-facing roles environment-specific:
| Role | Namespace | Access Level |
|---|---|---|
eks-admins |
cluster-wide | Full read/write |
eks-developers |
app namespaces | Read/write within namespace |
eks-viewers |
cluster-wide | Read-only |
This gives you a clean, auditable permission structure before you even start configuring the Dex LDAP configuration or touching OIDC settings.
Deploying and Configuring Dex as Your Identity Broker

Installing Dex on Your EKS Cluster with Helm
Getting Dex running on your EKS cluster is straightforward when you use the official Helm chart. Add the Dex chart repository and pull down the latest stable release:
helm repo add dex https://charts.dexidp.io
helm repo update
helm install dex dex/dex \
  --namespace dex \
  --create-namespace \
  --values dex-values.yaml
Your dex-values.yaml file carries all the heavy lifting — connector definitions, client registrations, and TLS settings all live there. Keep this file in version control so changes are tracked and auditable.
Connecting Dex to Your LDAP Directory for User Authentication
Dex LDAP configuration ties your existing corporate directory straight into the Kubernetes authentication flow. Drop this into your dex-values.yaml under config.connectors:
config:
  connectors:
    - type: ldap
      id: ldap
      name: Corporate LDAP
      config:
        host: ldap.company.internal:636
        insecureNoSSL: false
        bindDN: "cn=dex-svc,ou=serviceaccounts,dc=company,dc=internal"
        bindPW: "$LDAP_BIND_PASSWORD"
        usernamePrompt: "Corporate Username"
        userSearch:
          baseDN: "ou=users,dc=company,dc=internal"
          filter: "(objectClass=person)"
          username: sAMAccountName
          idAttr: DN
          emailAttr: mail
          nameAttr: displayName
        groupSearch:
          baseDN: "ou=groups,dc=company,dc=internal"
          filter: "(objectClass=groupOfNames)"
          userMatchers:
            - userAttr: DN
              groupAttr: member
          nameAttr: cn
Key things to watch here:
host— always point to your LDAPS endpoint (port 636) to avoid sending credentials in plaintextbindDNandbindPW— use a dedicated service account with read-only access; never use an admin accountuserSearch.filter— narrow this down to a specific OU if your LDAP tree is large, which speeds up lookups considerablygroupSearch— pulling group membership lets you map LDAP groups to Kubernetes RBAC roles downstream
Store bindPW as a Kubernetes secret and reference it via an environment variable rather than hardcoding it in the values file.
Defining OAuth2 Clients and Scopes for Headlamp
Headlamp needs its own OAuth2 client registration inside Dex. This is how Dex knows which redirect URIs are trusted and what tokens to hand back. Add this block under config.staticClients:
config:
  staticClients:
    - id: headlamp
      redirectURIs:
        - "https://headlamp.company.internal/oidc-callback"
      name: Headlamp Dashboard
      secret: "a-strong-random-secret-here"
      trustedPeers: []
Scopes to request from Headlamp’s side:
openid— mandatory for OIDC flowsemail— gives Headlamp the user’s email address for displayprofile— pulls in the display namegroups— this is the big one; it carries LDAP group memberships that you map to Kubernetes RBAC
Generate the client secret with something like openssl rand -hex 32 and store it as a Kubernetes secret. Never commit a real secret value to Git — use a placeholder and inject it at deploy time through Helm values or a secrets manager like AWS Secrets Manager.
Securing Dex with TLS Certificates and Ingress Rules
Dex handles sensitive tokens, so running it without TLS is a hard no. The cleanest approach on EKS is to front Dex with an NGINX Ingress controller and use cert-manager to automate certificate provisioning.
cert-manager annotation on the Ingress:
apiVersion: networking.k8s.io/v1
kind: Ingress
metadata:
  name: dex
  namespace: dex
  annotations:
    cert-manager.io/cluster-issuer: "letsencrypt-prod"
    nginx.ingress.kubernetes.io/ssl-redirect: "true"
spec:
  ingressClassName: nginx
  tls:
    - hosts:
        - dex.company.internal
      secretName: dex-tls
  rules:
    - host: dex.company.internal
      http:
        paths:
          - path: /
            pathType: Prefix
            backend:
              service:
                name: dex
                port:
                  number: 5556
A few hardening rules worth applying to this Ingress:
- IP allowlisting — restrict access to your VPN CIDR range so Dex isn’t exposed to the open internet
- Rate limiting — add
nginx.ingress.kubernetes.io/limit-rpsto slow down any brute-force attempts against the token endpoint - HSTS headers — force browsers to always use HTTPS by adding the appropriate response headers through NGINX annotations
If you’re running internal-only domains, swap Let’s Encrypt for an internal CA managed through cert-manager’s CA issuer.
Validating Dex Connectivity and Token Issuance
Before wiring Headlamp up, confirm Dex is actually working end-to-end. Hit the discovery endpoint first — this is the fastest sanity check:
curl https://dex.company.internal/.well-known/openid-configuration
You should get back a JSON document listing the issuer URL, authorization endpoint, token endpoint, and JWKS URI. If that returns a 200, Dex is up and its TLS cert is valid.
Next, run a quick LDAP bind test directly from a pod inside the cluster:
kubectl run ldap-test --image=alpine --restart=Never -it --rm -- \
  sh -c "apk add openldap-clients && ldapsearch -H ldaps://ldap.company.internal:636 \
  -D 'cn=dex-svc,ou=serviceaccounts,dc=company,dc=internal' \
  -w '$BIND_PASSWORD' \
  -b 'ou=users,dc=company,dc=internal' '(sAMAccountName=testuser)'"
Checklist before moving on to Headlamp integration:
-
/.well-known/openid-configurationreturns valid JSON with correct issuer URL - LDAP bind succeeds from within the cluster network
- User search returns expected attributes (
mail,displayName,DN) - Group search returns the correct group memberships
- Dex logs show no TLS handshake errors (
kubectl logs -n dex deploy/dex) - The
headlampstatic client appears in Dex’s active configuration
Watch the Dex pod logs in real time while you run a test login — kubectl logs -n dex -l app.kubernetes.io/name=dex -f — to catch any connector errors or malformed LDAP queries before they become a headache during full integration testing.
Installing and Integrating Headlamp with Dex OIDC

Deploying Headlamp on EKS Using Helm Charts
Getting Headlamp running on your Amazon EKS cluster is straightforward with Helm. Add the Headlamp Helm repository and pull down the chart with a few commands:
helm repo add headlamp https://headlamp-k8s.github.io/headlamp/
helm repo update
helm install headlamp headlamp/headlamp --namespace headlamp --create-namespace
Key values to configure during installation:
replicaCount— set to at least 2 for high availabilityservice.type— keep asClusterIPsince you’ll front it with an ingressconfig.oidc.clientID— your Dex client IDconfig.oidc.clientSecret— the shared secret you defined in Dexconfig.oidc.issuerURL— your Dex external URL (e.g.,https://dex.yourdomain.com)config.oidc.scopes— includeopenid,email,groups, andprofile
Configuring Headlamp to Trust Dex as the OIDC Provider
Headlamp Kubernetes dashboard works as an OIDC-aware client, so it hands off authentication entirely to Dex. When a user hits the Headlamp UI, they get redirected to Dex, which then talks to your LDAP directory behind the scenes. The user never touches Headlamp’s backend with raw credentials. Create a dedicated values.yaml for your Helm deployment:
config:
  oidc:
    clientID: "headlamp"
    clientSecret: "your-shared-secret"
    issuerURL: "https://dex.yourdomain.com"
    scopes: "openid,email,groups,profile"
A few things to double-check:
- The
issuerURLmust match exactly what you configured in Dex — trailing slashes matter - Dex’s TLS certificate must be trusted by the EKS nodes; if you’re using a private CA, mount it into the Headlamp pod
- The redirect URI registered in Dex should be
https://headlamp.yourdomain.com/oidc-callback
Once Headlamp receives the JWT from Dex, it passes the token directly to the Kubernetes API server on behalf of the user, so your EKS cluster authentication happens natively through the API server’s own OIDC validation — not through any proxy layer.
Mapping LDAP Groups to Kubernetes RBAC Roles for Granular Access
This is where LDAP authentication Kubernetes really pays off. Dex reads group membership from your LDAP directory and embeds those groups into the JWT as claims. The Kubernetes API server then uses those claims for RBAC lookups. You wire this up with ClusterRoleBinding or RoleBinding objects that target the group names coming out of Dex.
Example binding for a read-only group:
apiVersion: rbac.authorization.k8s.io/v1
kind: ClusterRoleBinding
metadata:
  name: ldap-viewers
subjects:
  - kind: Group
    name: "cn=k8s-viewers,ou=groups,dc=yourdomain,dc=com"
    apiGroup: rbac.authorization.k8s.io
roleRef:
  kind: ClusterRole
  name: view
  apiGroup: rbac.authorization.k8s.io
Common RBAC patterns to set up:
- Platform admins (
cn=k8s-admins,...) →cluster-adminClusterRole - Developers (
cn=k8s-developers,...) → custom role scoped to specific namespaces - Read-only users (
cn=k8s-viewers,...) → built-inviewClusterRole - Namespace owners →
adminrole bound at namespace level only
Make sure the groups scope is included in your Dex connector config AND in Headlamp’s OIDC scopes list, otherwise the group claims won’t flow through into the token.
Exposing Headlamp Securely Through an Ingress Controller
For EKS secure dashboard access, running Headlamp behind an NGINX or AWS Load Balancer Controller ingress is the cleanest approach. Here’s a solid ingress definition using cert-manager for TLS:
apiVersion: networking.k8s.io/v1
kind: Ingress
metadata:
  name: headlamp
  namespace: headlamp
  annotations:
    kubernetes.io/ingress.class: "nginx"
    cert-manager.io/cluster-issuer: "letsencrypt-prod"
    nginx.ingress.kubernetes.io/ssl-redirect: "true"
    nginx.ingress.kubernetes.io/proxy-buffer-size: "16k"
spec:
  tls:
    - hosts:
        - headlamp.yourdomain.com
      secretName: headlamp-tls
  rules:
    - host: headlamp.yourdomain.com
      http:
        paths:
          - path: /
            pathType: Prefix
            backend:
              service:
                name: headlamp
                port:
                  number: 80
Security hardening steps worth doing at this layer:
- Add
nginx.ingress.kubernetes.io/proxy-buffer-size: "16k"— OIDC tokens are large and default buffer sizes cause 502 errors - Restrict ingress access by source IP using
nginx.ingress.kubernetes.io/whitelist-source-rangeif the dashboard is internal-only - Set strict
Content-Security-PolicyandX-Frame-Optionsheaders via ingress annotations - Enable access logging on the ingress controller and ship those logs to CloudWatch for audit trails
Testing, Hardening, and Maintaining Your Secure Dashboard Setup

A. Verifying End-to-End Login Flow from LDAP to Headlamp
Run a full login test by opening Headlamp in your browser and clicking the OIDC login button. You should get redirected to Dex, which then pulls your credentials from LDAP and hands back a token to Headlamp. Watch for these common failure points:
- Dex connector errors — check
kubectl logs -n dex deploy/dexfor LDAP bind failures or TLS handshake issues - Token audience mismatch — confirm the
client_idin Headlamp matches exactly what Dex has registered - Redirect URI rejected — Dex will block any callback URL not explicitly listed in its config, so double-check your
redirectURIsfield - Group claim missing — if RBAC isn’t working post-login, verify
groupSearchin your Dex LDAP connector is returning the rightdnvalues
A clean login produces a valid JWT you can decode at jwt.io to inspect claims like email, groups, and exp. Getting these right is the backbone of solid Amazon EKS dashboard security.
B. Auditing User Access and Monitoring Authentication Events
Kubernetes API server audit logs are your best friend here. When a user authenticates through Headlamp using Dex OIDC, every kubectl-equivalent API call gets stamped with their identity. Enable audit logging on your EKS cluster and ship those logs to CloudWatch or an external SIEM so you always have a trail.
Key things to track:
- Authentication events in Dex — Dex logs successful and failed logins at the connector level; pipe these into your log aggregator
- RBAC authorization decisions —
kubectl get eventsand audit logs will showForbiddenresponses, which help you catch over-permissioned or under-permissioned roles fast - User identity in audit logs — with LDAP authentication Kubernetes setups, the
user.usernamefield in audit records should reflect the actual LDAPuid, making traceability clean - CloudTrail for EKS control plane — AWS CloudTrail captures EKS API calls, giving you a second layer of visibility beyond cluster-level logs
Set up alerts for repeated login failures or sudden spikes in get secrets calls from a single identity — those patterns are worth catching early.
C. Rotating Secrets and Certificates to Maintain Security
Secrets get stale and certs expire, so building a rotation habit into your workflow keeps your EKS secure dashboard access from quietly degrading over time.
Here’s a practical rotation checklist:
- Dex OIDC client secret — update the
clientSecretin both the Dex config and the Headlamp deployment env vars, then restart both pods; store the new value in AWS Secrets Manager rather than hardcoding it - LDAP bind password — change the bind account password in your directory, update the Kubernetes secret holding it, and restart the Dex pod to pick up the change
- Dex signing keys — Dex rotates its own signing keys automatically by default, but confirm
rotationFrequencyis set to something reasonable like6hin your config - TLS certificates for Dex ingress — if you’re using cert-manager, certificates renew automatically 30 days before expiry; otherwise, set a calendar reminder and manually swap them before they lapse
- Kubeconfig tokens — short-lived tokens tied to OIDC sessions expire naturally, but static
ServiceAccounttokens used during initial setup should be revoked once OIDC is fully working
Keeping a rotation schedule — even a simple one tracked in a shared doc — cuts a huge chunk of risk from your Kubernetes SSO integration over the long run.

Setting up secure dashboard access for your Amazon EKS cluster doesn’t have to be overwhelming. By combining Headlamp as your Kubernetes dashboard, Dex as the identity broker, and LDAP as your user directory, you get a solid authentication chain that keeps unauthorized users out while giving your team a clean, visual way to manage cluster resources. Each component plays a specific role, and when they work together, you end up with a setup that’s both practical and enterprise-ready.
The real win here is that you’re not just installing a dashboard — you’re building a proper access control layer around it. Taking the time to harden your configuration, test your OIDC flows, and keep things maintained means you’re not leaving security gaps open down the road. If you haven’t started yet, pick up the Dex configuration piece first, get your LDAP connection solid, and the rest of the setup will fall into place naturally.