Stop Manually Configuring MySQL Databases on AWS — There’s a Better Way
If you’re a cloud engineer, DevOps practitioner, or AWS developer who’s tired of clicking through the console every time you spin up a database, this guide is for you. Deploying MySQL RDS CloudFormation deployment gives you repeatable, version-controlled infrastructure that you can trust from day one.
In this guide, you’ll walk through three core areas:
- Building a solid CloudFormation template for MySQL RDS that covers every moving part — from instance settings to parameter groups
- Locking down network access using VPC security groups and RDS configuration so only the right resources can talk to your database
- Encrypting RDS data at rest and in transit while setting up access control and monitoring that actually catches problems before they become incidents
By the end, you’ll have a working CloudFormation stack ready to deploy and validate against AWS RDS security best practices — no guesswork, no gaps.
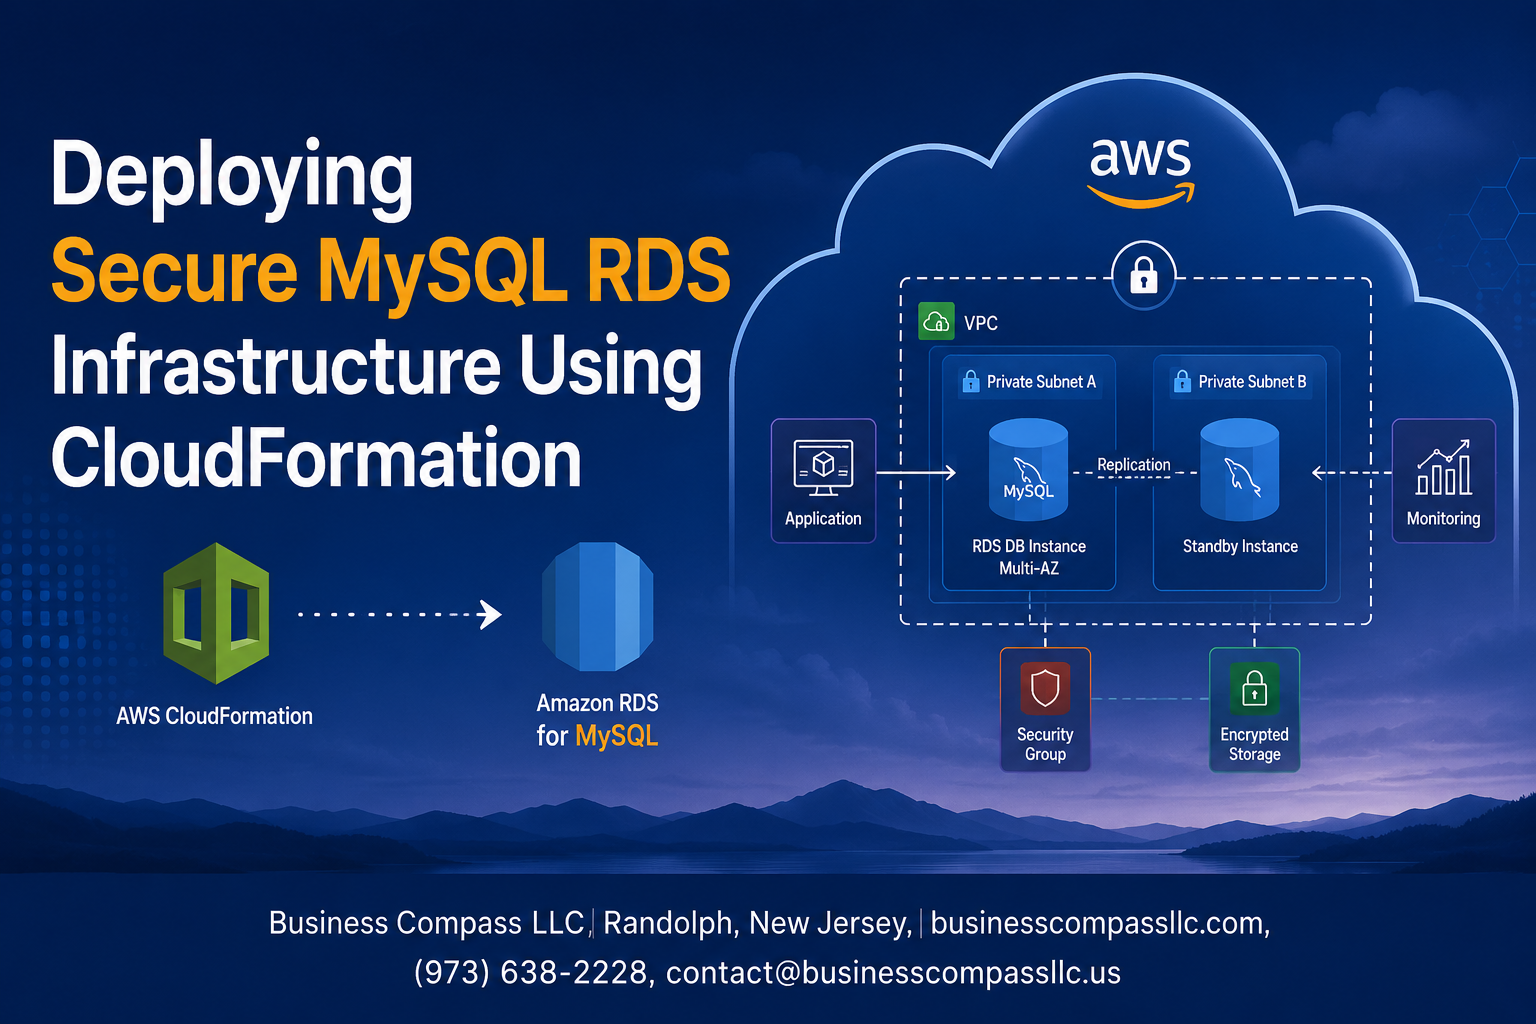
Understanding the Core Components of a Secure MySQL RDS Setup

Key Benefits of Using AWS RDS Over Self-Managed Databases
Running your own MySQL server on EC2 means you’re on the hook for patching, backups, replication, and failover — all of that ops overhead adds up fast. AWS RDS takes those headaches off your plate with:
- Automated backups and point-in-time recovery — RDS snapshots your data on a schedule you define, so recovery is a few clicks away
- Multi-AZ failover — if your primary instance goes down, RDS automatically promotes the standby replica with minimal disruption
- Managed patching — minor engine upgrades can be applied automatically during your chosen maintenance window
- Built-in monitoring — CloudWatch metrics and Enhanced Monitoring give you CPU, storage, and connection visibility without extra setup
Why CloudFormation Is the Right Tool for RDS Provisioning
Clicking through the AWS console to spin up a MySQL RDS instance works fine once — but it’s not repeatable, reviewable, or auditable. CloudFormation lets you define your entire secure RDS infrastructure as code, which means your database config lives in version control, gets reviewed in pull requests, and deploys consistently across dev, staging, and production. A solid CloudFormation template for MySQL database provisioning captures every security-sensitive setting — encryption, parameter groups, subnet groups — so nothing gets misconfigured by accident.
Critical Security Layers Every MySQL RDS Deployment Needs
A production-grade secure RDS infrastructure on AWS isn’t a single setting — it’s several layers working together:
- Network isolation — place your RDS instance inside a private subnet with no direct internet access
- VPC security groups — restrict inbound traffic to only the application tier on port 3306
- Encryption at rest — enable AWS KMS-backed storage encryption on the RDS volume
- Encryption in transit — enforce SSL/TLS connections at the parameter group level
- IAM authentication — replace static passwords with IAM database authentication where possible
- CloudTrail and RDS event subscriptions — log every API call and get notified on critical instance events
Designing Your CloudFormation Template for MySQL RDS

A. Structuring Your Template With Parameters for Flexibility
A well-structured CloudFormation template for MySQL RDS deployment starts with a solid Parameters section. Instead of hardcoding values, you define inputs that let you reuse the same template across dev, staging, and production environments without touching the core logic.
Here are the key parameters to include:
- DBInstanceClass – lets you pick the instance size (e.g.,
db.t3.microfor dev,db.r6g.largefor prod) - DBName – the initial database name
- MasterUsername and MasterUserPassword – credentials, with the password marked as
NoEcho: trueto keep it out of logs - VpcId and SubnetIds – references to your existing VPC resources
- MultiAZ – a boolean toggle for high availability
- BackupRetentionPeriod – number of days to keep automated backups
- EnvironmentName – used for tagging and naming resources consistently
Using AllowedValues constraints on parameters like DBInstanceClass prevents accidental deployments with unsupported instance types. Pairing Default values with Description fields also makes the template self-documenting, which your teammates will appreciate.
B. Defining the RDS Instance Resource With Optimal Settings
The AWS::RDS::DBInstance resource is where the real configuration lives. A secure, production-ready MySQL RDS CloudFormation template needs more than just the minimum required properties.
MyDBInstance:
  Type: AWS::RDS::DBInstance
  Properties:
    DBInstanceIdentifier: !Sub "${EnvironmentName}-mysql-db"
    DBInstanceClass: !Ref DBInstanceClass
    Engine: MySQL
    EngineVersion: "8.0"
    MasterUsername: !Ref MasterUsername
    MasterUserPassword: !Ref MasterUserPassword
    DBName: !Ref DBName
    AllocatedStorage: "100"
    StorageType: gp3
    StorageEncrypted: true
    KmsKeyId: !Ref MyKMSKey
    VPCSecurityGroups:
      - !Ref DBSecurityGroup
    DBSubnetGroupName: !Ref DBSubnetGroup
    MultiAZ: !Ref MultiAZ
    PubliclyAccessible: false
    DeletionProtection: true
    EnablePerformanceInsights: true
    PerformanceInsightsRetentionPeriod: 7
A few things worth calling out here:
PubliclyAccessible: falsekeeps the instance inside your VPC, away from the public internetDeletionProtection: trueprevents accidental stack deletions from wiping your databaseStorageEncrypted: truewith a custom KMS key covers encrypting RDS data at restgp3storage gives better baseline IOPS performance compared togp2at the same costEnablePerformanceInsightsgives you query-level visibility without needing a third-party tool
C. Configuring Multi-AZ Deployment for High Availability
Multi-AZ deployment creates a synchronous standby replica in a different Availability Zone. If the primary instance goes down — whether from hardware failure, an AZ outage, or a patching event — RDS automatically fails over to the standby with minimal disruption.
In your CloudFormation template, enabling it is straightforward:
MultiAZ: !Ref MultiAZ
Where MultiAZ is a parameter with:
MultiAZ:
  Type: String
  Default: "true"
  AllowedValues:
    - "true"
    - "false"
  Description: Enable Multi-AZ deployment for high availability
A few practical points about Multi-AZ for MySQL RDS:
- Failover typically completes in 60–120 seconds — your application needs retry logic at the connection layer to handle this gracefully
- The standby is not a read replica — you can’t query it directly; it’s purely for failover
- Both instances sit inside your private subnets — the DBSubnetGroup you define should span at least two AZs
- Patching and backups happen on the standby first, reducing performance impact on the primary
For a DBSubnetGroup spanning multiple AZs:
DBSubnetGroup:
  Type: AWS::RDS::DBSubnetGroup
  Properties:
    DBSubnetGroupDescription: "Subnet group for MySQL RDS"
    SubnetIds:
      - !Ref PrivateSubnet1
      - !Ref PrivateSubnet2
    Tags:
      - Key: Environment
        Value: !Ref EnvironmentName
D. Setting Automated Backup and Maintenance Windows
Automated backups and maintenance windows are two settings teams often rush through, but getting them right avoids painful surprises in production.
Backup configuration:
BackupRetentionPeriod: !Ref BackupRetentionPeriod
PreferredBackupWindow: "02:00-03:00"
- Set
BackupRetentionPeriodto at least 7 days for production workloads; AWS allows up to 35 - The backup window should be during your lowest traffic hours — RDS takes a brief I/O pause at the start of the backup
- Automated backups are stored in S3 and support point-in-time recovery down to the last 5 minutes
Maintenance window configuration:
PreferredMaintenanceWindow: "sun:04:00-sun:05:00"
AutoMinorVersionUpgrade: true
- Schedule the maintenance window after the backup window so both don’t run simultaneously
AutoMinorVersionUpgrade: truekeeps your MySQL engine patched automatically — this covers security patches for minor versions- For major version upgrades, you control the timing manually, so you’re never caught off guard
A clean combined example for these properties inside your AWS::RDS::DBInstance:
BackupRetentionPeriod: 7
PreferredBackupWindow: "02:00-03:00"
PreferredMaintenanceWindow: "sun:04:00-sun:05:00"
AutoMinorVersionUpgrade: true
These small configuration choices add up to a CloudFormation template for MySQL database deployments that handles real-world operational needs, not just the happy path.
Locking Down Network Access With VPC and Security Groups

Building a Dedicated VPC to Isolate Your Database
Keeping your MySQL RDS instance inside its own VPC is one of the smartest moves you can make for AWS RDS network security setup. Think of a VPC as a private neighborhood — your database lives there, and only the people you specifically invite can get in.
MyVPC:
  Type: AWS::EC2::VPC
  Properties:
    CidrBlock: 10.0.0.0/16
    EnableDnsHostnames: true
    EnableDnsSupport: true
    Tags:
      - Key: Name
        Value: RDS-VPC
Key things to configure here:
- CidrBlock — pick a range that doesn’t clash with other networks you might peer with later
- EnableDnsHostnames — turn this on so RDS endpoints resolve cleanly inside the VPC
- EnableDnsSupport — required for DNS resolution to work at all
Configuring Private Subnets to Block Public Exposure
Your RDS instance should never sit in a public subnet. Full stop. A private subnet means there’s no direct route to the internet — the only traffic that reaches your database comes through other resources inside your VPC, like an EC2 app server or a Lambda function.
PrivateSubnet1:
  Type: AWS::EC2::Subnet
  Properties:
    VpcId: !Ref MyVPC
    CidrBlock: 10.0.1.0/24
    AvailabilityZone: !Select [0, !GetAZs '']
    MapPublicIpOnLaunch: false

PrivateSubnet2:
  Type: AWS::EC2::Subnet
  Properties:
    VpcId: !Ref MyVPC
    CidrBlock: 10.0.2.0/24
    AvailabilityZone: !Select [1, !GetAZs '']
    MapPublicIpOnLaunch: false
Notice MapPublicIpOnLaunch: false — that single line ensures no resource in this subnet accidentally gets a public IP assigned to it. You need at least two private subnets in different availability zones because RDS requires them for Multi-AZ deployments.
Writing Least-Privilege Security Group Rules for RDS Access
Security groups act as the firewall layer around your RDS instance. The golden rule is simple: only allow the specific port MySQL runs on (3306), and only from the specific security group attached to your application layer — nothing else.
RDSSecurityGroup:
  Type: AWS::EC2::SecurityGroup
  Properties:
    GroupDescription: Security group for MySQL RDS
    VpcId: !Ref MyVPC
    SecurityGroupIngress:
      - IpProtocol: tcp
        FromPort: 3306
        ToPort: 3306
        SourceSecurityGroupId: !Ref AppServerSecurityGroup
    Tags:
      - Key: Name
        Value: RDS-Security-Group
What makes this a least-privilege VPC security groups RDS configuration:
- No 0.0.0.0/0 — wide-open IP ranges are completely off the table
- Source by security group ID, not IP — this is more dynamic and far more secure
- Port 3306 only — nothing else gets through, no exceptions
- No outbound rules defined manually — AWS allows all outbound by default, which is fine for RDS
Using DB Subnet Groups to Control Placement Across Availability Zones
A DB Subnet Group tells RDS which subnets it can place your database instance in. Without this, you can’t launch RDS inside a VPC properly. Pairing this with your private subnets means you get full control over where the database physically lives.
RDSSubnetGroup:
  Type: AWS::RDS::DBSubnetGroup
  Properties:
    DBSubnetGroupDescription: Subnet group for MySQL RDS
    SubnetIds:
      - !Ref PrivateSubnet1
      - !Ref PrivateSubnet2
    Tags:
      - Key: Name
        Value: RDS-Subnet-Group
Why this matters in a CloudFormation template MySQL database setup:
- RDS with Multi-AZ enabled will automatically pick the best subnet across zones for the standby replica
- You’re locking RDS into your private subnets — it can’t wander into a public subnet by accident
- Adding more subnets across additional availability zones gives RDS more flexibility during failover
Restricting Inbound Traffic to Trusted Application Layers Only
The final layer of network control is making sure only your application tier can talk to RDS — not developers’ laptops, not bastion hosts (unless explicitly required), and definitely not the open internet. The way to do this cleanly in CloudFormation is by referencing your application server’s security group directly as the inbound source.
AppServerSecurityGroup:
  Type: AWS::EC2::SecurityGroup
  Properties:
    GroupDescription: Security group for application servers
    VpcId: !Ref MyVPC
    SecurityGroupEgress:
      - IpProtocol: tcp
        FromPort: 3306
        ToPort: 3306
        DestinationSecurityGroupId: !Ref RDSSecurityGroup
This creates a tight, explicit trust relationship:
- App servers can reach RDS on port 3306 — that’s their only permitted outbound database connection
- RDS only accepts traffic from app servers — anything else is dropped before it even touches the database
- No hardcoded IP ranges — the security group reference stays valid even as your app tier scales up or down
This approach is exactly what deploying MySQL RDS with CloudFormation best practices looks like — every connection path is intentional, documented in code, and reviewable in a pull request.
Protecting Sensitive Data at Rest and in Transit

Enabling AWS KMS Encryption for RDS Storage
Encrypting RDS data at rest is straightforward with AWS KMS. In your CloudFormation template, set StorageEncrypted: true and reference a KMS key ARN using the KmsKeyId property on your AWS::RDS::DBInstance resource.
StorageEncrypted: true
KmsKeyId: !Ref MyRDSKMSKey
Key setup tips:
- Create a dedicated KMS key per environment (dev, staging, prod) rather than sharing the default AWS-managed key
- Attach a key policy that restricts usage to specific IAM roles and the RDS service principal
- Enable key rotation annually to reduce exposure from potential key compromise
Enforcing SSL/TLS Connections to Prevent Data Interception
MySQL RDS supports SSL/TLS natively, but you need to actively enforce it — connections won’t be encrypted by default unless you push a parameter group setting. Create a custom DB parameter group in CloudFormation and set require_secure_transport to ON.
MyRDSParamGroup:
  Type: AWS::RDS::DBParameterGroup
  Properties:
    Family: mysql8.0
    Parameters:
      require_secure_transport: "1"
Additional steps worth doing:
- Download the AWS RDS CA certificate bundle and configure your application’s database driver to verify the server certificate
- Rotate certificates before expiry using the AWS-managed certificate rotation process
- Reject any application connection string that omits
sslmode=verify-fullor its MySQL equivalent
Managing Master Credentials Securely With AWS Secrets Manager
Hard-coding database passwords in CloudFormation templates is a real security risk. AWS Secrets Manager solves this cleanly — you can generate and rotate credentials automatically without ever touching a plaintext password.
Reference the secret directly in your RDS resource:
MasterUsername: admin
MasterUserPassword: !Sub "{{resolve:secretsmanager:${MyDBSecret}:SecretString:password}}"
Best practices here:
- Set
GenerateSecretStringwithExcludeCharactersto avoid special chars that break connection strings - Enable automatic rotation using the built-in Lambda rotation function AWS provides for MySQL
- Scope the Secrets Manager IAM policy so only your application’s task role or EC2 instance profile can call
GetSecretValueon that specific secret ARN — not a wildcard
Strengthening Access Control and Monitoring

Applying IAM Roles and Policies for Controlled Database Access
Locking down who can touch your RDS instance starts with tight IAM roles and policies. Instead of handing out broad permissions, create a dedicated IAM role that grants only the specific actions your application needs — think rds:Connect and nothing more.
RDSAccessRole:
  Type: AWS::IAM::Role
  Properties:
    RoleName: RDSAccessRole
    AssumeRolePolicyDocument:
      Version: "2012-10-17"
      Statement:
        - Effect: Allow
          Principal:
            Service: ec2.amazonaws.com
          Action: sts:AssumeRole
    Policies:
      - PolicyName: RDSConnectPolicy
        PolicyDocument:
          Version: "2012-10-17"
          Statement:
            - Effect: Allow
              Action:
                - rds-db:connect
              Resource: !Sub "arn:aws:rds-db:${AWS::Region}:${AWS::AccountId}:dbuser:${MyDBInstance}/*"
Key practices to follow:
- Least privilege always — avoid wildcard
*actions on RDS resources - Use IAM database authentication to replace static passwords with short-lived tokens
- Separate roles per service — your Lambda function and EC2 app server shouldn’t share the same role
- Rotate credentials regularly using AWS Secrets Manager integration
Enabling Enhanced Monitoring and Performance Insights
Enhanced Monitoring gives you OS-level metrics — CPU steal, memory usage, disk I/O — at intervals as short as one second. Performance Insights goes deeper, showing you which SQL queries are choking your database. Both are simple to flip on in CloudFormation.
MyDBInstance:
  Type: AWS::RDS::DBInstance
  Properties:
    MonitoringInterval: 60
    MonitoringRoleArn: !GetAtt RDSMonitoringRole.Arn
    EnablePerformanceInsights: true
    PerformanceInsightsRetentionPeriod: 7
    PerformanceInsightsKMSKeyId: !Ref RDSKMSKey
MonitoringInterval— set between 1–60 seconds depending on how granular you need visibilityPerformanceInsightsRetentionPeriod— 7 days free, up to 731 days with paid retention- Always attach a dedicated
MonitoringRoleArnusing theAmazonRDSEnhancedMonitoringRolemanaged policy
Setting Up CloudWatch Alarms for Suspicious Activity
CloudWatch Alarms are your early warning system for AWS RDS access control and monitoring. Set thresholds on the metrics that matter most — high CPU, low free storage, or a spike in database connections can all be signs of something going wrong.
HighCPUAlarm:
  Type: AWS::CloudWatch::Alarm
  Properties:
    AlarmName: RDS-HighCPU
    MetricName: CPUUtilization
    Namespace: AWS/RDS
    Statistic: Average
    Period: 300
    EvaluationPeriods: 2
    Threshold: 80
    ComparisonOperator: GreaterThanOrEqualToThreshold
    Dimensions:
      - Name: DBInstanceIdentifier
        Value: !Ref MyDBInstance
    AlarmActions:
      - !Ref SNSAlertTopic

DatabaseConnectionsAlarm:
  Type: AWS::CloudWatch::Alarm
  Properties:
    AlarmName: RDS-HighConnections
    MetricName: DatabaseConnections
    Namespace: AWS/RDS
    Statistic: Average
    Period: 300
    EvaluationPeriods: 1
    Threshold: 200
    ComparisonOperator: GreaterThanOrEqualToThreshold
    Dimensions:
      - Name: DBInstanceIdentifier
        Value: !Ref MyDBInstance
    AlarmActions:
      - !Ref SNSAlertTopic
Metrics worth watching closely:
- CPUUtilization — consistent spikes above 80% deserve attention
- FreeStorageSpace — alert before you hit zero, not after
- DatabaseConnections — unexpected surges can signal a connection leak or an attack
- ReadLatency / WriteLatency — helps separate performance issues from security incidents
Activating RDS Event Notifications for Real-Time Alerts
RDS Event Notifications keep you in the loop whenever something significant happens — a failover, a backup failure, or a configuration change. These come through SNS, so you can pipe them straight to email, Slack, or a ticketing system.
SNSAlertTopic:
  Type: AWS::SNS::Topic
  Properties:
    TopicName: RDSAlertTopic
    Subscription:
      - Protocol: email
        Endpoint: ops-team@yourcompany.com

RDSEventSubscription:
  Type: AWS::RDS::EventSubscription
  Properties:
    SubscriptionName: RDSCriticalEvents
    SnsTopicArn: !Ref SNSAlertTopic
    SourceType: db-instance
    SourceIds:
      - !Ref MyDBInstance
    EventCategories:
      - availability
      - failure
      - configuration change
      - backup
      - security patching
    Enabled: true
Event categories to always include:
- failure — catches instance crashes and storage issues fast
- configuration change — tracks any modifications, whether planned or not
- security patching — stays on top of automatic minor version updates
- availability — notifies you the moment a failover kicks in during a Multi-AZ event
Deploying and Validating Your CloudFormation Stack

Deploying the Stack Through AWS CLI for Repeatability
Running your MySQL RDS CloudFormation deployment through the AWS CLI keeps things consistent and scriptable across environments. Use the following command to kick off the stack:
aws cloudformation create-stack \
  --stack-name secure-mysql-rds \
  --template-body file://rds-template.yaml \
  --parameters ParameterKey=DBPassword,ParameterValue=YourSecurePass123! \
  --capabilities CAPABILITY_NAMED_IAM \
  --region us-east-1
Key flags to pay attention to:
--capabilities CAPABILITY_NAMED_IAM— needed when your template creates IAM roles--parameters— pass sensitive values here or pull them from AWS Secrets Manager to avoid hardcoding credentials- Use
--profileto specify a named AWS CLI profile when working across multiple accounts
For updates, swap create-stack with update-stack or use change sets for safer, reviewable deployments:
aws cloudformation create-change-set \
  --stack-name secure-mysql-rds \
  --change-set-name rds-update-v2 \
  --template-body file://rds-template.yaml
Verifying Resource Creation and Security Configuration
Once the stack reaches CREATE_COMPLETE, check that every resource got wired up correctly.
Things to verify in the AWS Console or CLI:
- RDS Instance — Confirm the instance is in the correct private subnet group and that public accessibility is set to
No - Security Groups — The RDS security group should only allow inbound traffic on port 3306 from your application tier’s security group, nothing else
- Encryption — Go to the RDS console, open your instance, and confirm
Storage encrypted: Yesand that SSL enforcement is active via the parameter group (require_secure_transport = ON) - Subnet Group — Should span at least two private subnets across different Availability Zones
Run this CLI command to quickly pull instance details:
aws rds describe-db-instances \
  --db-instance-identifier secure-mysql-db \
  --query 'DBInstances[*].{Endpoint:Endpoint.Address,Encrypted:StorageEncrypted,PubliclyAccessible:PubliclyAccessible}'
Expected output should show PubliclyAccessible: false and Encrypted: true. If either shows otherwise, your CloudFormation template needs a fix before you go anywhere near production.
Testing Connectivity From Application Tier to RDS Instance
With your secure RDS infrastructure on AWS in place, testing real connectivity from the application tier confirms that your VPC security groups and RDS configuration are working as intended — not just that CloudFormation reported success.
Steps to test:
- SSH or SSM into your app server — Use AWS Systems Manager Session Manager to avoid opening SSH ports
- Install the MySQL client if not already available:
sudo yum install mysql -y - Connect using SSL to validate both network access and in-transit encryption:
mysql -h your-rds-endpoint.rds.amazonaws.com \ -u admin -p \ --ssl-ca=/path/to/rds-ca-2019-root.pem \ --ssl-mode=VERIFY_IDENTITY - Confirm the SSL connection inside MySQL:
SHOW STATUS LIKE 'Ssl_cipher';A non-empty result means your connection is encrypted in transit.
What a failed connection tells you:
- Timeout → security group rule is missing or pointed at the wrong source
Access denied→ credentials or IAM auth config issue- SSL handshake failure → certificate path is wrong or
require_secure_transportisn’t set
Run these tests in every environment after each CloudFormation stack deployment to catch misconfigurations before they become real problems.

Setting up a secure MySQL RDS infrastructure with CloudFormation doesn’t have to be overwhelming. By breaking it down into clear steps — designing a solid template, locking down network access with VPC and security groups, encrypting data at rest and in transit, and tightening access controls — you end up with a database environment that’s both reliable and well-protected. Layering in monitoring gives you the visibility you need to catch anything unusual before it becomes a real problem.
The best part? Once your CloudFormation stack is deployed and validated, you have a repeatable, version-controlled setup you can roll out again and again. So take what you’ve learned here, start building your template, and put these security practices to work in your own AWS environment. A little upfront effort goes a long way toward keeping your data safe.