

How to Migrate from CloudFront OAI to OAC Without Breaking S3 Access
If you’re running an S3-backed CloudFront distribution, there’s a good chance you’re still using Origin Access Identity (OAI) — and that’s becoming a problem. AWS has made it clear that Origin Access Control (OAC) is the modern replacement, with stronger security defaults and support for features OAI simply can’t handle.
This guide is for AWS developers, cloud engineers, and DevOps teams who need to complete a CloudFront OAI to OAC migration without taking their application offline or locking users out of S3 content.
Here’s what we’ll walk through together:
- Why OAC beats OAI — what’s actually different between the two, and why the upgrade is worth doing now rather than later
- How to set up CloudFront origin access control and update your S3 bucket policy so access keeps working through the switch
- How to test, validate, and clean up — confirming everything works before you remove the old OAI for good
No fluff, no unnecessary detours. By the end, you’ll have a working OAC configuration and a clean AWS account with the old setup fully retired.
Understanding OAI vs OAC and Why the Upgrade Matters

What OAI Does and Where It Falls Short
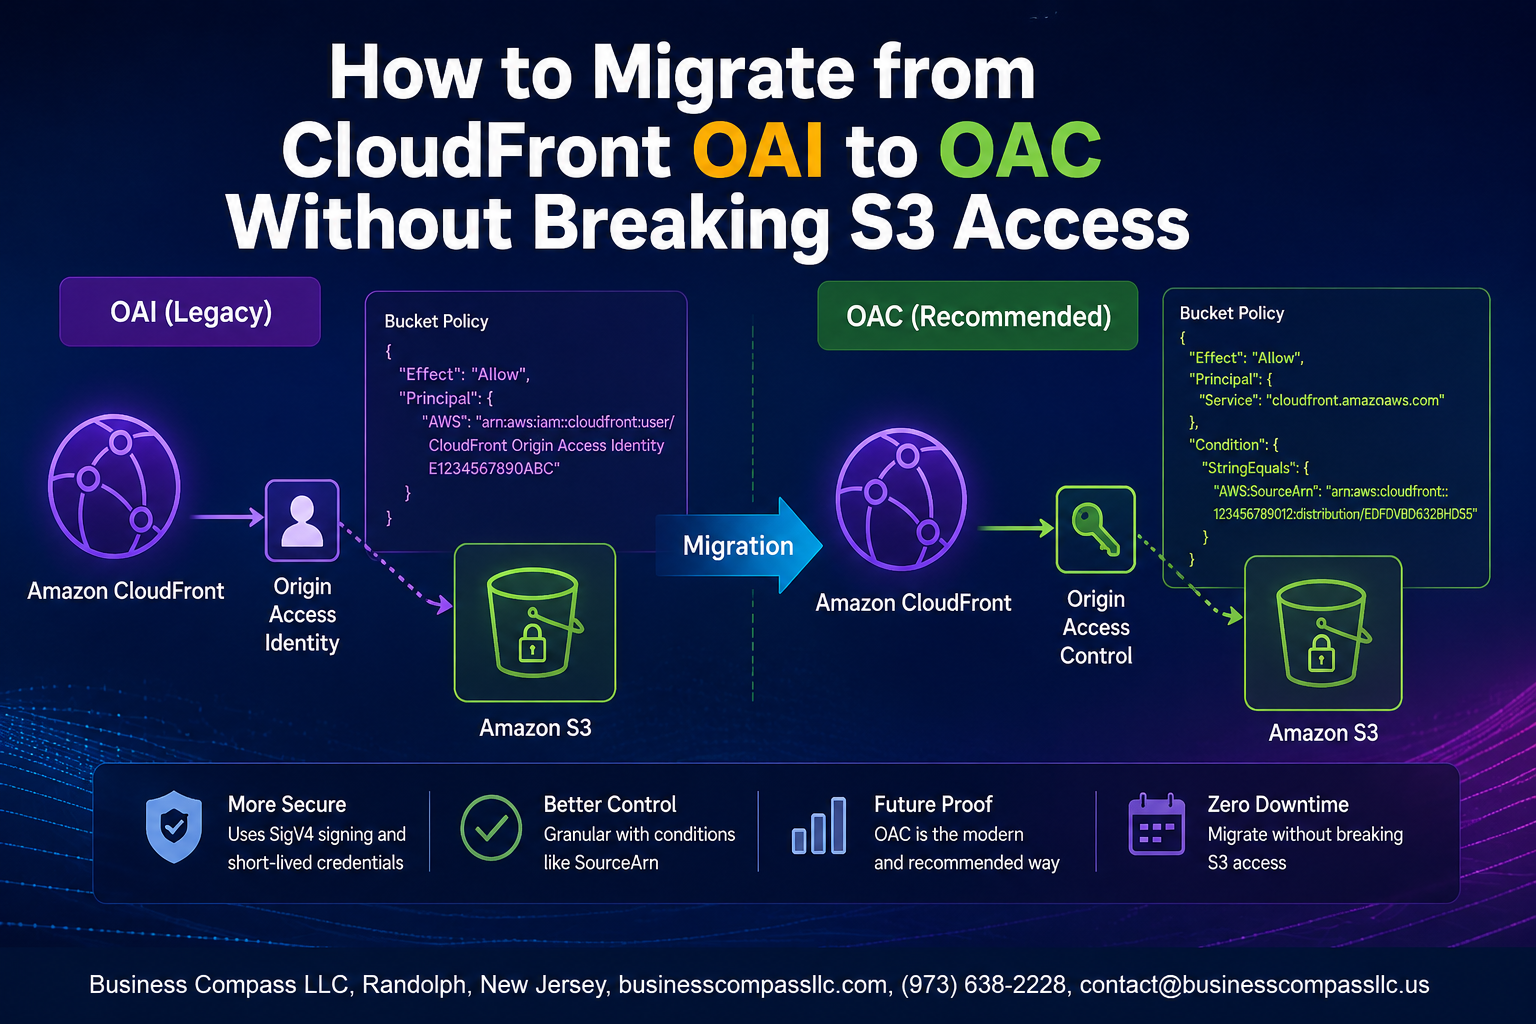
OAI restricts S3 access to CloudFront but lacks support for SSE-KMS encryption and newer AWS regions.
Key Advantages OAC Brings
- Supports SSE-KMS encrypted buckets
- Enables short-lived, signed requests
- Works across all AWS regions
Why AWS Is Pushing Migration Now
OAI is deprecated — OAC is the future.
Preparing Your Environment Before the Migration

A. Auditing Your Existing CloudFront and S3 Configuration
Run aws cloudfront list-distributions to snapshot your current setup.
B. Identifying Distributions Using OAI
Check each distribution’s origin settings for S3OriginConfig with an OriginAccessIdentity value.
C. Backing Up S3 Bucket Policies
Copy existing policies using aws s3api get-bucket-policy.
D. Checking IAM Permissions
You’ll need cloudfront:CreateOriginAccessControl and s3:PutBucketPolicy rights.
Creating and Configuring the New OAC

Setting Up OAC in the AWS Console Step by Step
- Go to CloudFront > Security > Origin Access, click Create.
- Name your OAC, select S3 as origin type.
Choosing the Right Signing Behavior
- Pick Sign requests for secure S3 access.
Associating OAC with Your Distribution
- Edit your origin, swap OAI for the new OAC, save.
Updating S3 Bucket Policies for OAC Compatibility

A. Removing the Old OAI-Based Policy Statements Safely
Open your S3 bucket policy and delete the aws:PrincipalArn statement referencing your OAI canonical ID.
B. Writing the Correct OAC Policy
Replace it with:
- Principal:
cloudfront.amazonaws.com - Condition:
AWS:SourceArnpointing to your distribution ARN
Testing and Validating Access After the Switch

Confirming Content Is Served Correctly Through CloudFront
Request your S3 objects via the CloudFront URL and check for 200 OK responses.
Verifying Direct S3 Access Remains Blocked
Direct S3 URL requests should return 403 Forbidden — that’s your OAC working correctly.
Using CloudFront Access Logs to Spot Permission Errors
Filter logs for 403 or AccessDenied errors to catch any broken bucket policy rules fast.
Cleaning Up OAI Resources After a Successful Migration

Safely Detaching OAI from All Distributions
- Remove OAI from each CloudFront distribution’s origin settings after confirming OAC works.
Deleting Unused OAI Identities to Reduce Security Risk
- Delete orphaned OAI identities via the AWS Console to tighten your AWS CloudFront security migration posture.
Documenting the New Configuration for Future Reference
- Record your OAC IDs, bucket policies, and distribution settings for easy troubleshooting later.

Migrating from OAI to OAC is one of those tasks that sounds intimidating at first but becomes pretty straightforward once you break it down step by step. From understanding why OAC is the better choice going forward, to prepping your environment, setting up the new OAC, adjusting your S3 bucket policies, and finally validating everything works, each phase builds on the last. The key is taking your time with testing before you tear anything down.
Once you’re confident your CloudFront distribution is serving content correctly through OAC, go ahead and clean up those old OAI resources. Keeping your AWS setup tidy saves you from confusion later. If you haven’t started the migration yet, there’s no better time than now — OAI isn’t getting any new features, and OAC gives you stronger security with a lot more flexibility. Take it one step at a time, and you’ll have everything running smoothly without any surprise access issues along the way.