Migrating from Heroku to AWS can feel overwhelming, but with the right roadmap, you can move your applications smoothly while unlocking better performance and cost savings. This comprehensive Heroku to AWS migration guide is designed for developers, DevOps engineers, and technical teams ready to take control of their cloud infrastructure and reduce monthly hosting expenses.
You’ll discover how to plan your migration strategically, starting with a thorough assessment of your current Heroku setup and choosing the AWS services that best match your application needs. We’ll walk through the complete step-by-step application migration process, covering everything from initial AWS infrastructure setup to testing procedures that ensure your apps run flawlessly on their new platform.
The guide also covers critical post-migration topics like cost optimization strategies and performance tuning, helping you maximize the benefits of your move to AWS. By the end, you’ll have a clear understanding of cloud migration best practices and the confidence to execute a successful transition from Heroku’s platform-as-a-service to AWS’s flexible infrastructure options.
Understanding the Key Differences Between Heroku and AWS

Platform-as-a-Service vs Infrastructure-as-a-Service Models
Heroku operates as a Platform-as-a-Service (PaaS), handling most infrastructure concerns automatically. You push your code, and Heroku manages servers, operating systems, runtime environments, and scaling decisions. This abstraction layer simplifies deployment but limits your control over the underlying infrastructure.
AWS functions primarily as an Infrastructure-as-a-Service (IaaS) provider, giving you granular control over virtual machines, networking, storage, and security configurations. While AWS offers some PaaS options like Elastic Beanstalk and AWS App Runner, the platform excels at providing building blocks you can configure to meet specific requirements.
The shift from Heroku’s managed environment to AWS requires taking ownership of infrastructure decisions previously handled automatically. You’ll need to choose instance types, configure load balancers, set up monitoring, and manage security groups. This increased responsibility comes with greater flexibility to optimize performance and costs.
Cost Structure and Pricing Comparison
Heroku’s pricing model centers around dynos (application containers) with predictable monthly costs. Each dyno tier includes specific memory, CPU, and feature allocations. While this simplicity helps with budgeting, costs can escalate quickly as your application scales, especially when you need specialized resources like larger databases or additional add-ons.
AWS employs a pay-as-you-use model across hundreds of services. You pay separately for compute instances, storage, data transfer, and managed services. This granular pricing allows for significant cost optimization through right-sizing resources, using spot instances, or implementing auto-scaling policies that reduce costs during low-traffic periods.
| Aspect | Heroku | AWS |
|---|---|---|
| Pricing Model | Fixed monthly per dyno | Pay-per-use, granular billing |
| Small Apps | Often more expensive | Can be cost-effective with Reserved Instances |
| Large Scale | Expensive at scale | More economical with proper optimization |
| Predictability | Highly predictable | Requires monitoring and optimization |
Heroku to AWS migration often results in 30-70% cost savings for medium to large applications, but requires active cost management and optimization strategies.
Control and Customization Capabilities
Heroku’s opinionated approach limits customization options to maintain simplicity. You work within predefined dyno types, supported languages, and approved add-ons. Custom configurations, specific operating system requirements, or non-standard software installations aren’t possible without workarounds.
AWS provides complete control over your infrastructure stack. You can choose operating systems, install custom software, configure network topology, and implement specialized security requirements. This flexibility supports complex architectures, compliance requirements, and performance optimizations that aren’t possible on Heroku.
Key areas where AWS offers superior control include:
- Operating System Selection: Choose from various Linux distributions or Windows Server
- Custom Software Installation: Install any required libraries, databases, or tools
- Network Configuration: Design VPCs, subnets, and security groups to match your requirements
- Resource Allocation: Fine-tune CPU, memory, and storage configurations
- Security Policies: Implement custom access controls and encryption strategies
Scalability and Performance Differences
Heroku handles scaling through dyno management, automatically distributing traffic across available instances. Vertical scaling involves upgrading to higher-tier dynos, while horizontal scaling adds more dyno instances. This approach works well for standard web applications but has limitations for specialized workloads.
AWS offers multiple scaling approaches with greater granularity. Auto Scaling Groups can automatically adjust instance counts based on metrics like CPU usage, memory consumption, or custom application metrics. You can combine different instance types within the same application, using compute-optimized instances for processing-heavy tasks and memory-optimized instances for data-intensive operations.
Performance advantages of AWS include:
- Instance Variety: Choose from dozens of instance types optimized for different workloads
- Geographic Distribution: Deploy across multiple regions for reduced latency
- Dedicated Hardware: Access to bare metal instances and dedicated tenancy options
- Advanced Networking: Enhanced networking features for high-performance computing
- Storage Options: Multiple storage types including NVMe SSD and high-IOPS configurations
AWS infrastructure typically delivers better price-to-performance ratios, especially for applications with specific performance requirements or variable traffic patterns. The ability to mix instance types and implement sophisticated scaling strategies makes AWS particularly suitable for complex, high-performance applications that have outgrown Heroku’s standardized environment.
Pre-Migration Planning and Assessment

Auditing Your Current Heroku Application Architecture
Before making the jump from Heroku to AWS, you need to understand exactly what you’re working with. Start by documenting your current Heroku setup in detail. List all your dynos, including web, worker, and scheduler processes, along with their resource allocations. Note which buildpacks you’re using and any custom configurations you’ve implemented.
Take inventory of your add-ons like PostgreSQL, Redis, SendGrid, or New Relic. These services often have direct AWS equivalents, but the migration approach varies for each. Document your current performance metrics, including response times, throughput, and resource utilization patterns. This baseline data becomes crucial when sizing your AWS infrastructure.
Pay special attention to your application’s scaling patterns. Does your traffic spike during certain hours? Do you rely on Heroku’s automatic scaling features? Understanding these patterns helps you choose the right AWS services and configure auto-scaling policies appropriately.
Review your deployment pipeline and release processes. Heroku’s git-based deployments might need restructuring for AWS deployment tools like CodeDeploy or AWS CodePipeline. Document your current CI/CD workflows, environment variables, and configuration management practices.
Identifying Dependencies and Third-Party Integrations
Map out every external service your application connects to. This includes payment processors, email services, monitoring tools, content delivery networks, and any APIs your app consumes. Some integrations might work seamlessly with AWS, while others may require configuration changes or alternative solutions.
Check if your current third-party services offer AWS-specific features or optimizations. For example, many SaaS providers have native VPC connectivity options or AWS Marketplace integrations that could simplify your setup and potentially reduce costs.
Document your current networking setup, including any custom domains, SSL certificates, and routing configurations. Heroku handles much of this automatically, but AWS requires explicit configuration of Route 53, CloudFront, and Application Load Balancers.
Review your monitoring and logging setup. If you’re using Heroku’s built-in logging or third-party add-ons, you’ll need to plan how to replicate this functionality using CloudWatch, AWS X-Ray, or other monitoring solutions.
Calculating Total Cost of Ownership on AWS
AWS pricing differs significantly from Heroku’s straightforward dyno-based model. Start by mapping your current Heroku costs to equivalent AWS services. A standard web dyno might translate to an EC2 instance, ECS task, or Lambda function, depending on your chosen architecture.
Create a detailed cost model that includes compute resources, storage, data transfer, and managed services. Don’t forget about often-overlooked costs like NAT gateways, load balancers, and CloudWatch logs storage. Use the AWS Pricing Calculator to get accurate estimates based on your specific requirements.
Consider different AWS deployment models and their cost implications:
- EC2 instances: Direct control but requires more management
- ECS/Fargate: Container-based with varying pricing models
- Elastic Beanstalk: Closest to Heroku’s experience
- Lambda: Serverless option for specific use cases
Factor in operational costs beyond AWS services. You might need additional tooling for deployment, monitoring, or security. Consider whether you’ll need dedicated DevOps resources or if you’ll use managed services to reduce operational overhead.
Compare costs across different usage scenarios. AWS often provides better economics at scale, but small applications might initially cost more than Heroku. Plan for growth and evaluate how costs change as your usage increases. Remember to account for Reserved Instance discounts and Savings Plans that can significantly reduce long-term AWS costs.
Choosing the Right AWS Services for Your Migration

Selecting Compute Options: EC2, ECS, or Lambda
Moving from Heroku’s simplified app hosting to AWS means choosing the compute service that best fits your application architecture. EC2 instances offer the closest parallel to traditional servers, giving you complete control over the operating system and environment. This works well for applications that need specific configurations or when you want to lift-and-shift your existing setup with minimal changes.
Amazon ECS (Elastic Container Service) shines when your Heroku app already uses Docker containers or you want to modernize your deployment strategy. ECS handles container orchestration while you maintain control over the underlying infrastructure. You can run ECS on EC2 instances for maximum flexibility or use Fargate for a serverless container experience that eliminates server management entirely.
AWS Lambda transforms how you think about application deployment by running code without provisioning servers. This serverless approach works perfectly for APIs, background jobs, and event-driven functions. Many developers migrating from Heroku find Lambda ideal for breaking monolithic applications into microservices.
| Service | Best For | Pricing Model | Management Overhead |
|---|---|---|---|
| EC2 | Full control, legacy apps | Per hour/second | High |
| ECS | Containerized apps | Container-based | Medium |
| Lambda | Event-driven, APIs | Per execution | Minimal |
Database Migration: RDS, DynamoDB, or Self-Managed Solutions
Database selection significantly impacts your Heroku to AWS migration success. Amazon RDS provides managed relational databases compatible with PostgreSQL, MySQL, and other engines commonly used on Heroku. RDS handles backups, patching, and scaling while maintaining familiar SQL interfaces your application already uses.
DynamoDB offers a NoSQL alternative that scales automatically and integrates seamlessly with other AWS services. Consider DynamoDB when your application handles unpredictable traffic patterns or you want to eliminate database administration tasks entirely.
Self-managed databases on EC2 instances give you complete control but require more operational expertise. This approach makes sense when you need specific database configurations not available in managed services or have compliance requirements demanding full control.
Database migration strategies vary based on your current setup:
- Direct migration: Use AWS Database Migration Service (DMS) for minimal downtime
- Hybrid approach: Run both databases temporarily during transition
- Gradual migration: Move data in phases while testing functionality
Storage and Content Delivery Network Setup
Amazon S3 replaces Heroku’s ephemeral file system with durable, scalable object storage. S3 integrates with your AWS application migration by storing user uploads, static assets, and backups. Configure different storage classes to optimize costs based on access patterns.
CloudFront, AWS’s content delivery network, dramatically improves global performance by caching content at edge locations worldwide. This becomes especially important when migrating from Heroku’s limited geographic distribution.
Storage architecture considerations:
- Use S3 for static assets and user-generated content
- Implement CloudFront for faster global content delivery
- Configure S3 lifecycle policies to automatically move old data to cheaper storage tiers
- Set up cross-region replication for disaster recovery
Networking and Security Service Selection
Amazon VPC (Virtual Private Cloud) creates your isolated network environment, replacing Heroku’s shared networking model. Design your VPC with public and private subnets to enhance security while maintaining internet connectivity where needed.
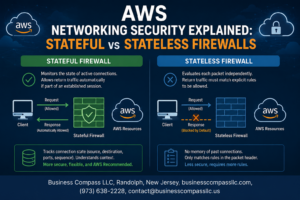
Security Groups and NACLs (Network Access Control Lists) provide layered security controls. Security Groups act as virtual firewalls for individual resources, while NACLs control traffic at the subnet level. This dual approach offers more granular control than Heroku’s simplified security model.
Essential networking services for your migration:
- Application Load Balancer: Distributes traffic across multiple instances
- Route 53: Manages DNS and health checks
- AWS WAF: Protects against web-based attacks
- VPN Gateway: Connects on-premises resources securely
AWS Identity and Access Management (IAM) controls who can access your resources and what actions they can perform. Create specific roles and policies rather than using broad permissions, following the principle of least privilege to enhance your cloud migration best practices.
Setting Up Your AWS Infrastructure

Creating VPC and Network Architecture
Building a proper network foundation is the first step in your AWS infrastructure setup. When moving from Heroku’s managed platform, you’ll need to design your Virtual Private Cloud (VPC) from scratch. Start by creating a VPC with multiple availability zones for high availability – typically, use at least two AZs in your chosen region.
Design your subnets strategically. Create public subnets for resources that need internet access (like load balancers) and private subnets for your application servers and databases. A common pattern is to have public subnets in each AZ for load balancers and NAT gateways, with private subnets hosting your actual applications.
Configure your internet gateway for public subnet connectivity and set up NAT gateways in each AZ to allow private subnet resources to reach the internet for updates and external API calls. Route tables tie everything together – associate your public subnets with routes pointing to the internet gateway, and private subnets with routes through NAT gateways.
Network ACLs provide an additional security layer at the subnet level. While security groups handle instance-level filtering, NACLs offer stateless filtering that can block traffic before it reaches your instances.
Configuring Auto Scaling Groups and Load Balancers
Auto Scaling Groups (ASGs) replace Heroku’s automatic scaling functionality. Create launch templates first, defining your instance type, AMI, security groups, and user data scripts. These templates ensure consistent instance configuration across your scaling events.
Set up your ASG with minimum, desired, and maximum instance counts based on your application’s traffic patterns. Configure scaling policies using CloudWatch metrics – CPU utilization, memory usage, or custom application metrics can trigger scaling events. Target tracking policies work well for most applications, automatically adjusting capacity to maintain specific metric targets.
Application Load Balancers (ALBs) distribute traffic across your instances. Configure health checks that accurately reflect your application’s readiness – use specific endpoints that verify database connectivity and critical dependencies. Set appropriate thresholds for healthy and unhealthy instance detection.
Enable connection draining to handle deployments gracefully. This prevents new requests from reaching instances being terminated while allowing existing connections to complete naturally.
Implementing Security Groups and IAM Policies
Security groups act as virtual firewalls for your EC2 instances. Create specific security groups for different application tiers – web servers, application servers, and databases should have separate groups with minimal required access.
Follow the principle of least privilege. Web server security groups might allow HTTP/HTTPS from anywhere, while application server groups only accept traffic from web server security groups. Database security groups should only allow connections from application servers on specific ports.
IAM policies control what AWS services your applications can access. Create specific roles for your EC2 instances with only the permissions they need. Use AWS managed policies when possible, but create custom policies for specific application requirements.
Implement cross-account access carefully if you’re using multiple AWS accounts. Service-linked roles and resource-based policies help manage permissions across account boundaries without compromising security.
Setting Up Monitoring and Logging with CloudWatch
CloudWatch replaces Heroku’s built-in logging and monitoring. Configure CloudWatch agent on your instances to collect system-level metrics like memory usage, disk utilization, and network statistics that aren’t available by default.
Create custom metrics for application-specific monitoring. Use the CloudWatch API or agent to send business metrics, error rates, and performance data. This gives you deeper visibility than Heroku’s basic application metrics.
Set up log groups for different application components. Configure log retention policies to balance cost and compliance requirements. Use log insights to query and analyze logs efficiently – create saved queries for common troubleshooting scenarios.
CloudWatch alarms notify you about issues before they impact users. Create alarms for critical metrics with appropriate thresholds and notification channels. Use SNS topics to route notifications to email, SMS, or integration platforms like Slack.
Dashboard creation helps visualize your application’s health. Build dashboards showing key performance indicators, error rates, and resource utilization. Share dashboards across teams to improve collaboration and incident response.
Step-by-Step Application Migration Process

Preparing Your Codebase for AWS Deployment
Before moving your application to AWS, you’ll need to make several code adjustments to ensure smooth deployment. Start by reviewing your Heroku-specific configurations and dependencies that won’t work on AWS.
Remove Heroku-specific buildpacks and replace them with AWS-compatible alternatives. If you’re using Heroku’s automatic SSL certificates, you’ll need to configure AWS Certificate Manager for SSL/TLS termination. Update any hardcoded Heroku URLs or endpoints to use environment variables that can be configured for your AWS environment.
Your Procfile won’t be needed on AWS, so extract the commands and adapt them for your chosen AWS service. For EC2 deployments, create startup scripts or systemd services. For containerized applications using ECS or EKS, convert your Procfile commands into Dockerfile instructions or Kubernetes deployment configurations.
Update logging configurations to work with CloudWatch Logs instead of Heroku’s built-in logging. This might involve installing the CloudWatch agent or updating your application’s logging libraries to send logs directly to CloudWatch.
Review your application’s health check endpoints and ensure they’re compatible with AWS load balancers. Application Load Balancers and Network Load Balancers have specific requirements for health check responses that may differ from Heroku’s expectations.
Database Migration and Data Transfer Strategies
Database migration represents one of the most critical aspects of your Heroku to AWS migration. The strategy you choose depends on your database size, acceptable downtime, and data consistency requirements.
For smaller databases with flexible downtime windows, a simple dump and restore approach works well. Export your Heroku database using pg_dump for PostgreSQL or appropriate tools for other database engines, then import the data into your AWS RDS instance or self-managed database.
Larger databases require more sophisticated approaches to minimize downtime. AWS Database Migration Service (DMS) provides continuous replication capabilities, allowing you to sync your Heroku database with AWS while your application continues running. This approach reduces cutover time to minutes rather than hours.
Migration Strategy Comparison:
| Method | Downtime | Complexity | Best For |
|---|---|---|---|
| Dump & Restore | Hours | Low | Small databases |
| DMS Continuous Sync | Minutes | Medium | Large databases |
| Read Replica Promotion | Minutes | High | Critical applications |
Consider implementing a read replica strategy if your database supports it. Create a read replica of your Heroku database in AWS, let it sync completely, then promote it to primary during your migration window.
Don’t forget to update connection strings, security groups, and database credentials in your application configuration. Test database connections thoroughly before going live.
Environment Variables and Configuration Management
Moving from Heroku’s config vars to AWS configuration management requires careful planning. AWS offers several options for managing environment variables and sensitive configuration data.
AWS Systems Manager Parameter Store provides a secure, scalable way to manage configuration data. You can store both plain text and encrypted parameters, with fine-grained access control through IAM policies. For highly sensitive data like database passwords and API keys, use AWS Secrets Manager, which offers automatic rotation capabilities.
For containerized applications, consider storing non-sensitive configuration in ConfigMaps (Kubernetes) or task definitions (ECS), while keeping secrets in AWS Secrets Manager or Parameter Store.
Create a mapping document that lists all your Heroku config vars and their AWS equivalents. Some variables might need modification – for example, database URLs will change when moving from Heroku Postgres to RDS.
Implement proper environment separation by using different parameter namespaces for development, staging, and production environments. This prevents accidental cross-environment configuration issues during your AWS application migration.
Update your deployment scripts to retrieve configuration values from AWS services rather than Heroku’s environment. Most AWS SDKs provide simple methods to fetch parameters and secrets programmatically.
Test your configuration management thoroughly in a staging environment before migrating production workloads. Verify that your application can successfully retrieve all required configuration values and handle cases where parameters might be temporarily unavailable.
Testing and Validation Procedures

Performance Testing on New AWS Infrastructure
Your shiny new AWS setup needs thorough performance testing before you flip the switch on production traffic. Start by establishing baseline metrics from your Heroku environment – response times, throughput rates, and resource consumption patterns. These numbers become your performance targets for the AWS migration.
Configure monitoring tools like CloudWatch, New Relic, or Datadog to track key performance indicators across your AWS infrastructure. Focus on application response times, database query performance, and network latency between services. Pay special attention to auto-scaling behaviors since AWS scaling mechanisms work differently from Heroku’s automatic dyno management.
Run comprehensive load tests that simulate real user behavior patterns. Tools like JMeter, LoadRunner, or Artillery can generate realistic traffic scenarios. Test different load patterns – gradual ramp-ups, sudden traffic spikes, and sustained high loads. Monitor how your AWS resources respond and verify that auto-scaling policies trigger appropriately.
Database performance requires special attention during AWS application migration. Test connection pooling, query optimization, and backup/restore procedures. Compare database response times between your old Heroku Postgres setup and your new RDS or Aurora configuration. Verify that database scaling behaviors meet your application’s needs.
Security Vulnerability Assessment
Security testing takes center stage when migrating from Heroku to AWS since you’re now responsible for more security layers. Start with automated vulnerability scanning using tools like AWS Inspector, Qualys, or Nessus. These tools identify common security weaknesses in your EC2 instances, container images, and network configurations.
Conduct penetration testing on your new AWS infrastructure. Engage security professionals or use tools like OWASP ZAP and Burp Suite to test your application endpoints, authentication mechanisms, and data transmission security. Test both external-facing services and internal communication channels between AWS services.
Review IAM policies and access controls meticulously. Test that users and services have minimum required permissions – no more, no less. Verify that cross-service communications use proper authentication and that secrets management works correctly with AWS Secrets Manager or Parameter Store.
Network security testing covers VPC configurations, security groups, and network ACLs. Verify that only necessary ports remain open and that traffic flows follow expected patterns. Test your WAF rules if you’re using AWS WAF, and validate that DDoS protection mechanisms function properly.
Load Testing and Stress Testing
Load testing goes beyond basic performance checks – it validates that your AWS infrastructure handles real-world traffic patterns safely. Design test scenarios that mirror your actual user behavior, including peak usage periods, geographic distribution, and typical session durations.
Start with baseline load testing at expected traffic levels. Gradually increase load until you identify breaking points. Document exactly when and how your system degrades – does response time gradually increase, or do you hit a hard wall where everything stops working? Understanding these failure modes helps you set appropriate monitoring alerts and auto-scaling triggers.
Stress testing pushes your system beyond normal operating limits. This reveals how gracefully your AWS infrastructure degrades under extreme conditions. Test scenarios like sudden traffic spikes that are 5x or 10x your normal load. Monitor how quickly auto-scaling responds and whether your application maintains functionality during scaling events.
Don’t forget to test failure scenarios during load conditions. What happens when an EC2 instance fails during peak traffic? How does your load balancer respond when multiple instances become unhealthy simultaneously? These edge cases often reveal configuration issues that only surface under stress.
Data Integrity Verification
Data integrity testing ensures your AWS migration preserves every piece of critical information. Start by taking detailed snapshots of your Heroku database before migration begins. These snapshots become your verification baseline for the AWS environment.
Compare record counts, data types, and relationships between your source and destination databases. Write scripts that checksum critical data tables and compare results between environments. Pay attention to timestamp formats, character encoding, and decimal precision – these details often cause subtle data corruption during migration.
Test your backup and restore procedures thoroughly. Verify that AWS RDS automated backups work correctly and that point-in-time recovery functions as expected. Practice restoring data from different backup points and confirm that restored data maintains integrity.
File storage migration requires separate integrity checks. If you’re moving from Heroku’s ephemeral filesystem to S3, verify that all files transfer completely and maintain their original checksums. Test file upload and retrieval processes to ensure your application can access stored files correctly in the new AWS environment.
Validate data migration scripts multiple times with test datasets before running them on production data. Create rollback procedures for each migration step and test these rollback processes with sample data to ensure they work when you need them most.
Go-Live Strategy and Rollback Planning

DNS Cutover and Traffic Routing
The DNS cutover represents the critical moment in your Heroku to AWS migration where live traffic begins flowing to your new infrastructure. This process requires careful timing and preparation to minimize downtime and user impact.
Start by reducing your DNS TTL (Time To Live) values to 300 seconds at least 24-48 hours before your planned cutover. This ensures faster propagation when you make the actual change. Document all current DNS records pointing to Heroku, including your root domain, www subdomain, and any custom subdomains.
Create a detailed cutover checklist with specific times and responsibilities. Consider using AWS Route 53 for enhanced control over DNS routing, as it provides health checks and automatic failover capabilities. Configure Route 53 health checks to monitor your AWS application endpoints before the cutover.
For the actual migration, implement a phased approach:
- Phase 1: Route a small percentage of traffic (5-10%) to AWS while monitoring performance
- Phase 2: Gradually increase traffic to 50% if initial phase succeeds
- Phase 3: Complete the cutover by routing 100% of traffic to AWS
Use Route 53 weighted routing policies to control traffic distribution during this process. Keep your Heroku application running during the initial phases to enable quick rollback if needed. Monitor both platforms simultaneously to ensure data consistency and performance metrics align with expectations.
Blue-Green Deployment Implementation
Blue-green deployment provides the safest approach for your Heroku AWS migration tutorial by maintaining two identical production environments. This strategy eliminates downtime and creates an instant rollback option if issues arise during the go-live process.
Set up your “green” environment on AWS while your “blue” environment remains active on Heroku. The green environment should mirror your current Heroku setup exactly, including:
- Application code and configurations
- Database schemas and data
- Third-party integrations and API connections
- SSL certificates and security configurations
Use AWS Application Load Balancer (ALB) or CloudFront to manage traffic switching between environments. Configure your load balancer with target groups pointing to both Heroku and AWS instances initially.
The deployment process follows these steps:
- Prepare: Ensure both environments are synchronized and healthy
- Switch: Update load balancer rules to route traffic to AWS (green)
- Validate: Monitor application performance and user experience
- Commit or Rollback: Either decommission Heroku or switch back if issues occur
Implement automated health checks using AWS CloudWatch and custom application metrics. Set up alerts for key performance indicators like response time, error rates, and database connections. This monitoring ensures you can detect problems immediately and trigger rollback procedures if necessary.
Keep both environments running for at least 24-48 hours after cutover to validate stability before decommissioning the Heroku infrastructure.
Monitoring Critical Metrics During Launch
Comprehensive monitoring during your AWS application migration launch prevents small issues from becoming major outages. Establish baseline metrics from your Heroku environment to compare against AWS performance during and after the migration.
Focus on these critical metrics:
Application Performance Metrics:
- Response time and latency
- Error rates (4xx and 5xx HTTP responses)
- Throughput (requests per second)
- Memory and CPU utilization
- Database connection pool usage
Infrastructure Health Metrics:
- EC2 instance health and status checks
- Load balancer target health
- Database performance (RDS metrics)
- Network connectivity and DNS resolution
- SSL certificate validity
Business Impact Metrics:
- User session duration
- Conversion rates
- Revenue-generating transactions
- Customer support ticket volume
- Page load times from different geographic regions
Set up AWS CloudWatch dashboards with real-time visibility into all critical systems. Configure alerts with appropriate thresholds – not too sensitive to cause alert fatigue, but strict enough to catch real problems quickly. Use AWS X-Ray for distributed tracing to identify bottlenecks in your application architecture.
Implement log aggregation using AWS CloudWatch Logs or a third-party solution like ELK stack. This centralized logging helps correlate issues across multiple services and provides detailed context when problems occur.
Create an escalation matrix with clear roles and contact information for your migration team. Establish communication channels (Slack, PagerDuty, or similar) for real-time collaboration during the launch window. Document your rollback procedures clearly and ensure all team members understand their responsibilities if rapid response becomes necessary.
Post-Migration Optimization and Cost Management

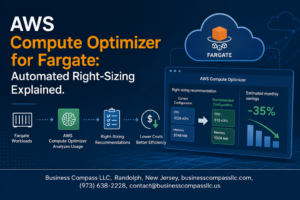
Right-Sizing Resources Based on Actual Usage
After completing your Heroku AWS migration, your cloud infrastructure likely needs fine-tuning. Many organizations over-provision resources during migration to ensure smooth operations, but this approach can quickly drain your budget. Start by analyzing your actual usage patterns using AWS CloudWatch metrics and Cost Explorer.
Monitor your EC2 instances, RDS databases, and other services for at least two weeks to establish baseline performance metrics. Look for instances with consistently low CPU utilization (under 20%) or memory usage that rarely exceeds 50% of allocated capacity. These are prime candidates for downsizing.
Consider these optimization strategies:
- EC2 Instance Types: Switch from general-purpose instances to compute-optimized or memory-optimized instances based on your application’s specific needs
- Reserved Instances: Commit to one or three-year terms for predictable workloads to save up to 75% compared to on-demand pricing
- Spot Instances: Use for non-critical workloads and development environments where interruptions are acceptable
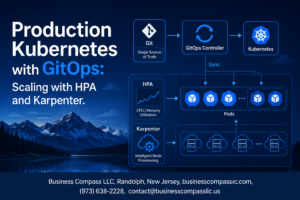
- Auto Scaling: Implement horizontal scaling policies that automatically adjust capacity based on demand
For RDS databases, evaluate your instance classes and consider Aurora Serverless for applications with variable traffic patterns. Storage optimization includes moving infrequently accessed data to cheaper storage classes and enabling automated backups with appropriate retention periods.
Implementing Cost Monitoring and Alerts
Cost visibility becomes crucial once you’ve moved from Heroku’s simplified pricing model to AWS’s granular billing structure. Set up comprehensive cost monitoring to prevent bill shock and maintain budget control throughout your cloud migration best practices implementation.
Configure AWS Budgets to track spending across different dimensions:
| Budget Type | Use Case | Alert Threshold |
|---|---|---|
| Cost Budget | Overall monthly spending | 80% and 100% of budget |
| Usage Budget | Specific service consumption | 85% of allocated usage |
| Reservation Budget | Reserved Instance utilization | Below 80% utilization |
Create CloudWatch billing alarms for real-time cost monitoring. Set up multiple alert levels – warning alerts at 50% of your monthly budget and critical alerts at 85%. Include multiple notification channels like email, SMS, and Slack integration for immediate visibility.
Use AWS Cost Anomaly Detection to automatically identify unusual spending patterns. This machine learning service learns your typical usage patterns and alerts you when costs deviate significantly from expected ranges.
Tag all resources consistently using a standardized tagging strategy. Essential tags include Environment (prod/staging/dev), Project, Owner, and Cost Center. These tags enable detailed cost allocation reports and help identify optimization opportunities across different teams and projects.
Setting Up Automated Backup and Disaster Recovery
Your AWS infrastructure setup must include robust backup and disaster recovery procedures that surpass what Heroku provided. Design a multi-layered approach that protects against various failure scenarios while balancing cost and recovery time objectives.
Implement automated EBS snapshots for your EC2 instances using AWS Backup or custom Lambda functions. Schedule daily snapshots for production systems and weekly snapshots for development environments. Configure snapshot lifecycle policies to automatically delete old backups and control storage costs.
For RDS databases, enable automated backups with point-in-time recovery. Set backup retention periods based on your business requirements – typically 7-30 days for most applications. Consider cross-region backups for critical databases to protect against regional failures.
Create a comprehensive disaster recovery strategy:
- RTO (Recovery Time Objective): Define acceptable downtime for different service tiers
- RPO (Recovery Point Objective): Determine maximum acceptable data loss intervals
- Multi-AZ Deployments: Use for high availability within a single region
- Cross-Region Replication: Implement for critical systems requiring geographic redundancy
Document your recovery procedures and test them regularly. Create runbooks with step-by-step instructions for common failure scenarios. Use AWS Systems Manager for automated recovery workflows and consider AWS Disaster Recovery service for mission-critical applications.
Set up monitoring and alerting for backup failures using CloudWatch and SNS. Regular backup testing ensures your disaster recovery procedures work when needed and helps identify potential issues before they become critical problems.
Moving your applications from Heroku to AWS doesn’t have to be overwhelming when you break it down into manageable steps. We’ve covered the fundamental differences between these platforms, walked through proper planning and assessment, and explored how to choose the right AWS services for your needs. The migration process itself involves careful infrastructure setup, systematic application transfer, and thorough testing to ensure everything works smoothly in your new environment.
Success comes down to preparation and patience. Take time to plan your go-live strategy, have a solid rollback plan ready, and don’t rush the testing phase. Once you’re running on AWS, focus on optimizing your setup and managing costs effectively. Start small with a non-critical application if possible, learn from that experience, and then tackle your more complex systems. With the right approach, you’ll end up with a more scalable, cost-effective infrastructure that gives you greater control over your applications.