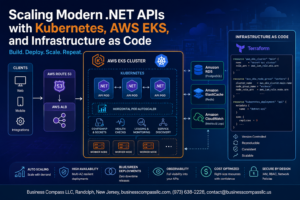
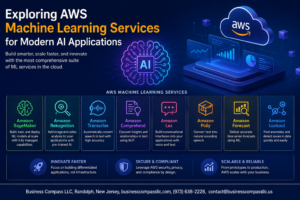
Kubernetes has become the go-to solution for container orchestration, and AWS EKS makes running Kubernetes clusters in the cloud easier than ever. This comprehensive Kubernetes tutorial is designed for developers, DevOps engineers, and cloud architects who want to master container deployment on AWS and build scalable applications.
You’ll start by exploring Kubernetes architecture and its core components, then dive into the practical side with our step-by-step AWS EKS setup guide. We’ll cover essential Kubernetes objects you need for application deployment, walk through EKS deployment best practices, and show you proven Kubernetes scaling strategies for high-performance apps.
The guide also includes AWS EKS monitoring techniques and Kubernetes troubleshooting methods to keep your applications running smoothly in production. By the end, you’ll have the confidence to deploy, scale, and maintain robust containerized applications on AWS EKS.
Understanding Kubernetes Architecture and Core Components
Master Node Components and Their Critical Functions
The Kubernetes master node operates as the brain of your cluster, housing the API server that handles all communication, etcd for storing cluster state data, the scheduler that assigns pods to worker nodes, and the controller manager that maintains desired system state. These components work together to ensure your Kubernetes architecture remains stable and responsive to deployment requests.
Worker Node Elements That Power Your Applications
Worker nodes run your actual applications through key components: kubelet acts as the node agent communicating with the master, kube-proxy manages network routing and load balancing, and the container runtime (like Docker or containerd) executes your containers. Each worker node also includes DNS services and monitoring agents that enable seamless container orchestration across your cluster.
Pod Lifecycle Management and Container Orchestration
Pods represent the smallest deployable units in Kubernetes, containing one or more tightly coupled containers that share storage and network resources. The pod lifecycle moves through phases including Pending, Running, Succeeded, Failed, and Unknown, with Kubernetes automatically handling container restarts, health checks, and resource allocation. This container orchestration ensures applications maintain high availability and proper resource distribution.
Service Discovery and Network Communication Essentials
Kubernetes services provide stable network endpoints for accessing pods, even as underlying containers restart or scale. The cluster DNS automatically resolves service names to IP addresses, while different service types (ClusterIP, NodePort, LoadBalancer) offer various exposure methods. Network policies control traffic flow between pods, creating secure communication channels that support both internal cluster communication and external access patterns essential for production deployments.
Essential Kubernetes Objects for Application Deployment
Creating and Managing Deployments for Scalable Applications
Deployments represent the backbone of Kubernetes application management, providing declarative updates and automated rollbacks for containerized workloads. Creating a deployment involves defining your desired state through YAML manifests, specifying replica counts, container images, and resource requirements. The deployment controller continuously monitors and maintains this desired state, automatically replacing failed pods and managing rolling updates without downtime. Best practices include setting appropriate resource limits, implementing readiness and liveness probes, and using deployment strategies like rolling updates or blue-green deployments. You can scale applications horizontally by adjusting replica counts or vertically by modifying resource allocations, making deployments perfect for handling variable traffic loads in production environments.
ConfigMaps and Secrets for Secure Configuration Management
ConfigMaps and Secrets separate configuration data from application code, following the twelve-factor app methodology for maintainable deployments. ConfigMaps store non-sensitive configuration data like environment variables, configuration files, and command-line arguments, while Secrets handle sensitive information such as passwords, API keys, and certificates with base64 encoding and optional encryption at rest. Both objects can be consumed by pods through environment variables, volume mounts, or command-line arguments. Create ConfigMaps from literal values, files, or directories using kubectl commands, and always use Secrets for sensitive data to leverage Kubernetes’ built-in security features. This approach enables environment-specific configurations without rebuilding container images, streamlining your container deployment AWS workflow.
Services and Ingress Controllers for Traffic Routing
Services provide stable networking endpoints for dynamic pod collections, abstracting the complexity of pod IP changes and load balancing. The three main service types—ClusterIP for internal communication, NodePort for external access on specific ports, and LoadBalancer for cloud provider integration—address different networking scenarios in your Kubernetes architecture. Ingress controllers extend this functionality by providing HTTP/HTTPS routing rules, SSL termination, and path-based routing for multiple services through a single entry point. Popular ingress controllers like NGINX, Traefik, and AWS Load Balancer Controller offer advanced features such as rate limiting, authentication, and request transformation. Proper service configuration with appropriate selectors and port mappings ensures reliable traffic distribution, while ingress rules enable sophisticated routing patterns for microservices architectures running on AWS EKS.
Setting Up Your AWS EKS Environment
Prerequisites and IAM Roles Configuration
Before diving into your AWS EKS setup, you need to prepare your AWS environment with proper permissions and prerequisites. Start by installing the AWS CLI and ensuring your AWS account has sufficient privileges to create EKS clusters. Create an EKS service role with the AmazonEKSClusterPolicy attached, which allows the Kubernetes control plane to manage resources on your behalf. You’ll also need a node group role with policies like AmazonEKSWorkerNodePolicy, AmazonEKS_CNI_Policy, and AmazonEC2ContainerRegistryReadOnly for worker nodes to function properly. Don’t forget to configure your VPC with public and private subnets across multiple availability zones to ensure high availability for your cluster.
Creating Your First EKS Cluster Using AWS Console
Navigate to the Amazon EKS console and click “Create cluster” to begin your EKS deployment guide journey. Choose a cluster name and select the Kubernetes version that matches your application requirements. Select the service role you created earlier and configure networking by choosing your VPC and subnets. Enable endpoint access based on your security needs – public access for external connectivity or private access for enhanced security. Configure logging options to capture API server, audit, authenticator, controller manager, and scheduler logs for better monitoring capabilities. The cluster creation process typically takes 15-20 minutes, during which AWS provisions the managed control plane across multiple availability zones.
Installing and Configuring kubectl for Cluster Management
Download and install kubectl, the command-line tool essential for Kubernetes tutorial operations and cluster management. For Windows users, use chocolatey or download the binary directly, while macOS users can leverage Homebrew for easy installation. Linux users should download the binary and add it to their PATH. After installation, configure kubectl to communicate with your EKS cluster using the AWS CLI command aws eks update-kubeconfig --region your-region --name your-cluster-name. Verify the connection by running kubectl get nodes to see your cluster nodes. This setup enables seamless container orchestration management from your local machine.
Connecting Local Development Environment to EKS
Establishing a robust connection between your local development environment and EKS streamlines your development workflow significantly. Configure your AWS credentials using aws configure or through environment variables to ensure proper authentication. Install eksctl, a simple CLI tool for creating and managing EKS clusters, which simplifies many administrative tasks. Set up your local Docker environment to push images to Amazon ECR by authenticating with aws ecr get-login-password. Create a dedicated namespace for your development work using kubectl create namespace dev-environment to isolate your applications. Consider using tools like Lens or k9s for visual cluster management, making your container deployment AWS experience more intuitive and efficient.
Deploying Applications on EKS with Best Practices
Containerizing Applications for Kubernetes Deployment
Docker containers serve as the foundation for Kubernetes deployment success. Start by creating lightweight base images using Alpine Linux or distroless containers to reduce attack surface and improve startup times. Multi-stage builds optimize image size by separating build dependencies from runtime requirements. Your Dockerfile should follow the principle of least privilege, running containers as non-root users and avoiding unnecessary packages. Include health check endpoints in your application code and ensure proper signal handling for graceful shutdowns. Container security scanning tools like Trivy or Snyk should be integrated into your CI/CD pipeline to catch vulnerabilities before deployment.
Writing Effective YAML Manifests for Production
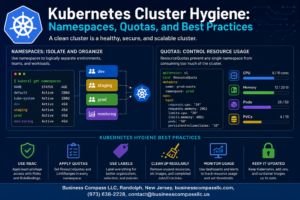
Production-ready YAML manifests require careful attention to resource specifications and metadata organization. Structure your manifests with clear labels and annotations that support GitOps workflows and cluster management tools. Use namespaces to isolate workloads and implement proper RBAC policies. Template your manifests with Helm or Kustomize to manage environment-specific configurations without code duplication. Version control all manifest files and implement validation pipelines using tools like kubeval or Open Policy Agent. Resource quotas and limit ranges should be defined at the namespace level to prevent resource exhaustion. Consider using admission controllers to enforce organizational policies across all deployments.
Implementing Health Checks and Resource Limits
Kubernetes health checks are critical for maintaining application reliability and enabling automatic recovery. Configure liveness probes to detect and restart unhealthy containers, typically checking application-specific endpoints like /health or /alive. Readiness probes ensure traffic only reaches containers ready to serve requests, preventing cascading failures during startup or deployment. Startup probes accommodate slow-starting applications without triggering premature restarts. Resource requests guarantee minimum CPU and memory allocation, while limits prevent containers from consuming excessive cluster resources. Set realistic values based on load testing and monitoring data. Memory limits should account for JVM heap size and overhead for Java applications, while CPU limits affect performance more than availability.
Managing Application Updates with Rolling Deployments
Rolling deployments provide zero-downtime updates by gradually replacing old pods with new versions. Configure deployment strategy parameters including maxSurge and maxUnavailable to control update velocity and resource usage. Blue-green deployments offer instant rollbacks but require double the resources, making them suitable for critical applications. Canary deployments minimize risk by routing small traffic percentages to new versions before full rollout. Implement proper pod disruption budgets to maintain availability during voluntary disruptions like node maintenance. Use readiness gates for complex applications requiring external validation before receiving traffic. Automated rollback triggers based on error rates or performance metrics add another safety layer to your deployment strategy.
Setting Up Persistent Storage for Stateful Applications
Stateful applications on EKS require careful storage planning using Persistent Volumes and Storage Classes. Amazon EBS CSI driver provides high-performance block storage with features like volume snapshots and encryption. Configure appropriate volume types based on IOPS requirements – gp3 for general purpose workloads, io2 for high-performance databases. StatefulSets ensure predictable pod naming and persistent volume binding for applications like databases and message queues. Implement backup strategies using volume snapshots or application-specific backup tools. Consider using Amazon EFS for shared storage scenarios requiring ReadWriteMany access patterns. Storage sizing should account for growth projections and snapshot overhead. Test disaster recovery procedures regularly to validate backup integrity and restoration processes.
Scaling Strategies for High-Performance Applications
Horizontal Pod Autoscaling Based on Metrics
The Horizontal Pod Autoscaler (HPA) automatically adjusts the number of pod replicas based on observed metrics like CPU utilization, memory consumption, or custom metrics. Configure HPA by setting target thresholds—for example, scaling out when CPU exceeds 70% and scaling in when it drops below 30%. This Kubernetes scaling strategy ensures your applications handle traffic spikes efficiently while minimizing resource waste. Use kubectl autoscale deployment commands or YAML manifests to define scaling policies. The HPA controller evaluates metrics every 15 seconds by default and makes scaling decisions to maintain your target performance levels.
Vertical Pod Autoscaling for Resource Optimization
Vertical Pod Autoscaling (VPA) optimizes individual pod resource requests and limits by analyzing historical usage patterns. Unlike HPA which adds more pods, VPA increases or decreases CPU and memory allocations for existing pods. This approach works best for applications that can’t scale horizontally or when you want to right-size resource requests. VPA operates in three modes: “Off” for recommendations only, “Initial” for setting resources at pod creation, and “Auto” for live updates. Be cautious with “Auto” mode as it restarts pods to apply new resource settings, potentially causing brief service interruptions.
Cluster Autoscaling to Handle Variable Workloads
AWS EKS Cluster Autoscaler automatically adjusts the number of worker nodes in your cluster based on pod scheduling demands. When pods can’t be scheduled due to insufficient resources, the autoscaler provisions new nodes. Conversely, it removes underutilized nodes to reduce costs. Configure node groups with appropriate scaling policies, including minimum, maximum, and desired capacity settings. The autoscaler respects pod disruption budgets and avoids scaling down nodes with system pods or pods without controllers. Set up proper IAM roles and policies to allow the autoscaler to manage EC2 instances within your AWS EKS deployment guide specifications.
Monitoring and Troubleshooting EKS Deployments
Setting Up CloudWatch for Comprehensive Logging
Enable container insights in your EKS cluster to automatically collect logs from pods, nodes, and control plane components. Configure log groups in CloudWatch to capture application logs, system events, and audit trails. Set up custom log retention policies to manage costs while maintaining visibility into your cluster’s health and performance metrics.
Implementing Prometheus and Grafana for Metrics
Deploy Prometheus using the community Helm chart to scrape metrics from your EKS nodes and applications. Install kube-state-metrics to gather cluster-level data about deployments, services, and resource utilization. Connect Grafana dashboards to visualize CPU usage, memory consumption, and network traffic patterns. Create custom alerts for threshold breaches and configure notification channels for rapid incident response.
Debugging Common Pod and Service Issues
Check pod status using kubectl describe pod to identify image pull errors, resource constraints, or configuration problems. Examine service endpoints with kubectl get endpoints to verify connectivity between pods and services. Debug networking issues by testing DNS resolution within containers and validating ingress controller configurations. Use kubectl logs with timestamps to trace application errors and correlate them with cluster events.
Performance Optimization Techniques for Cost Efficiency
Right-size your node groups by analyzing actual resource consumption patterns through CloudWatch metrics. Implement horizontal pod autoscaling based on CPU and memory thresholds to handle traffic spikes efficiently. Use cluster autoscaling to add or remove nodes automatically, reducing costs during low-demand periods. Configure resource requests and limits properly to prevent resource contention and optimize scheduling across your EKS infrastructure.
Kubernetes has become the go-to solution for managing containerized applications at scale, and AWS EKS makes it even more accessible for teams of all sizes. From understanding pods and services to setting up your first EKS cluster, you now have the foundation to deploy and scale applications with confidence. The key is starting with solid architecture knowledge, following deployment best practices, and implementing proper monitoring from day one.
Ready to put these concepts into action? Start by setting up a simple EKS cluster and deploying a basic application. Focus on getting comfortable with kubectl commands and understanding how your applications behave in the cluster. As you gain experience, gradually introduce more advanced scaling strategies and monitoring tools. Remember, mastering Kubernetes is a journey – each deployment teaches you something new about building resilient, scalable applications in the cloud.