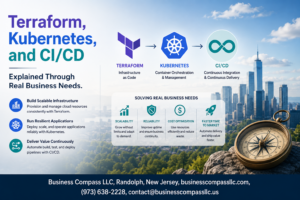
Automate Your CI/CD Pipeline with Infrastructure as Code: Deploy Jenkins Server Using Terraform
DevOps engineers and system administrators who want to streamline their Jenkins deployment process can eliminate manual setup headaches by using Terraform for automated infrastructure provisioning. This guide shows you how to deploy a production-ready Jenkins server through code, making your CI/CD pipeline infrastructure repeatable and version-controlled.
This tutorial is perfect for:
- DevOps teams managing multiple environments
- System administrators wanting to automate Jenkins deployments
- Engineers building scalable CI/CD pipeline infrastructure
You’ll learn how to:
- Set up Terraform configuration files that define your complete Jenkins infrastructure
- Design a robust Jenkins server architecture that scales with your team’s needs
- Apply Terraform best practices to create maintainable, production-ready deployments
By the end, you’ll have a fully automated Jenkins deployment process that you can reproduce across development, staging, and production environments with a single command.
Understanding Infrastructure as Code Benefits for CI/CD Pipeline Management

Eliminate manual server configuration errors and inconsistencies
Manual server configuration is like playing a dangerous game of telephone – each time someone sets up a Jenkins server by hand, small variations creep in. One administrator might install Java 11 while another uses Java 17. Security settings get missed, plugins differ between environments, and suddenly your development Jenkins behaves completely differently from production.
Infrastructure as Code eliminates these headaches by treating your Jenkins server configuration as code. When you define your entire Jenkins setup in Terraform configuration files, every deployment becomes identical. Your development, staging, and production environments use the exact same specifications, removing the “it works on my machine” problem that haunts traditional CI/CD pipeline infrastructure.
The beauty lies in consistency. Whether your team member deploys Jenkins on Monday or Friday, whether they’re a senior DevOps engineer or junior developer, the Terraform Jenkins deployment creates identical infrastructure every time. This consistency extends beyond the operating system and application layer – network configurations, security groups, storage volumes, and backup policies all remain perfectly aligned across environments.
Enable version control for your entire infrastructure setup
Your application code lives in Git repositories with complete change history, branching strategies, and rollback capabilities. Why shouldn’t your infrastructure receive the same treatment? Infrastructure as Code transforms your Jenkins server configuration into versioned, trackable code that integrates seamlessly with your existing development workflows.
Every infrastructure change becomes a commit. Need to upgrade Jenkins from version 2.401 to 2.414? That’s a pull request with peer review. Want to add monitoring capabilities or modify security settings? Track these changes through your standard code review process. When problems arise, you can quickly identify what changed and when, making troubleshooting significantly faster.
Version control also enables infrastructure branching strategies. Create feature branches to test new Jenkins configurations without affecting production systems. Experiment with plugin combinations, security hardening, or performance optimizations in isolated environments. Once validated, merge these changes through your established CI/CD pipeline infrastructure processes.
Team collaboration improves dramatically when infrastructure changes follow the same patterns as application development. Multiple team members can contribute to infrastructure improvements simultaneously, conflicts get resolved through standard merge processes, and institutional knowledge gets preserved in commit messages and documentation.
Achieve faster deployment cycles with automated provisioning
Traditional Jenkins setup involves hours of manual work: spinning up servers, configuring operating systems, installing Java, downloading Jenkins, setting up reverse proxies, configuring SSL certificates, and establishing monitoring. This process often takes an entire day and requires deep system administration knowledge.
DevOps automation tools like Terraform compress this timeline from hours to minutes. A single terraform apply command provisions your complete Jenkins infrastructure – compute instances, networking, storage, security configurations, and application installation. What previously required extensive manual intervention now happens automatically while you grab coffee.
This speed advantage compounds during scaling operations. Adding new Jenkins environments for different projects or teams becomes trivial. Instead of dedicating days to manual setup, you simply point your Terraform configuration at new resource groups or regions. The entire Jenkins deployment tutorial becomes reproducible with minimal human intervention.
Automated provisioning also reduces deployment anxiety. Manual processes carry inherent risks – forgotten steps, configuration drift, human errors during critical operations. Terraform eliminates these concerns by executing identical, tested procedures every time. Your team can deploy with confidence, knowing the infrastructure provisioning follows proven patterns.
Scale Jenkins environments effortlessly across multiple projects
Growing organizations often struggle with Jenkins proliferation. Different teams want isolated CI/CD environments, various projects require specific plugin sets, and compliance requirements demand segregated infrastructure. Managing multiple Jenkins instances manually becomes a logistical nightmare.
Infrastructure as Code transforms this challenge into an opportunity. Your Terraform Jenkins deployment becomes a reusable template that scales horizontally across unlimited environments. Need Jenkins for the mobile app team? Deploy the same infrastructure with project-specific variables. Require compliance-hardened Jenkins for financial applications? Modify security parameters while maintaining core configuration consistency.
Terraform best practices include modularization strategies that make scaling elegant. Create reusable modules for common Jenkins patterns – basic development environments, production-grade deployments, or specialized configurations for specific compliance frameworks. Teams can consume these modules while customizing relevant parameters for their unique requirements.
Resource management becomes predictable and cost-effective. Instead of guessing hardware requirements or over-provisioning to avoid performance issues, you can quickly spin up appropriately-sized environments. When projects conclude, tear down infrastructure completely with terraform destroy, ensuring you only pay for resources actively supporting business objectives.
Multi-environment management through Infrastructure as Code also enables advanced patterns like blue-green deployments for Jenkins infrastructure itself. Maintain parallel environments during major upgrades, validate changes thoroughly, then switch traffic seamlessly. This approach minimizes downtime and reduces upgrade risks across your entire CI/CD pipeline infrastructure ecosystem.
Essential Terraform Prerequisites and Setup Requirements

Install Terraform CLI and configure your local development environment
Before diving into Jenkins infrastructure automation, you need to get Terraform up and running on your machine. The installation process varies depending on your operating system, but the HashiCorp team makes it pretty straightforward.
For Windows users, downloading the binary from HashiCorp’s official website is the most reliable approach. Extract the executable to a directory that’s already in your system PATH, or create a new folder like C:\terraform and add it to your PATH environment variable. Mac users can leverage Homebrew with a simple brew install terraform command, while Linux distributions typically support package managers like apt or yum.
After installation, verify everything works by running terraform version in your terminal. You should see version information displayed, confirming the CLI is properly installed and accessible from your command line.
Next, create a dedicated workspace directory for your Jenkins infrastructure project. This keeps your Terraform configuration files organized and separate from other projects. A typical structure might look like:
jenkins-terraform/
├── main.tf
├── variables.tf
├── outputs.tf
└── terraform.tfvars
Configure your preferred code editor with Terraform syntax highlighting and auto-completion. Popular choices include Visual Studio Code with the HashiCorp Terraform extension, which provides excellent support for Infrastructure as Code development workflows.
Set up AWS credentials and configure proper IAM permissions
AWS credential configuration is critical for Terraform to interact with your AWS account securely. You have several options for providing these credentials, each suitable for different scenarios.
The AWS CLI method offers the most flexibility for local development. Install the AWS CLI and run aws configure to set up your access key ID, secret access key, default region, and output format. This creates credential files in your home directory that Terraform automatically detects and uses.
For enhanced security, create a dedicated IAM user specifically for Terraform operations rather than using your root account credentials. This IAM user needs specific permissions to create and manage AWS resources for your Jenkins deployment.
Essential IAM permissions for Jenkins server deployment include:
- EC2 permissions:
ec2:RunInstances,ec2:TerminateInstances,ec2:DescribeInstances,ec2:CreateTags - Security Group permissions:
ec2:CreateSecurityGroup,ec2:DeleteSecurityGroup,ec2:AuthorizeSecurityGroupIngress - Key Pair permissions:
ec2:CreateKeyPair,ec2:DeleteKeyPair,ec2:DescribeKeyPairs - VPC permissions:
ec2:CreateVpc,ec2:CreateSubnet,ec2:CreateInternetGateway
Create a custom IAM policy with these permissions and attach it to your Terraform user. This principle of least privilege reduces security risks while providing necessary access for infrastructure provisioning.
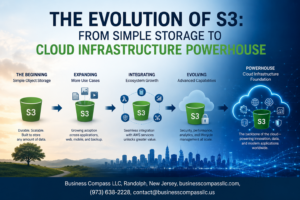
Create dedicated S3 bucket for Terraform state management
Terraform state management becomes crucial when working with team environments or production deployments. The state file contains sensitive information about your infrastructure and needs proper storage with versioning and locking capabilities.
Creating a dedicated S3 bucket for state storage provides several advantages over local state files. First, it enables team collaboration since multiple team members can access the same state file. Second, it provides automatic backup and versioning through S3’s built-in features.
Set up your state bucket with these recommended configurations:
| Setting | Value | Purpose |
|---|---|---|
| Versioning | Enabled | Track state file changes |
| Encryption | AES-256 or KMS | Protect sensitive data |
| Public Access | Blocked | Prevent unauthorized access |
| Lifecycle Policy | 90-day retention | Manage storage costs |
Create a DynamoDB table alongside your S3 bucket for state locking. This prevents multiple users from running Terraform simultaneously and corrupting the state file. The table needs a primary key called LockID with string data type.
Your backend configuration in Terraform looks like this:
terraform {
  backend "s3" {
    bucket         = "your-terraform-state-bucket"
    key            = "jenkins/terraform.tfstate"
    region         = "us-west-2"
    dynamodb_table = "terraform-state-lock"
    encrypt        = true
  }
}
Remember to run terraform init after configuring your backend to initialize the remote state storage. This command downloads necessary providers and sets up the backend connection, preparing your environment for Jenkins infrastructure deployment.
Designing Your Jenkins Server Infrastructure Architecture

Define VPC networking components for secure Jenkins deployment
Setting up a robust VPC architecture forms the foundation of your Jenkins infrastructure deployment. Your Virtual Private Cloud should include public and private subnets across multiple availability zones for high availability and fault tolerance. Place your Jenkins master in a private subnet to enhance security, while positioning load balancers or bastion hosts in public subnets for controlled access.
Create separate subnets for different tiers of your Infrastructure as Code setup. The web tier subnet hosts your load balancer, the application tier contains your Jenkins master server, and the data tier accommodates your database or persistent storage solutions. This multi-tier approach provides better security isolation and allows for granular network access control.
Configure route tables to direct traffic appropriately between subnets. Your private subnets need routes to a NAT Gateway for outbound internet access, enabling Jenkins to download plugins and updates while maintaining security. Public subnets route directly to an Internet Gateway for external connectivity.
Implement VPC Flow Logs to monitor network traffic and identify potential security issues. These logs become invaluable for troubleshooting Jenkins connectivity problems and ensuring your Terraform Jenkins deployment maintains optimal performance.
Configure security groups to control inbound and outbound traffic
Security groups act as virtual firewalls for your Jenkins server automation setup. Design security groups with the principle of least privilege, allowing only necessary traffic to reach your Jenkins infrastructure. Create separate security groups for different components rather than using a single permissive group.
For your Jenkins master server, configure inbound rules that allow:
- SSH access (port 22) from your bastion host or specific IP ranges
- HTTPS traffic (port 443) from your load balancer security group
- Jenkins web interface access (port 8080) from authorized sources
- Agent connectivity (port 50000) from Jenkins agent security groups
Outbound rules should permit:
- HTTPS traffic for plugin downloads and updates
- Database connections to your persistence layer
- Communication with version control systems
- Access to artifact repositories and container registries
Build security groups for Jenkins agents separately, allowing inbound connections only from your Jenkins master. This segmentation prevents unauthorized access to your CI/CD pipeline infrastructure while maintaining necessary functionality.
Name your security groups descriptively and use tags for better organization. Examples include “jenkins-master-sg,” “jenkins-agent-sg,” and “jenkins-alb-sg” to clearly identify their purposes within your Terraform configuration files.
Select optimal EC2 instance types for your Jenkins workload requirements
Choosing the right EC2 instance type directly impacts your Jenkins performance and cost efficiency. Start by analyzing your expected workload patterns, including the number of concurrent builds, build complexity, and peak usage times. This analysis helps determine the appropriate CPU, memory, and network performance requirements.
For most Jenkins deployments, consider these instance families:
| Instance Type | Best For | CPU | Memory | Network |
|---|---|---|---|---|
| t3.medium | Light workloads, getting started | 2 vCPU | 4 GiB | Up to 5 Gbps |
| m5.large | Balanced workloads | 2 vCPU | 8 GiB | Up to 10 Gbps |
| c5.xlarge | CPU-intensive builds | 4 vCPU | 8 GiB | Up to 10 Gbps |
| r5.large | Memory-intensive applications | 2 vCPU | 16 GiB | Up to 10 Gbps |
Memory requirements scale with the number of concurrent builds and plugins installed. Plan for at least 4 GB of RAM for basic setups, with 8-16 GB recommended for production environments running multiple concurrent jobs.
Consider burstable performance instances (T3 family) for development environments with variable workloads. These instances provide baseline performance with the ability to burst when needed, offering cost savings for non-production environments.
Plan for vertical scaling by choosing instance types that allow easy upgrades. Your Terraform Jenkins deployment should accommodate growth without requiring complete infrastructure redesign.
Plan storage solutions for Jenkins data persistence and backups
Jenkins data persistence requires careful planning to prevent data loss and ensure consistent performance. Use Amazon EBS volumes for primary storage, selecting volume types based on your performance and cost requirements. General Purpose SSD (gp3) volumes provide the best balance of performance and cost for most Jenkins workloads.
Separate your Jenkins data across multiple volumes:
- Root volume: Operating system and Jenkins application (20-50 GB)
- Jenkins home volume: Configuration, jobs, and plugins (100+ GB)
- Build artifacts volume: Temporary build data and artifacts (size varies)
Implement automated backup strategies using EBS snapshots scheduled through Terraform or AWS Backup services. Daily snapshots of your Jenkins home volume ensure you can recover from failures or configuration mistakes quickly.
Consider using Amazon EFS for shared storage when running distributed Jenkins setups with multiple masters or when build artifacts need sharing across instances. EFS provides the scalability and concurrent access patterns that traditional EBS volumes cannot support.
Plan for log rotation and artifact cleanup to prevent storage volumes from growing indefinitely. Jenkins generates substantial log data, and build artifacts can consume significant space over time. Configure retention policies within Jenkins and implement automated cleanup scripts to maintain optimal storage usage.
Use encryption at rest for all volumes containing sensitive build data or credentials. Your DevOps automation tools should enforce security standards throughout the infrastructure provisioning process, and encrypted storage provides an essential security layer for your CI/CD pipeline infrastructure.
Writing Terraform Configuration Files for Jenkins Deployment

Create provider configuration and variable definitions
Setting up your Terraform configuration files starts with defining the AWS provider and establishing variables for flexible deployment. The provider configuration tells Terraform which cloud platform to use and specifies authentication details.
terraform {
  required_providers {
    aws = {
      source  = "hashicorp/aws"
      version = "~> 5.0"
    }
  }
}

provider "aws" {
  region = var.aws_region
}
Variable definitions make your Terraform Jenkins deployment configuration reusable across different environments. Create a variables.tf file to store all configurable parameters:
variable "aws_region" {
  description = "AWS region for Jenkins deployment"
  type        = string
  default     = "us-west-2"
}

variable "instance_type" {
  description = "EC2 instance type for Jenkins server"
  type        = string
  default     = "t3.medium"
}

variable "jenkins_admin_password" {
  description = "Initial admin password for Jenkins"
  type        = string
  sensitive   = true
}
Build VPC and networking infrastructure resources
Your Jenkins server needs secure networking infrastructure to operate effectively. Creating a dedicated VPC provides isolation and control over network traffic flow.
resource "aws_vpc" "jenkins_vpc" {
  cidr_block           = "10.0.0.0/16"
  enable_dns_hostnames = true
  enable_dns_support   = true

  tags = {
    Name = "jenkins-vpc"
  }
}

resource "aws_internet_gateway" "jenkins_igw" {
  vpc_id = aws_vpc.jenkins_vpc.id

  tags = {
    Name = "jenkins-internet-gateway"
  }
}

resource "aws_subnet" "jenkins_public_subnet" {
  count             = 2
  vpc_id            = aws_vpc.jenkins_vpc.id
  cidr_block        = "10.0.${count.index + 1}.0/24"
  availability_zone = data.aws_availability_zones.available.names[count.index]

  map_public_ip_on_launch = true

  tags = {
    Name = "jenkins-public-subnet-${count.index + 1}"
  }
}
The route table configuration ensures proper traffic routing between your Jenkins infrastructure and the internet:
resource "aws_route_table" "jenkins_public_rt" {
  vpc_id = aws_vpc.jenkins_vpc.id

  route {
    cidr_block = "0.0.0.0/0"
    gateway_id = aws_internet_gateway.jenkins_igw.id
  }

  tags = {
    Name = "jenkins-public-route-table"
  }
}

resource "aws_route_table_association" "jenkins_public_rta" {
  count          = length(aws_subnet.jenkins_public_subnet)
  subnet_id      = aws_subnet.jenkins_public_subnet[count.index].id
  route_table_id = aws_route_table.jenkins_public_rt.id
}
Configure EC2 instance with Jenkins installation scripts
The EC2 instance configuration combines compute resources with automated Jenkins installation through user data scripts. This approach ensures your Jenkins server is ready immediately after deployment.
resource "aws_security_group" "jenkins_sg" {
  name_prefix = "jenkins-sg"
  vpc_id      = aws_vpc.jenkins_vpc.id

  ingress {
    from_port   = 8080
    to_port     = 8080
    protocol    = "tcp"
    cidr_blocks = ["0.0.0.0/0"]
  }

  ingress {
    from_port   = 22
    to_port     = 22
    protocol    = "tcp"
    cidr_blocks = ["0.0.0.0/0"]
  }

  egress {
    from_port   = 0
    to_port     = 0
    protocol    = "-1"
    cidr_blocks = ["0.0.0.0/0"]
  }

  tags = {
    Name = "jenkins-security-group"
  }
}

resource "aws_instance" "jenkins_server" {
  ami                    = data.aws_ami.ubuntu.id
  instance_type          = var.instance_type
  subnet_id              = aws_subnet.jenkins_public_subnet[0].id
  vpc_security_group_ids = [aws_security_group.jenkins_sg.id]
  key_name               = var.key_pair_name

  user_data = base64encode(templatefile("jenkins_install.sh", {
    admin_password = var.jenkins_admin_password
  }))

  tags = {
    Name = "jenkins-server"
  }
}
Create a separate jenkins_install.sh script for the installation process:
#!/bin/bash
apt-get update
apt-get install -y openjdk-11-jdk wget curl

wget -q -O - https://pkg.jenkins.io/debian-stable/jenkins.io.key | apt-key add -
sh -c 'echo deb http://pkg.jenkins.io/debian-stable binary/ > /etc/apt/sources.list.d/jenkins.list'

apt-get update
apt-get install -y jenkins

systemctl enable jenkins
systemctl start jenkins

echo "admin:${admin_password}" > /var/lib/jenkins/users/admin/config.xml
systemctl restart jenkins
Set up Application Load Balancer for high availability access
An Application Load Balancer provides reliable access to your Jenkins server and enables easy scaling for future growth. The ALB distributes traffic and performs health checks automatically.
resource "aws_lb" "jenkins_alb" {
  name               = "jenkins-alb"
  internal           = false
  load_balancer_type = "application"
  security_groups    = [aws_security_group.jenkins_alb_sg.id]
  subnets            = aws_subnet.jenkins_public_subnet[*].id

  enable_deletion_protection = false

  tags = {
    Name = "jenkins-application-load-balancer"
  }
}

resource "aws_security_group" "jenkins_alb_sg" {
  name_prefix = "jenkins-alb-sg"
  vpc_id      = aws_vpc.jenkins_vpc.id

  ingress {
    from_port   = 80
    to_port     = 80
    protocol    = "tcp"
    cidr_blocks = ["0.0.0.0/0"]
  }

  ingress {
    from_port   = 443
    to_port     = 443
    protocol    = "tcp"
    cidr_blocks = ["0.0.0.0/0"]
  }

  egress {
    from_port   = 0
    to_port     = 0
    protocol    = "-1"
    cidr_blocks = ["0.0.0.0/0"]
  }
}

resource "aws_lb_target_group" "jenkins_tg" {
  name     = "jenkins-target-group"
  port     = 8080
  protocol = "HTTP"
  vpc_id   = aws_vpc.jenkins_vpc.id

  health_check {
    enabled             = true
    healthy_threshold   = 2
    interval            = 30
    matcher             = "200,403"
    path                = "/login"
    port                = "traffic-port"
    protocol            = "HTTP"
    timeout             = 5
    unhealthy_threshold = 2
  }
}

resource "aws_lb_target_group_attachment" "jenkins_tg_attachment" {
  target_group_arn = aws_lb_target_group.jenkins_tg.arn
  target_id        = aws_instance.jenkins_server.id
  port             = 8080
}

resource "aws_lb_listener" "jenkins_listener" {
  load_balancer_arn = aws_lb.jenkins_alb.arn
  port              = "80"
  protocol          = "HTTP"

  default_action {
    type             = "forward"
    target_group_arn = aws_lb_target_group.jenkins_tg.arn
  }
}
Define outputs for easy access to Jenkins URL and credentials
Output values provide convenient access to important information after your Terraform Jenkins deployment completes. These outputs display essential details needed to access and manage your Jenkins server.
output "jenkins_url" {
  description = "URL to access Jenkins server"
  value       = "http://${aws_lb.jenkins_alb.dns_name}"
}

output "jenkins_admin_username" {
  description = "Default admin username for Jenkins"
  value       = "admin"
}

output "jenkins_server_ip" {
  description = "Public IP address of Jenkins server"
  value       = aws_instance.jenkins_server.public_ip
}

output "load_balancer_dns" {
  description = "DNS name of the Application Load Balancer"
  value       = aws_lb.jenkins_alb.dns_name
}

output "vpc_id" {
  description = "ID of the VPC created for Jenkins"
  value       = aws_vpc.jenkins_vpc.id
}

output "security_group_id" {
  description = "ID of the Jenkins security group"
  value       = aws_security_group.jenkins_sg.id
}
These Terraform configuration files create a complete Jenkins infrastructure with proper networking, security, and load balancing. The modular approach makes the configuration maintainable and allows for easy modifications as your CI/CD pipeline infrastructure requirements evolve.
Executing Terraform Deployment and Managing Your Jenkins Infrastructure

Initialize Terraform workspace and validate configuration syntax
Before deploying your Jenkins infrastructure, you need to prepare your Terraform workspace properly. Start by navigating to your project directory containing your Terraform configuration files and run terraform init. This command downloads the required provider plugins, initializes the backend configuration, and sets up the working directory.
terraform init
The initialization process creates a .terraform directory and downloads the AWS provider plugins specified in your configuration. You’ll see output confirming successful initialization and plugin installation.
Next, validate your configuration syntax using terraform validate. This command checks your Terraform configuration files for syntax errors and basic structural issues without actually connecting to your cloud provider:
terraform validate
Run terraform fmt to automatically format your configuration files according to Terraform’s style conventions. This command ensures consistent formatting across all your .tf files:
terraform fmt
Review execution plan before applying infrastructure changes
The planning phase represents one of Terraform’s most powerful features for Infrastructure as Code management. Execute terraform plan to generate a detailed execution plan showing exactly what resources Terraform will create, modify, or destroy:
terraform plan -out=jenkins-plan
The output displays a comprehensive breakdown of your Jenkins server infrastructure changes:
| Symbol | Action | Description |
|---|---|---|
| + | Create | New resource will be created |
| ~ | Modify | Existing resource will be updated |
| – | Destroy | Resource will be removed |
Review each planned change carefully, paying special attention to:
- EC2 instance specifications and sizing
- Security group rules and port configurations
- IAM roles and policy attachments
- Storage volumes and backup settings
Save the plan to a file using the -out parameter. This practice ensures you apply exactly what you reviewed, preventing unexpected changes between planning and execution.
Monitor deployment progress and troubleshoot common issues
Apply your Terraform configuration using the saved plan file to deploy your Jenkins infrastructure:
terraform apply jenkins-plan
Terraform displays real-time progress as it provisions resources. The deployment typically takes 3-5 minutes for a basic Jenkins server setup. Monitor the output for any error messages or warnings.
Common deployment issues and solutions:
Instance Launch Failures: Check your AMI ID availability in the target region and verify your AWS credentials have sufficient permissions.
Security Group Errors: Ensure your VPC and subnet configurations are correct, and verify CIDR blocks don’t conflict with existing infrastructure.
IAM Permission Issues: Confirm your Terraform execution role has the necessary permissions to create EC2 instances, security groups, and IAM roles.
Use terraform show to inspect the current state of your infrastructure and verify resource creation:
terraform show
Access your newly deployed Jenkins server and complete initial setup
Once Terraform deployment completes successfully, retrieve your Jenkins server’s public IP address from the output values or use terraform output to display connection information:
terraform output jenkins_public_ip
terraform output jenkins_url
Access your Jenkins server by navigating to http://your-server-ip:8080 in your web browser. The initial setup requires retrieving the administrator password from the server.
SSH into your Jenkins instance to collect the initial admin password:
ssh -i your-key.pem ubuntu@your-server-ip
sudo cat /var/lib/jenkins/secrets/initialAdminPassword
Complete the Jenkins setup wizard by:
- Entering the initial admin password
- Installing suggested plugins or selecting custom plugin installation
- Creating your first admin user account
- Configuring the Jenkins URL
Your Jenkins server is now ready for CI/CD pipeline configuration and job creation. The Terraform-deployed infrastructure provides a solid foundation for your DevOps automation workflows, with all security groups, IAM roles, and network configurations properly established through Infrastructure as Code practices.
Implementing Best Practices for Production-Ready Jenkins Infrastructure

Configure automated backups for Jenkins configuration and job data
Production Jenkins environments require bulletproof backup strategies to protect years of carefully crafted CI/CD configurations. Setting up automated backups through Terraform configuration files creates a reliable safety net that prevents catastrophic data loss.
Start by provisioning an S3 bucket specifically for Jenkins backups using Terraform. Configure versioning and lifecycle policies to manage storage costs while maintaining backup retention. Your Terraform configuration should include bucket encryption and cross-region replication for disaster recovery scenarios.
The ThinBackup plugin offers excellent automation capabilities for Jenkins data protection. Install it through your Terraform provisioning scripts and configure it to backup job configurations, plugin settings, and user data on scheduled intervals. Store these backups in your designated S3 bucket using IAM roles with minimal required permissions.
Consider implementing database backups if you’re using external databases for Jenkins data storage. PostgreSQL or MySQL instances provisioned through Terraform should include automated backup configurations with point-in-time recovery capabilities.
Create Terraform modules that handle backup verification by spinning up test Jenkins instances and restoring from backup files. This validation process ensures your backups actually work when disaster strikes.
Set up monitoring and alerting for infrastructure health checks
Monitoring your Jenkins infrastructure through Infrastructure as Code principles means embedding observability directly into your Terraform deployment pipeline. This approach transforms monitoring from an afterthought into a core component of your Jenkins server automation strategy.
Deploy CloudWatch agents through Terraform to collect system metrics like CPU utilization, memory consumption, and disk space usage. Configure custom metrics for Jenkins-specific indicators including queue length, job failure rates, and agent connectivity status.
Set up comprehensive alerting rules using Terraform-managed CloudWatch alarms or Prometheus alert manager configurations. Critical alerts should trigger immediate notifications for scenarios like Jenkins service failures, high memory usage, or disk space depletion. Configure escalation policies that automatically scale infrastructure resources when performance thresholds are exceeded.
Implement log aggregation using ELK stack or CloudWatch Logs, provisioned entirely through Terraform configuration files. Centralized logging helps identify patterns in build failures and infrastructure issues before they impact your CI/CD pipeline infrastructure.
Dashboard creation becomes reproducible when defined as code. Use Grafana or CloudWatch dashboards provisioned through Terraform to visualize Jenkins performance metrics, build trends, and infrastructure health indicators.
Implement infrastructure updates using Terraform versioning strategies
Managing infrastructure updates safely requires sophisticated Terraform best practices that prevent service disruptions while enabling continuous improvement. Version control your Terraform configuration files using Git tags and semantic versioning to track infrastructure changes systematically.
Implement blue-green deployment strategies for major Jenkins infrastructure updates. Create parallel infrastructure stacks using Terraform workspaces, allowing you to test changes thoroughly before switching traffic. This approach minimizes downtime and provides immediate rollback capabilities if issues arise.
Use Terraform state file versioning with remote backends like S3 with DynamoDB locking. This setup prevents concurrent modifications and maintains detailed history of infrastructure changes. Configure backend versioning to store multiple state file versions, enabling quick recovery from problematic deployments.
Establish infrastructure update pipelines that automatically test Terraform configuration files before applying changes. Include validation steps like terraform plan analysis, security scanning, and compliance checking. Automate the process using Jenkins pipelines that apply infrastructure changes only after passing all quality gates.
Create Terraform modules for reusable Jenkins infrastructure components. Version these modules independently and use specific version constraints in your main configurations. This modular approach enables controlled updates to individual infrastructure components without affecting the entire system.
Implement feature flags within your Terraform configurations using variables and conditional logic. This technique allows gradual rollout of infrastructure changes and quick disabling of problematic features without full rollbacks.

Setting up Jenkins with Terraform transforms your CI/CD pipeline from a manual, error-prone process into a reliable, repeatable deployment. You’ve learned how Infrastructure as Code brings consistency to your Jenkins deployments, from understanding the core benefits to writing configuration files that define your infrastructure. The step-by-step approach of designing your architecture, configuring Terraform files, and executing deployments gives you complete control over your Jenkins environment.
Ready to take your DevOps game to the next level? Start with a simple Jenkins deployment using the Terraform configurations discussed, then gradually implement the production best practices as your confidence grows. Your future self will thank you when you can spin up identical Jenkins environments in minutes instead of hours, and your team will appreciate the reliability that comes with infrastructure that’s defined in code rather than clicks.